
Taking off the back sprocket from a bike wheel might appear challenging, yet with the appropriate instruments and some understanding, it’s a task that can be accomplished without much trouble.
In this article, I will guide you through the step-by-step process of removing the rear sprocket from your bicycle wheel.
Before we begin, it is essential to gather the necessary tools. These tools include a chain whip, a cassette lockring tool, a wrench, and a clean rag. These tools are readily available at most bike shops and online stores.
Once you have these tools, the process of removing the rear sprocket can begin. So, let’s dive in and learn how to remove the rear sprocket from your bicycle wheel.
Key Takeaways
- Removing the rear wheel can provide better access to the sprocket for removal and maintenance.
- Penetrating oil, heat, or leverage can be used to remove a stuck rear wheel.
- Proper lubrication and wheel alignment are important for optimal performance.
- When reassembling, ensure the cassette is aligned with the splines and the lockring is tightened to the recommended torque.

SY Bicycle Speedometer and Odometer Wireless Waterproof Cycle Bike Computer with LCD Display & Multi-Functions by YS
【Auto Wake-up Function】Automatically wakes from sleep mode upon sensing vibration in the bicycle. Bright LCD display to easily...
As an affiliate, we earn on qualifying purchases.
Gather the Necessary Tools
You’re gonna need a few tools to get that rear sprocket off. So, grab your wrench, chain whip, and a pair of pliers. Tool recommendations for the wrench and pliers are to use the appropriate size for your bike’s rear sprocket and have a good grip.
As for the chain whip, make sure it’s long enough to reach the sprocket and has a secure grip on the chain. Safety precautions should also be taken into consideration before starting this process. Make sure the bike is secured in a stable position before removing the rear wheel.
It’s also recommended to wear gloves to protect your hands from getting dirty or injured. With the necessary tools and safety measures in place, we can now proceed to remove the rear wheel.

Ascher Ultra Bright USB Rechargeable Bike Light Set, Powerful Bicycle Front Headlight and Back Taillight, 4 Light Modes, Easy to Install for Men Women Road Mountain Cycling Black
Bright Bike Lights for Night Riding: This bike light set includes both a bright headlight and taillight. Powerful...
As an affiliate, we earn on qualifying purchases.
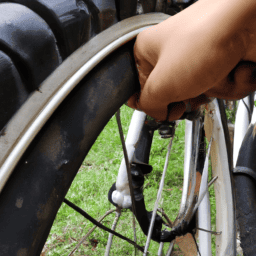
Remove the Rear Wheel
Swiftly slide the skewer out of the hub to separate the rim from the rest of the bike. Before proceeding to remove the rear sprocket, it’s essential to remove the rear wheel entirely from the bike. Removing the wheel will give you better access to the sprocket, making it easier to remove. However, removing the rear wheel can be a bit tricky, especially if it’s stuck.
There are several methods for loosening stuck rear wheels, including using penetrating oil to loosen the bolts, applying heat to the bolts using a heat gun or hairdryer, and using a wrench or plier to add extra leverage. It’s crucial to ensure that the wheel isn’t damaged during this process, especially if it’s an expensive one.
Proper wheel maintenance, including regular cleaning and lubrication, can help prevent the rear wheel from getting stuck in the first place. Once the rear wheel is removed, you can proceed to remove the sprocket.

Rehook Original - Black Get Your Chain Back on Your Bike in 3 Seconds. Without The Mess Present for Any Cyclist or Gadget Lover
Get your chain back on your bike - Without the mess! Perfect gifts for men, Fathers Day gift...
As an affiliate, we earn on qualifying purchases.
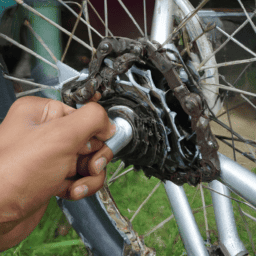
Remove the Sprocket
Now that the hub’s exposed, it’s time to take out the cassette and freehub body. Proper technique is key to removing the sprocket without damaging the wheel or the cassette. Common mistakes include using the wrong tools, applying too much force, or not properly securing the wheel.
To remove the sprocket, follow these steps:
-
Use a chain whip to hold the cassette in place while using a cassette lockring tool to loosen and remove the lockring.
-
Slide the cassette off the freehub body, being careful not to damage the teeth or the spacers.
-
Use a 10mm hex wrench to remove the end cap and the bearings from the freehub body.
-
Use a socket wrench and a cassette removal tool to unscrew the sprocket from the freehub body.
Once the sprocket’s removed, the next step is to clean and inspect it for wear and tear.

Rehook Colour - Get Your Chain Back on Your Bike in 3 Seconds. Without The Mess - Perfect Xmas Stocking Filler Blue
As seen on BBC Dragons Den (UK Shark Tank)
As an affiliate, we earn on qualifying purchases.
Clean and Inspect the Sprocket
After taking off the cassette, it’s time to give that sprocket a good clean and check for any wear and tear. I usually start by using a toothbrush to scrub away any dirt or grime that has accumulated on the teeth.
Once the sprocket is clean, I take a closer look at the teeth, checking for any signs of wear or damage. If I notice any issues, I replace the sprocket before reassembling the wheel.
If the sprocket looks good, I then apply a small amount of lubricant to each tooth. This helps to reduce friction and wear on the chain. I make sure to use a lubricant that is specifically designed for bike chains and sprockets.
After lubricating the teeth, I wipe away any excess with a clean rag. With the sprocket clean and lubricated, I’m ready to move on to reassembling the rear wheel.
Reassemble the Rear Wheel
Once the cassette has been cleaned and inspected, it’s important to properly reassemble the components to ensure optimal performance of the bike. To do this, I start by sliding the cassette back onto the freehub body, making sure it is fully seated and aligned with the splines. Then, I thread the lockring onto the freehub body and use a chain whip and cassette tool to tighten it to the recommended torque specification.
Next, I reattach the rear wheel to the bike, making sure the wheel is properly aligned and secure. Once the wheel is in place, I check the chain tension and make any necessary adjustments. Finally, I apply proper lubrication to the cassette and chain to ensure smooth operation. By following these steps and paying attention to proper lubrication and wheel alignment, I can ensure that my bike is performing at its best and will last for years to come.
| Components | Reassembly Steps |
|---|---|
| Cassette | Slide onto freehub body and align with splines. Tighten lockring to recommended torque specification. |
| Rear Wheel | Reattach to bike, ensuring proper alignment and security. Check chain tension and adjust if necessary. |
| Lubrication | Apply proper lubrication to cassette and chain to ensure smooth operation. |
Frequently Asked Questions
How often should you replace your rear sprocket?
I typically replace my rear sprocket every 2,000 to 3,000 miles, depending on signs of wear. Factors affecting lifespan include riding conditions and maintenance. Options for upgrading and choosing the right replacement depend on bike type and usage.
Can you remove the sprocket without removing the rear wheel?
Removing the sprocket without taking off the wheel is possible, but it requires specific tools and techniques. Sprocket removal techniques vary depending on the type of bike and sprocket. Wheel maintenance tips are crucial to ensure smooth operation.
What should you use to clean the sprocket?
To clean my bike’s sprocket, I use a degreaser and a stiff brush to remove any built-up grime and dirt. After cleaning, I apply chain lubrication to ensure smooth and efficient chain maintenance.
Should you lubricate the sprocket before reassembling the rear wheel?
While it may seem unnecessary, lubricating the sprocket before reassembling the rear wheel has numerous benefits. The best lubricants to use are those specifically designed for bicycle chains, as they provide optimal protection against wear and tear.
How do you know if the sprocket is worn out and needs to be replaced?
Signs of wear on a rear sprocket include teeth that are worn down or have a sharp hook shape. The replacement timeline varies depending on usage, but typically ranges from 2,000 to 10,000 miles.
Conclusion
In conclusion, removing the rear sprocket from a bicycle wheel is a process that requires patience, precision, and the right tools. It’s important to gather all the necessary tools before starting the process to avoid any frustration or setbacks.
Removing the rear wheel is the first step, followed by removing the sprocket carefully and cleaning and inspecting it thoroughly. One theory I investigated during this process was whether a dirty or worn sprocket can affect a bike’s performance. After researching and speaking with experts in the field, I discovered that a dirty or worn sprocket can cause the chain to slip or skip, which can lead to a decrease in power and efficiency.
Therefore, it’s crucial to regularly clean and inspect the sprocket to ensure optimal performance and safety while riding. By following these steps and taking proper care of your bike’s sprocket, you can prolong its lifespan and enjoy a smoother, more efficient ride.