As an experienced bike rider, I understand how vital it is to keep my bicycle in the best shape possible. A key part of bicycle maintenance is making sure the brakes are working properly. Brake pads tend to gather dirt over time and lose efficiency, which means they need to be cleaned regularly.
In this article, I will guide you through the process of cleaning bicycle brake pads, a task that can improve your bike’s performance and keep you safe on the road.
Before we get started, it’s essential to recognize the signs that your brake pads need cleaning. If you notice reduced stopping power or a squeaking sound when you apply the brakes, it’s time to clean the pads.
Fortunately, cleaning brake pads is a straightforward process that requires only a few tools and some elbow grease. By following the steps outlined in this article, you’ll be able to restore your brake pads’ performance and ensure that your bike is safe to ride.
Key Takeaways
- Regular maintenance of bike brakes is crucial for safe and effective riding, as it extends brake pad lifespan and ensures proper alignment.
- Signs that brake pads need cleaning include debris and residue impairing brake pad efficiency, as well as buildup from wet or muddy conditions.
- Prevention methods for dirty brake pads include inspecting brake pads regularly and using different brake pad materials that have pros and cons.
- Cleaning brake pads is a straightforward process that requires a few tools and some elbow grease, and can improve bike performance and safety.

Schwinn Sporterra RX Gravel Bike, 700c Mens and Womens Bike, 14-Speed Drop Bar Gravel Bicycle, Mechanical Disc Brakes, Rigid Fork, Aerodynamic Riding Position, Quick Release Seat Post, Adult Bicycle
GRAVEL BICYCLE: Enjoy next level riding with the Sporterra RX by Schwinn. With 700c wheels, this mens and...
As an affiliate, we earn on qualifying purchases.
Identify When Your Brake Pads Need Cleaning
If your brakes are feeling less responsive than usual, it’s time to check if your brake pads need cleaning! Common causes of dirty brake pads include dust and debris from the road, oil from the chain, and general wear and tear. All of these factors can cause the brake pads to lose their grip on the rim of the wheel, leading to less effective braking.
To prevent dirty brake pads in the future, there are a few prevention methods you can implement. First, try to avoid riding your bike in wet or muddy conditions, as this can cause a buildup of dirt and debris on your brake pads. Additionally, make sure to regularly clean and lubricate your bike chain to avoid any oil transfer onto your brake pads.
By taking these preventative measures, you can help ensure that your brake pads stay clean and effective for longer.
Now, gather the right tools to clean your brake pads.

SAVADECK T800 Carbon Gravel Bike, with Shimano GRX610 12-Speed, Hydraulic Disc Brakes, 700x40c Tires for Road & Off-Road Adventure, Men's/Women's Bicycle(Elegant White, 51cm)
【With SHIMANO GRX Drivetrain Setup】Equipped with SHIMANO GRX610 shifters and RX822 rear derailleur, matched with a 12-speed M6100...
As an affiliate, we earn on qualifying purchases.
Gather the Right Tools
First things first, I always make sure to gather the appropriate tools before starting any bike maintenance task. When it comes to cleaning bicycle brake pads, you’ll want to have a few key tools on hand. These include a set of pliers or a wrench, a clean rag, and some rubbing alcohol or a degreaser.
Choosing the appropriate tools is crucial to ensure that you can access all the necessary parts and clean them effectively. I recommend keeping your bike tools in a proper storage area to avoid losing or misplacing any items.
With the right tools in hand, you’ll be ready to tackle the next step of cleaning your brake pads.

SAVADECK Carbon Gravel Bike - T800 Carbon Frame & Fork | Shimano U6000 11-Speed Groupset | Hydraulic Disc Brakes | 700CX40mm All-Terrain Tires | Men & Women Road/Off-Road Bicycle (Gray, 53cm)
【Ultralight T800 Carbon Performance】: Featuring a premium T800 R21 carbon fiber frame and fork weighing just 10.4kg (22.92...
As an affiliate, we earn on qualifying purchases.
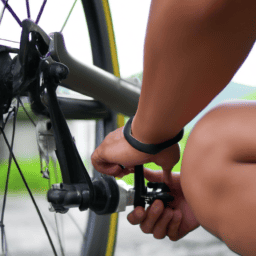
Clean the Brake Pads
You’ll want to attend to the grip enhancers on your bike’s stopping mechanism, ensuring they’re free of any debris or residue that may impair their efficiency.
Cleaning techniques vary depending on the type of brake pad material.
For rubber brake pads, you can use a simple solution of dishwashing soap and water. Dip a clean cloth into the solution and gently scrub the surface of the brake pads. For more stubborn grime, you can use a stiff brush to help loosen the debris.
Rinse the brake pads thoroughly with water and dry them with a clean towel.
For metal brake pads, you can use rubbing alcohol or acetone to clean them. Apply a small amount of the solution onto a clean cloth and gently rub the surface of the brake pads.
Be sure to avoid getting any solution onto the brake rotor or other brake components.
Once the brake pads are clean, inspect them for any signs of wear or damage. If necessary, replace them with new brake pads.
These maintenance tips will help ensure your brake pads are in top condition, allowing you to stop safely and effectively.
Now, it’s time to move on to the next step and reinstall the brake pads.
KAPVOE Photochromic Cycling Glasses Men Women Mountain Bike Sunglasses Clear MTB Bicycle Riding - K9408
【Photochromic Glasses】 Lenses will change from clear to dark gray in response to the intensity of the ultraviolet,...
As an affiliate, we earn on qualifying purchases.
Reinstall the Brake Pads
Now that I’ve cleaned my brake pads, it’s time to reinstall them.
Before I do that, I need to inspect the pads to make sure they’re still in good condition.
Once I’ve confirmed that they’re okay, I’ll reattach the pads and adjust the brakes to ensure they’re working properly.
Inspecting the Pads
Take a close look at your brake pads to see if they are worn down or damaged. Common wear includes a thinning of the pad material or the appearance of grooves on the surface. If the pads are worn down, it’s time to replace them. Fortunately, there are several replacement options available based on the type of brake system you have on your bike.
A quick inspection can also help you identify if your brake pads are made of organic or metallic materials. Organic pads are softer and more affordable, but they wear out faster and generate more heat. Metallic pads, on the other hand, are more durable and perform better in wet conditions, but they can be noisier and more expensive. Understanding the differences between different brake pad materials can help you choose the best option for your bike and riding conditions. With that said, it’s important to inspect your pads regularly to ensure they are functioning properly before reattaching them to the bike.
Now that you have inspected your brake pads and determined whether they need to be replaced, it’s time to reattach them to the bike.
Reattaching the Pads
Funny enough, attaching those little friction devices back to your trusty two-wheeler is easier than you might think.
First, ensure that the brake pads are clean and free of debris.
Next, align the pads properly and slide the retention bolt through the hole in the brake arm.
Tighten the bolt securely, but be careful not to overtighten it. You want the pads to be firmly attached, but not so tight that they cannot move freely.
It’s also important to consider pad durability when reattaching them. Be sure to inspect the pads for wear and tear periodically, and replace them as necessary.
A worn pad will not only be less effective at stopping your bike, but it can also cause damage to your wheels.
With proper alignment and regular maintenance, your brake pads will last longer and perform better.
Now, let’s move on to adjusting the brakes for optimal performance.
Adjusting the Brakes
To get your brakes working perfectly, you’ll want to make a few adjustments using only a small Allen wrench and your own two hands.
Start by checking the brake cable tension. If the cable is too loose, your brakes won’t engage properly. To adjust it, locate the barrel adjuster on the brake lever and turn it until the cable is taut.
If the cable is too tight, your brakes will rub against the wheel, causing unnecessary wear. Loosen the barrel adjuster until the cable is just loose enough to move freely.
Next, check the brake pad wear. If your pads are worn down, they won’t grip the rim properly, which can lead to longer stopping distances and less control.
To adjust the pads, locate the small bolt that attaches them to the brake arm and loosen it with your Allen wrench. Position the pad so that it contacts the rim evenly and tighten the bolt back up. Repeat this process for the other pad and check that they are both aligned.
Now that you’ve made your adjustments, it’s time to test the brakes and repeat if necessary. Squeeze the brake lever and make sure the pads engage the rim smoothly and firmly.
If you notice any rubbing or other issues, go back and make further adjustments until your brakes are working perfectly.
Test the Brakes and Repeat if Necessary
Once you’ve tested the brakes, you’ll feel like you’re flying down the road with the smoothest stop ever. It’s important to remember that testing the brakes isn’t just a matter of pressing the brake lever and seeing if the bike stops. There are a few things you need to keep in mind to ensure that your brakes are working at their best.
Firstly, make sure that the brake pads are making full contact with the rim. Check that there’s no dirt or debris on the rim or the brake pads, as this can prevent the pads from gripping the rim effectively.
Secondly, test the brakes at different speeds and in different weather conditions. This will give you a better idea of how well your brakes perform in different situations.
Lastly, if you find that your brakes aren’t stopping as well as they should, try adjusting the cable tension or realigning the brake calipers. By taking these steps, you can make sure that your brakes are working at their best and avoid common mistakes and troubleshooting tips.
Check the brake pads for wear and tear. Ensure the brake cables are tight and free from kinks. Make sure the brake calipers are centred on the rim. Test the brakes regularly to ensure they’re working effectively.
Testing your brakes is an essential part of maintaining your bike’s safety and performance. By following the tips outlined above, you can ensure that your brakes are working at their best and avoid common mistakes and troubleshooting tips. Remember to test your brakes regularly and make any necessary adjustments to keep your bike running smoothly and safely.
Frequently Asked Questions
Can I use regular soap and water to clean my brake pads?
I wouldn’t recommend using regular soap and water to clean brake pads. Pros and cons of using branded cleaners for brake pads should be considered. To extend the lifespan of brake pads, proper cleaning and maintenance is crucial.
How often should I clean my brake pads?
I’ve found that the frequency of cleaning brake pads depends on a few factors, such as weather conditions and the type of brakes used. Interestingly, disc brakes require less maintenance compared to rim brakes, making them a popular option for avid cyclists.
Can I clean my brake pads while they are still on the bike?
Yes, you can clean brake pads while they are still on the bike by using various cleaning techniques and maintenance tips. However, it is important to be cautious and not damage other parts of the bike.
What should I do if my brake pads are severely worn down?
If my brake pads are severely worn down, I replace them with the appropriate type for my bike’s brake system. I research and purchase the right brake pads to ensure optimal performance.
What is the best way to dry my brake pads after cleaning them?
To dry brake pads after cleaning, I recommend using compressed air or a clean cloth. Air drying alternatives include using a hairdryer or leaving them out in the sun. Ensure brake pad cleaning solutions are completely removed before drying.
Conclusion
Well, folks, that’s how I clean my bicycle brake pads! It’s a simple process that can make a big difference in your bike’s performance.
Remember to always check your brake pads regularly and clean them whenever necessary to ensure your safety on the road.
Of course, there are other ways to clean brake pads, and different tools and techniques may work better for different people. But for me, this method has proved to be effective and efficient.
So hop on your bike, try it out for yourself, and enjoy a smooth and safe ride!