In this piece, I’m going to show you the method to trim a bicycle’s brake cable. Being a passionate cyclist myself, I’ve come to understand the crucial role that keeping your bike’s braking system in top condition plays in ensuring safety and achieving the best performance. A critical part of maintaining your brakes includes swapping out the brake cables once they show signs of wear or damage.
Cutting and installing a new brake cable may seem intimidating, but with the right tools and instructions, it is a simple process that anyone can accomplish.
Before we begin, it is important to gather the necessary tools and materials. You will need a pair of cable cutters or strong scissors, a new brake cable, and a set of Allen keys. Once you have these items, you can proceed with confidence knowing that you have everything you need to complete the task at hand.
With these simple instructions, you will be able to replace your worn-out brake cables and enjoy smooth, reliable braking on your bike.
Key Takeaways
- Cutting and installing new brake cables is an important step in bike brake maintenance for safety and performance.
- Cable cutters specifically designed for bicycle cables should be used to ensure a clean cut without fraying.
- The correct length of the new cable should be measured and marked before cutting, and extra centimeters should be added to the measurement to ensure proper tension.
- After installation, the brakes should be adjusted and tested using a cable tension gauge to ensure safe and effective stopping.

Schwinn Sporterra RX Gravel Bike, 700c Mens and Womens Bike, 14-Speed Drop Bar Gravel Bicycle, Mechanical Disc Brakes, Rigid Fork, Aerodynamic Riding Position, Quick Release Seat Post, Adult Bicycle
GRAVEL BICYCLE: Enjoy next level riding with the Sporterra RX by Schwinn. With 700c wheels, this mens and...
As an affiliate, we earn on qualifying purchases.
Gather Your Tools and Materials
Gather your tools and materials.
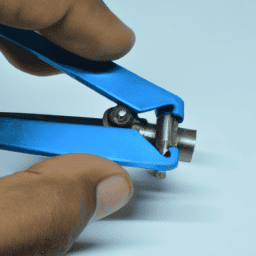
You’re gonna need some pliers, cable cutters, and a new brake cable to get started on cutting your bicycle brake cable. When choosing cable cutters, it’s important to find ones that are specifically designed for cutting bicycle cables. These cutters have a sharp, pointed edge and a notch for holding the cable in place while cutting. Using regular pliers or wire cutters can result in frayed or crushed cable ends, which can affect the performance of your brakes.
Before cutting your new cable, it’s important to measure the correct length. This can be done by placing the cable on the bike and running it from the brake lever to the brake caliper. Ensure the cable is taut and then add a couple of extra centimeters to allow for adjustment. Once you’ve measured the correct length, mark the cable with a pen or marker so you know where to cut.
Now that you have your tools and materials and have measured the correct length, it’s time to remove the old cable.

SAVADECK T800 Carbon Gravel Bike, with Shimano GRX610 12-Speed, Hydraulic Disc Brakes, 700x40c Tires for Road & Off-Road Adventure, Men's/Women's Bicycle(Elegant White, 51cm)
【With SHIMANO GRX Drivetrain Setup】Equipped with SHIMANO GRX610 shifters and RX822 rear derailleur, matched with a 12-speed M6100...
As an affiliate, we earn on qualifying purchases.
Remove the Old Cable
First, it’s time to take out the old, worn-out wire. Before we can replace the brake cable, we need to remove the old one.
The first step in doing this is to release the tension on the brake cable. This can be done by loosening the pinch bolt on the brake caliper or by disconnecting the cable from the brake lever. Once the tension has been released, use a pair of wire cutters or pliers to snip the cable end near the brake lever.
Pull the cable out of the housing, then remove any remaining cable end from the brake caliper.
Now that the old cable has been removed, it’s important to examine it for any signs of wear and tear. Common cable problems include fraying, rust, or kinks in the wire. If any of these are present, it’s likely that the cable has been stretched or damaged over time and needs to be replaced.
To prevent future cable problems, it’s important to practice regular cable maintenance techniques, such as lubricating the cable and housing, checking for tightness and proper alignment, and replacing worn-out components as needed.
With the old cable out of the way, it’s time to move on to the next step: cutting the new cable to size.

SAVADECK Carbon Gravel Bike - T800 Carbon Frame & Fork, Shimano GRX400 10-Speed Groupset, Hydraulic Disc Brakes, 700C x 40mm Tires - Lightweight Design for Road & Off-Road Adventures (Black, 58cm)
【Ultra-Lightweight T800 Carbon Frame】Built with a T800 R21 carbon fiber frame and fork, this bike weighs just 10.4kg...
As an affiliate, we earn on qualifying purchases.
Cut the New Cable
Once you’ve examined the old cable and identified any signs of wear and tear, it’s crucial to measure the new cable against it to ensure an accurate fit for optimal performance.
Choosing cable length is important as it affects the cable tension. To do this, place the new cable alongside the old one and measure the length needed. Be sure to add a few extra inches to accommodate for any bends or curves in the cable path.
Next, it’s important to properly crimp the cable end to prevent fraying or unraveling. Using a cable cutter, trim the new cable to the appropriate length. Then, insert the cable end into the crimp and use pliers to squeeze the crimp tightly around the cable. A properly crimped cable end ensures a secure fit and prevents the cable from slipping through the brake lever or housing.
With the new cable cut and crimped, it’s time to install it onto the bike.

SAVADECK Carbon Gravel Bike - T800 Carbon Frame & Fork | Shimano U6000 11-Speed Groupset | Hydraulic Disc Brakes | 700CX40mm All-Terrain Tires | Men & Women Road/Off-Road Bicycle (Gray, 53cm)
【Ultralight T800 Carbon Performance】: Featuring a premium T800 R21 carbon fiber frame and fork weighing just 10.4kg (22.92...
As an affiliate, we earn on qualifying purchases.
Install the New Cable
Now that the new cable is prepped, it’s time to slide it through the housing and attach it to the brake lever. This can be a bit tricky, but with some patience and attention to detail, it can be done easily.
Here are the steps I followed to install the new brake cable on my mountain bike:
- Slide the new cable through the housing, making sure it’s seated properly.
- Attach the cable to the brake lever, making sure it’s secure.
- Pull the cable tight and use pliers to tighten the pinch bolt on the brake caliper.
Proper tension is crucial when installing a new brake cable. A cable that’s too loose won’t provide enough stopping power, while one that’s too tight can cause the brakes to drag and wear out prematurely.
Once the cable is attached and tightened, it’s important to lubricate the cable and housing to ensure smooth operation. With the new cable installed and lubricated, the next step is to adjust the brakes to ensure they’re functioning properly.
Adjust the Brakes
To get your mountain bike stopping like a dream, you’ll want to make sure the brakes are adjusted just right. Proper brake adjustment is crucial to ensure that your bike stops safely and effectively. One way to ensure proper adjustment is to use a cable tension gauge. This tool measures the amount of tension in the brake cable, enabling you to adjust it accordingly.
Another way to adjust your brakes is by troubleshooting common brake issues. If you find that your brakes are squeaking, it could be due to a lack of lubrication. Applying a small amount of lubricant to the brake pads can help alleviate this issue. If your brakes are not stopping your bike effectively, it could be due to worn brake pads. Replacing the brake pads can help restore your bike’s stopping power. By properly adjusting and troubleshooting your brakes, you can ensure a safe and enjoyable ride.
| Common Brake Issues | Troubleshooting Tips | |||
|---|---|---|---|---|
| Squeaking brakes | Apply lubricant to brake pads | |||
| Ineffective braking | Replace brake pads | |||
| Loose cables | Tighten cable tension | Sticking brakes | Check for debris or corrosion on brake calipers and clean or replace as needed |
Frequently Asked Questions
How often should I replace my bicycle brake cable?
As a bike enthusiast, I replace my brake cable every 6-12 months to ensure my safety. Neglecting maintenance can lead to frayed cables or a sudden loss of braking power, endangering yourself and others. Look for signs of wear such as rust or cable stretch.
Can I use any type of cable cutter to cut the brake cable?
Using a proper cable cutter is crucial when cutting brake cables. It ensures a clean cut without fraying or damaging the cable. Additionally, maintaining proper cable tension is vital for optimal brake performance.
Is it necessary to lubricate the new brake cable before installing it?
Before installing a new brake cable, adding lubrication can improve the cable’s performance and prevent wear and tear. However, using too much lubricant can attract debris. As for cutting the cable, using a proper cable cutter is recommended over alternative methods.
Should I adjust the brake pads before or after installing the new cable?
I recommend adjusting the brake pads after installing the new cable. This allows for proper tension adjustment and ensures optimal brake performance. Timing of adjustment is crucial to prevent brake rub and ensure safety during rides.
What should I do if the new brake cable is too long or too short for my bicycle?
As a cyclist, I’ve learned the hard way that a poorly fitted brake cable can be dangerous. If my new brake cable is too long or short, I’ll need to shorten it and add cable housing to ensure a snug fit and optimal braking performance.
Conclusion
Well, that’s it! I hope this article on how to cut bicycle brake cable was helpful to you.
Remember, having properly functioning brakes is crucial to your safety while riding your bike, so it’s important to take the time to do the job right.
Cutting the cable itself is a simple task, but it’s important to be precise in measuring and installing the new cable to ensure your brakes work properly.
It may seem tedious, but the peace of mind that comes with knowing your brakes are in good working order is worth it. So, grab your tools and materials, follow the steps outlined in this article, and get back on the road with confidence!