
Here are some straightforward instructions for installing a bike chain to guarantee it functions correctly. Start by finding the master link on your chain. This master link needs to be positioned at the lowest part of the chain’s path. Confirm that it is placed on the correct side to prevent it from coming loose, irrespective of the direction.
Installing a quick link
Installing a quick link on a bicycle chain is a straightforward process that requires no tools. To do so, simply rotate the chain so the quick release is on top. Then, apply pressure and step down on the pedal to pull the links into place. Be sure to use the correct directional arrows to ensure the chain will not rub against any parts of the bike.
A quick link can be either directional or non-directional. You can tell which one you’re installing by the arrow on the side plate. The keyhole sections on the quick link have pins that push through the keyhole sections. Once you’ve placed the quick link in the proper position, push the pins back into their slots. Once you’ve done this, you can remove the chain.
There are many different types of quick links available for different speeds. The most important consideration when installing a quick link is chain compatibility. If a quick link is not compatible with the chain, it will prevent you from pedaling or shifting correctly. In fact, some quick links can be damaged if they’re not compatible with a chain.
While installing a quick link on a bicycle chain is simple enough, you need to use the right tools. For example, pliers can be useful for opening press-fit locks. You should make sure that the link pins slide towards each other and aren’t too stiff.
Most bike chains come with a quick link. These new links have interlocking plates and inbuilt pins that help you quickly connect them. Unlike the old chain tools, you can install a quick link on your bike chain by hand. However, it is important to have a high quality tool so you can get a secure connection. Otherwise, you could end up with a stiff link or broken chain.
Installing a quick link on a bicycle chain is easy if you have the right tools and a few minutes. But if you’re not comfortable with doing this, you can always try a master pin chain instead. You can also use Wippermann quick links on old bikes.
Installing a power link
Installing a power link on a bicycle chain is a relatively simple process. It is important to use the proper tools for the job. First, you need to turn the chain so the quick release is on top. Then, apply outward pressure to the link, compressing the brakes to help it engage the shaft. Finally, you should position the power link between the chain ring and the cassette.
The Powerlink is composed of two pieces: an outer plate and a pin. The pins fit into a hole in the other half of the Powerlink. The pins have a “head” that fits in an inset on the other plate. When you’re installing the Powerlink, you’ll want to make sure you have the correct slack in your chain.
Powerlinks have a very low failure rate. As they do not separate under load, they tend to last longer than other links in a chain. If your chain is worn or damaged, however, you’ll want to replace it. A power link is usually easy to replace.
PowerLinks are reusable, unlike PowerLocks, which are one-time use. After several uses, they can lose their strength and fail. In addition to making your chain maintenance easier, PowerLinks are ideal for emergencies. You can install a PowerLink or PowerLock on your bike chain in just a few minutes.
Installing a power link on a bicycle chain can be difficult, but it isn’t as difficult as you may think. Using the Park Tool MLP-1 master link pliers will make the job easy. By using these tools, you can remove the master link without breaking your chain.
Checking for slippage
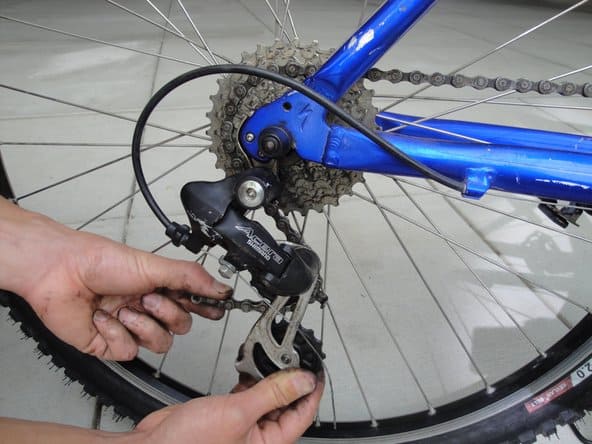
When fitting a new bike chain, one of the most important things to do is to check for slippage. This can occur due to a number of factors, including worn or damaged bike parts. It’s also possible for the chain to be too long or too tight, which can cause it to slip.
To identify this problem, you’ll need to check the chain’s sprockets for wear and loose links. The chainrings should be of the right size for the gears they’re designed for. The crankshaft should also be properly lubricated. This will help protect the needle bearings from wear and breakage. In addition, a worn chain can be the result of stretched cables or improper indexing. These problems can occur on any bike, regardless of make or model.
Another problem involving bikes is ghost shifting, which can occur when the cable length isn’t adjusted to take account of frame changes. If this happens, the chain needs to be replaced. Ghost shifting can be a common issue with mountain bikes, where the chain is stretched. A new chain can fix the problem, but in some cases the problem may be more complicated. To diagnose the problem, you can use a chain checker tool.
Another cause of slippage is a worn or distorted freehub shell. If the shell is worn, the sprocket will be loose and the chain will slip. A worn chain also has damaged cog teeth that won’t make good mechanical contact with the sprocket teeth. To find out why the chain is wearing out, measure it multiple times along the chain’s length. You should aim for the highest measurement, so that you can get a precise and accurate picture of the chain’s condition.
A skipping bike chain can be extremely frustrating. It happens at the most inconvenient times and requires immediate attention. To remedy skipping chain, you must determine the cause of the problem and make any necessary repairs. You can try to figure out the cause by studying your cycling habits, checking the chain’s age, and looking at how often you shift gears.