For those who love cycling, it’s crucial to ensure your bike’s brakes are in top working condition. Whether you’re descending a slope or moving through crowded city roads, the dependability of your brakes is what keeps you safe.
Fortunately, fixing your bicycle brakes is a task that can be easily accomplished with the right tools and a bit of know-how. In this article, we’ll guide you through the steps to diagnose and fix common brake issues on your bicycle.
You’ll learn how to adjust or replace brake pads, adjust brake cables, and test your brakes for optimal performance. With these skills, you’ll be able to confidently hit the road knowing that your brakes are in top shape.
So, let’s dive in and get started on fixing your bicycle brakes!
Key Takeaways
- Regular maintenance is crucial for well-functioning and safe bicycle brakes.
- Proper diagnosis of brake issues is important before starting repairs.
- Adjusting or replacing brake pads and cables is necessary for proper brake function.
- Different types of brake pads have varying characteristics and should be chosen based on personal preferences and needs.
Blackburn Outpost Fat Front or Rear Bike Rack (Outpost Pewter, One Size)
FITS FAT AND MOST TIRE SIZES - Our patent-pending adjustable width design will work with most fat bike...
As an affiliate, we earn on qualifying purchases.
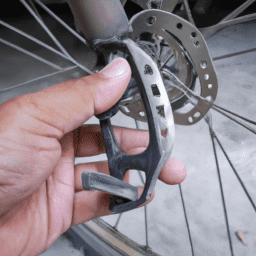
Diagnose the Issue
So, if you’re wondering why your brakes aren’t working properly, you’ll need to take a closer look and see if there’s any visible damage or wear and tear.
Identifying common problems is the first step in fixing your bicycle brakes. Some of the most common issues include worn brake pads, loose cables, and damaged brake calipers. To troubleshoot these problems, start by examining the brake pads. If they’re worn down or damaged, they’ll need to be replaced. Similarly, if the cables are loose or frayed, they’ll need to be tightened or replaced. Finally, if the brake calipers are damaged or misaligned, they’ll need to be adjusted or replaced.
To determine the exact issue with your brakes, you’ll need to inspect each component carefully. Check the brake pads for any signs of wear or damage, such as cracks or uneven wear. Next, examine the cables to ensure they’re properly attached and not frayed. Finally, inspect the brake calipers to make sure they’re in good condition and properly aligned.
Once you’ve identified the problem, you can move on to gather the necessary tools and materials to fix the issue.

Blackburn Outpost Front and Rear World Touring Bike Rack (Grey, Front)
UNIVERSAL FIT SYSTEM - This rack offers more fitment flexibility than other systems, to fit more bikes. That's...
As an affiliate, we earn on qualifying purchases.
Gather the Necessary Tools and Materials
You’ll need to grab some essential items to get started, like a set of pliers, a new brake cable, and a cable cutter. Tool recommendations may vary depending on the type of brakes you have, so make sure to do your research beforehand.
For caliper brakes, you’ll need a 5mm Allen wrench and a pair of brake shoe pliers. For disc brakes, you’ll need a T25 Torx wrench, a rotor truing tool, and a bleed kit. It’s important to have all the necessary tools before starting the repair to avoid any delays or accidents.
Before you begin, it’s important to take safety precautions. Make sure your bike is secure and won’t tip over while you’re working on it. Wear gloves to protect your hands from sharp edges and grease. If you’re working on disc brakes, avoid getting any brake fluid on your skin or eyes. Always refer to the manufacturer’s instructions for proper handling and disposal of chemicals.
With the necessary tools and safety precautions in place, you’re ready to move on to the next step: adjusting or replacing your brake pads.

CXWXC Rear Bike Rack - Bike Cargo Rack for Disc Brake/Non-Disc Brake Mount - Bicycle Pannier Rack, Touring Carrier Rack fit 26”-29” and 700c
【PANNIER RACK FOR TOURING】: The rear rack adds a lot of versatility, and is the most popular type...
As an affiliate, we earn on qualifying purchases.
Adjust or Replace Brake Pads
Imagine you’re flying down a steep hill on your bike, the wind rushing past your face, when suddenly you need to slow down. If your brakes aren’t adjusted or the brake pads are worn down, you could be in for a dangerous and scary ride.
That’s why it’s important to regularly check and adjust your brake pads to ensure they’re working properly and keeping you safe on your adventures. When adjusting or replacing your brake pads, it’s important to consider the materials they’re made of.
There are several different types of brake pad materials, including organic, metallic, and ceramic. Organic brake pads are made from a mix of rubber and resin and are generally the quietest and most affordable option. Metallic brake pads are made from a mix of metals, such as copper and steel, and are more durable but tend to be noisier. Ceramic brake pads are made from a blend of ceramic fibers and non-ferrous filler materials, making them the most expensive but also the longest-lasting and quietest option.
Common brake pad issues include uneven wear, glazing, and contamination. If you notice any of these issues, it may be time to adjust or replace your brake pads. To adjust your brake cables, first, make sure your brake pads are properly positioned and aligned. Then, use a wrench to loosen the brake cable anchor bolt.
Pull the cable tighter by hand and re-tighten the anchor bolt. Test the brake lever to ensure it’s properly adjusted and repeat the process if necessary.

West Biking 110Lb Capacity Almost Universal Adjustable Bike Cargo Rack Cycling Equipment Stand Footstock Bicycle Luggage Carrier Racks with Reflective Logo (Black)
🎁 Aluminum Alloy Material - Suitable for most bicycles, Such as road bike, mountain bike, fat bike, etc....
As an affiliate, we earn on qualifying purchases.
Adjust Brake Cables
Don’t let a loose brake cable ruin your ride – make sure to adjust it regularly to keep your bike safe and reliable. Checking and adjusting your brake cable tension is a crucial step in maintaining your bicycle’s braking system. If your brakes feel loose or have excessive travel, it can be a sign that the cable needs adjustment.
To adjust your brake cable tension, you will need a 5mm Allen key and a pair of pliers. First, locate the brake cable adjuster barrel on your brake lever. Loosen the locknut with the Allen key and then turn the barrel clockwise to increase cable tension or counterclockwise to decrease it. Check the brake pad wear by looking at the grooves on the surface of the pad. If they are worn down, it’s time to replace the pads. Use the pliers to adjust the cable tension until the brake pads make full contact with the rim when the lever is pulled. Once you have adjusted the tension, tighten the locknut and double-check the brake function before riding.
With your brake cables adjusted and brake pad wear checked, it’s time to test your brakes to ensure they are working properly. Roll your bike forward slowly and apply the brakes firmly to make sure they engage smoothly and bring you to a complete stop. If you notice any problems, go back and re-check your cable tension and pad wear before riding again. Remember, regularly maintaining your brakes will keep you safe and confident on your rides.
Test Your Brakes
Now that you’ve adjusted your brake cables, it’s time to test your brakes.
Begin by checking for proper brake function. Squeeze the brake levers and ensure that the brakes engage smoothly and quickly.
If you notice any issues, make final adjustments as needed to ensure your brakes are working correctly.
Check for Proper Brake Function
Make sure your brakes are functioning properly before heading out on your ride by checking for any issues or abnormalities. Proper brake function is crucial for your safety while riding, and regular brake maintenance is necessary to ensure they are working correctly. Here are some steps to help you check for proper brake function:
| Issue | Possible Cause | Solution |
|---|---|---|
| Brakes feel spongy | Air in brake line | Bleed brakes |
| Brakes don’t engage | Worn brake pads | Replace brake pads |
| Brakes rub against rim | Misaligned brake pads | Adjust brake pads |
First, check the brake pads for signs of wear. If the pads are worn down, they will need to be replaced. Next, squeeze the brake levers and make sure the brakes engage properly. If the brakes feel spongy or don’t engage, there may be air in the brake line and the brakes will need to be bled. Finally, check the alignment of the brake pads. If they are rubbing against the rim, they may need to be adjusted.
Once you have checked for proper brake function, make final adjustments if needed to ensure your brakes are working perfectly.
Make Final Adjustments if Needed
Ensure that your ride is safe and enjoyable by giving your brakes a final check to see if any adjustments are necessary. Even if you’ve checked your brakes thoroughly, it’s important to make sure they’re working perfectly.
Common mistakes include not adjusting the brake pads correctly, not tightening the bolts, or not aligning the brake calipers properly. These mistakes can lead to reduced braking power or even brake failure, so it’s important to be vigilant.
To make final adjustments, first, squeeze the brake lever and check if the brake pads are engaging the rim evenly. If not, adjust the pads by loosening the bolt and repositioning them. Make sure the pads are aligned with the rim and tightened securely.
Additionally, check the cable tension by pulling the brake lever and examining the distance between the pads and the rim. If the pads are too far away, tighten the cable tension by turning the barrel adjuster. If they’re too close, loosen it.
Finally, test the brakes to ensure they’re working properly. If you encounter any issues, troubleshoot the problem by referring to your bike’s manual or consulting a professional.
By taking these steps, you can ensure your brakes are in excellent working condition, making your ride safer and more enjoyable.
Frequently Asked Questions
What if my brakes still don’t work after following these steps?
Like a puzzle missing a piece, faulty brakes can be frustrating. Troubleshooting tips include checking cables and pads. If the problem persists, seek professional assistance for a thorough inspection. Safety first.
How often should I replace my brake pads?
To ensure safe and effective braking, replace your brake pads every 1,000 to 3,000 miles depending on your riding style and brake pad material selection. Regular replacement intervals will maintain optimal performance and prevent damage to your bike’s braking system. Compare performance of different brake pad materials to find the best fit for your needs.
Can I use any type of brake pad on my bike?
Compatibility concerns are important when choosing brake pads for your bike. Optimal materials include metallic, organic, and ceramic. Using the wrong type can result in poor performance and even damage to your braking system.
How do I know if my brake cables need to be replaced?
To know if your brake cables need replacing, look for signs of wear such as fraying, rust, or slackness. Check for smooth cable movement and proper tension. Regular maintenance, lubrication, and avoiding sharp bends can prolong cable life.
What should I do if my brake lever feels loose or spongy?
If your brake lever feels loose or spongy, you may need to bleed your brakes or adjust your brake calipers. Check for any leaks in the system and make sure all components are properly tightened.
Conclusion
Congratulations! You’ve successfully fixed your bicycle brakes.
Remember, it’s important to regularly check and maintain your brakes to ensure your safety while riding. In fact, a study by the Centers for Disease Control and Prevention found that bicycle-related injuries accounted for over 1.2 million emergency department visits in the United States alone.
By taking the time to properly maintain your brakes, you can help prevent accidents and injuries.
It’s also important to note that if you’re unsure about any aspect of brake maintenance, it’s best to consult a professional bike mechanic. They have the expertise and tools to properly diagnose and repair any issues with your brakes.
Remember, safety should always be a top priority when it comes to cycling. So, take the time to regularly check and maintain your brakes to ensure a safe and enjoyable riding experience.