Pumping up a fitness ball might seem like a daunting chore, particularly without the appropriate equipment. Yet, equipped with the correct supplies and a bit of expertise, the task can become swift and effortless.
In this article, I will guide you through the steps on how to inflate an exercise ball with a bicycle pump. Using a bicycle pump to inflate your exercise ball has many benefits.
First, it’s a cost-effective option as you won’t have to spend money on a separate pump. Second, it’s a convenient alternative as most people have a bicycle pump lying around at home. Lastly, a bicycle pump allows for a precise inflation level which is important for maintaining the shape and stability of the ball during your workouts.
So, let’s gather our materials and get started!
Key Takeaways
- Gather materials: bicycle pump, exercise ball, towel (optional)
- Check manufacturer’s instructions for recommended size and pressure
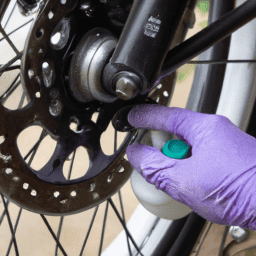
- Attach needle to bicycle pump and insert into ball’s valve
- Test firmness of ball by sitting on it

FIT KING Air Compression Recovery System,Dynamic Pressure for Circulation Improvement and Fast Recovery,Sequential Massage Boots for Athletes (Medium)
Deep Recovery and Relaxation - This system provides dynamic air compression massage by inflating and deflating the sleeves...
As an affiliate, we earn on qualifying purchases.
Benefits of Using a Bicycle Pump
You’ll love how easy it is to inflate your exercise ball with a bicycle pump – not to mention the added benefit of getting a little extra exercise while you do it!
Using a bicycle pump is a more efficient way of inflating your exercise ball compared to using a traditional hand pump. With a bicycle pump, you can easily fill up your exercise ball with air without exerting too much effort.
Moreover, using a bicycle pump is also environmentally friendly. Unlike electric pumps, a bicycle pump doesn’t require electricity or batteries to operate, making it a more sustainable option. By using a bicycle pump, you not only save money and time, but also reduce your carbon footprint.
So, now that you know the benefits of using a bicycle pump, let’s gather your materials to get started on inflating your exercise ball.

QUINEAR Air Compression Recovery System, Professional Sequential Device for Massage Therapy, Foot and Leg Recovery Boots to Improve Circulation for Athletes, FSA-HSA Eligible (Large)
Professional Leg Recovery System: Uses compression recovery technology with 4 air chambers (foot/calf/thigh) to boost circulation & reduce...
As an affiliate, we earn on qualifying purchases.
Gather Your Materials
First, grab all the things you need to blow up that round piece of equipment. Here are the materials you’ll need:
-
Bicycle pump – Make sure it has a nozzle that’ll fit the exercise ball valve. Most exercise balls have a standard size valve, but it’s always best to double-check before purchasing a pump.
-
Exercise ball – Obviously, you can’t inflate an exercise ball without one! Make sure it’s the correct size for your height and weight.
-
Towel – This is optional, but it can be helpful to place a towel under the exercise ball to prevent it from rolling around while you’re inflating it.
Troubleshooting common issues is important to ensure a smooth inflating process. Sometimes the valve may be difficult to insert the pump nozzle into, or air may leak out of the ball. Don’t panic! These issues can often be resolved by adjusting the valve or using a little bit of lubricant around the valve.
Now that you have all the necessary materials, it’s time to prepare the exercise ball for inflation.

FIT KING Professional Air Compression Leg Recovery Compression System, Rechargeable Portable Recovery Boots Pneumatic Compression Device, Fast Recovery & Improved Circulation for Athletes (Large)
Unlock Rapid Recovery: FT-091A professional recovery boots are tailored for athletes and those seeking effective recovery solutions, this...
As an affiliate, we earn on qualifying purchases.
Prepare the Exercise Ball
Before getting started, it’s important to ensure that the valve of the exercise ball is free from any debris or dust. To clean the valve, use a damp cloth to wipe it down. If the valve is particularly dirty, use a toothbrush or a cotton swab to reach into the crevices and remove any debris.
Once the valve is clean, it’s time to prepare the exercise ball for inflation. Make sure you’ve chosen the correct size exercise ball for your needs. The size should be based on your height, with the ball being large enough to support your weight without feeling too compressed.
Before inflating, inspect the ball for any damage or defects. If the ball has any tears or punctures, it may not hold air properly and should be replaced.
With the ball cleaned and inspected, it’s now time to inflate it using your bicycle pump.
(Note: The subsequent section will cover the steps for inflating the exercise ball.)
CINCOM Leg Massager Recovery System, Cordless Air Compression Boots for Circulation, Pro Sequential Compression Device for Athlete Fast Recovery
【75% Faster Inflation – Layered Air Compression】Experience upgraded CINCOM cordless recovery boots featuring layered overlapping air chambers that...
As an affiliate, we earn on qualifying purchases.
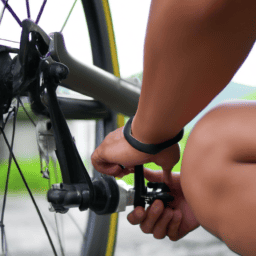
Inflate the Exercise Ball
To properly prepare for your workout, it’s crucial to ensure that the exercise ball is fully inflated using the appropriate equipment. Proper inflation ensures that the ball will be able to support your weight and provide the resistance necessary to engage your muscles.
Here are some tips for inflating your exercise ball:
-
Check the manufacturer’s instructions for the recommended size and pressure for your ball. Over-inflating the ball can cause it to burst, while under-inflating can make it difficult to use for certain exercises.
-
Attach the needle to the bicycle pump and insert it into the ball’s valve.
-
Begin pumping air into the ball, using your body weight to stabilize it as necessary.
-
Test the firmness of the ball by sitting on it. If it feels too soft, add more air. If it feels too hard, release some air until it reaches the desired level of firmness.
If you encounter any issues during inflation, such as a leak or difficulty inserting the needle into the valve, refer to the troubleshooting guide included with your ball or consult the manufacturer’s website.
Once your ball is fully inflated, you can move on to the next step of your workout routine.
To store your exercise ball, simply deflate it and store it in a cool, dry place. Avoid storing it near sharp objects or in direct sunlight, as this can cause damage to the ball.
Proper inflation and storage will help prolong the life of your exercise ball and ensure that it remains a valuable tool in your fitness routine.
Store Your Exercise Ball
Once I finish my workout, I always make sure to properly store my exercise ball to maximize its lifespan and ensure its usefulness in future workouts. Proper storage is important to prevent any damage or punctures to the ball, which can render it useless.
To properly store your exercise ball, start by deflating it completely using a pump or releasing the air valve. Once it’s deflated, wipe it down with a damp cloth to remove any sweat or dirt.
Next, fold the ball in half and then in half again, making sure to press out any remaining air.
Finally, store the ball in a cool, dry place away from direct sunlight and any sharp objects. By following these simple steps, you can ensure that your exercise ball will last for many workouts to come.
Frequently Asked Questions
Can I use a different type of pump to inflate the exercise ball?
Yes, different pump options are available to inflate exercise balls. However, using a bicycle pump has its advantages as it provides greater accuracy and control over the inflation process.
How much air pressure should I put in the exercise ball?
The proper inflation level for an exercise ball depends on the size of the ball. To measure elasticity, sit on the ball with feet flat on the ground. A properly inflated ball should compress by about 4 inches.
How often should I inflate my exercise ball?
The frequency of inflation of an exercise ball varies depending on its usage. It’s important to inflate it properly to prevent injury and get the most out of your workout. Benefits of proper inflation include improved stability and posture.
Can I use the exercise ball immediately after inflating it?
After inflating my exercise ball, I make sure to take post inflation precautions by checking the ball’s firmness and adjusting if necessary. It’s also important to maintain the ball by storing it properly and avoiding sharp objects. Only then can I safely use the ball for exercise.
How do I know when my exercise ball needs to be replaced?
To assess the durability of my exercise ball, I regularly check for signs of wear and test for leaks by inflating and monitoring it. Proper storage, such as avoiding sharp objects and extreme temperatures, can also prolong its lifespan.
Conclusion
In conclusion, inflating an exercise ball with a bicycle pump is a simple and convenient way to keep your workout equipment in top shape. It not only saves you money on purchasing a separate pump but also allows for easy transportation and storage of the pump and ball together.
By following the steps outlined in this article, you can ensure a safe and effective inflation process for your exercise ball. So why not give it a try and see the benefits for yourself?
Are you ready to take your fitness routine to the next level with a properly inflated exercise ball?