Maintaining the cleanliness of your bike’s disc brakes is crucial for optimal performance. As someone who’s passionate about cycling, I recognize the importance of keeping your bike in top condition, and this includes diligently cleaning the disc brakes, a duty that shouldn’t be neglected.
In this article, I will share with you my step-by-step guide on how to clean bicycle disc brakes.
Before we dive into the cleaning process, it is crucial to have the right tools and supplies on hand. You will need an Allen key, a clean rag, isopropyl alcohol, a toothbrush, and brake cleaner.
Removing the wheels is also necessary for cleaning the brake pads and rotors effectively. By following these steps, you can ensure that your disc brakes are free of dirt, debris, and grime, which will help them perform better, last longer, and provide you with a safer and smoother ride.
Key Takeaways
- Regular cleaning of bicycle disc brakes is important for optimal performance and safety during cycling.
- Proper tools and supplies are necessary for effective cleaning, including an Allen key, clean rag, isopropyl alcohol, toothbrush, and brake cleaner.
- Removing wheels is necessary for thorough cleaning, and proper storage of removed wheels is essential to avoid damage.
- Regularly checking brake pads for wear and inspecting rotors for signs of wear and tear is crucial for optimal braking performance.

Under Armour Squeeze Water Bottles, 32 oz Water Bottles, Sideline Sports Water Bottle with Quick-Shot Lid, Quick & Easy Hydration, Gym Water Bottles, Squeeze Bottle, 1 32oz Bottle
- Easy Hydration: Quick-shot lid and one-way valve
- On-the-Go Use: One-hand operation for active hydration
- Measurement Markings: Ounces and milliliters for tracking
As an affiliate, we earn on qualifying purchases.
Gather Your Supplies
You’ll need to grab some basic supplies before you can get started on cleaning your bike’s disc brakes, so make sure you’ve got everything you need on hand!
Firstly, you’ll need a clean rag or towel to wipe down the brake rotor and pads. You’ll also need a brake cleaner, but make sure to choose the right type for your bike’s disc brakes.
There are two types of brake cleaners: solvent and non-solvent. Solvent cleaners are more powerful but can damage some types of brake pads, while non-solvent cleaners are safer to use and won’t damage any types of pads.
It’s best to read your bike’s manual or consult with a bike mechanic to determine which type of brake cleaner is best for your bike.
Additionally, it’s important to follow best practices for brake pad replacement. This includes ensuring that the brake pads are properly aligned and that the rotor is clean and free from debris.
If you’re unsure about how to replace your brake pads, it’s always a good idea to consult with a bike mechanic.
With your supplies in hand and knowledge of best practices, you can now move on to the next step of removing the wheels.
Remove the Wheels
To begin, simply unscrew the quick release lever and pull the wheel away from the frame. This will allow for easy access to the disc brake. Before removing the wheel, it is important to ensure proper storage of the removed wheel. This can be achieved by laying the wheel on a clean and flat surface, away from any sharp or hard objects that could damage the rim or tire. Additionally, it is important to maintain wheel bearings by periodically cleaning and lubricating them to prevent rust and prolong the life of the wheel.
Once the wheel is removed, it is time to clean the disc brake. But before we move on to that, it is important to note that the wheel should not be left lying on the ground or leaned against a surface as it could damage the tire or rim. Proper storage is essential to avoid any unnecessary damage to the wheel. With that said, let’s move on to the next step of cleaning the brake pads.
Clean the Brake Pads
Now that the wheels have been removed, it’s time to clean the brake pads. To do this, I use a brake cleaner spray and a clean rag.
First, I spray the cleaner onto the pads and wipe away any debris that may have accumulated. It’s important to regularly check the brake pads for wear and replace them if necessary to ensure optimal braking performance.
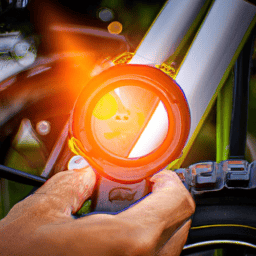
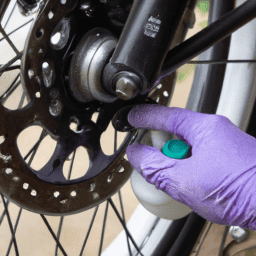
Use Brake Cleaner
Once the brake cleaner’s been applied, give it a few seconds to break down any dirt or debris on the rotor. Here are some benefits of using brake cleaner that you might not know:
-
Brake cleaner’s specifically designed to evaporate quickly, leaving no residue behind. So, you don’t have to worry about any leftover chemicals damaging your brake pads or rotor.
-
Brake cleaner’s also great at removing oil and grease, which can be common contaminants on bike rotors. This is especially important if you’ve been working on your bike and accidentally got some oil on the rotor.
-
Unlike some other cleaning products, brake cleaner won’t damage the rubber seals on your brake calipers. This means that you can use it without worrying about causing any long-term damage.
There are some alternatives to using brake cleaner, such as rubbing alcohol or acetone, but these products can be harsher on your bike’s components. If you do decide to use an alternative, make sure to do your research and choose a product that won’t cause any damage.
Now that the brake cleaner’s done its job, it’s time to remove any remaining debris from the rotor.
Remove Debris
You’ll want to take a closer look at your rotor to make sure it’s free of any debris that could cause issues with your braking performance. Start by removing any rust on the rotor using sandpaper or steel wool. Be careful not to scratch the rotor too much, as this could cause more problems.
Once you’ve removed the rust, use a clean rag and brake cleaner to wipe the rotor down. Make sure to get all the debris off, paying special attention to the areas around the brake pads.
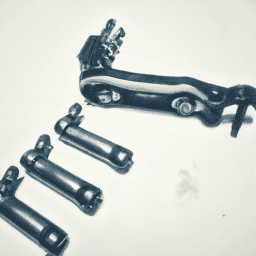
After cleaning the rotor, it’s important to lubricate the caliper pistons. This will ensure that your brakes are working smoothly and effectively. To lubricate the pistons, remove the brake pads and apply a thin layer of brake grease to the pistons using a clean rag. Be careful not to apply too much grease, as this could cause problems with your braking performance.
Once the pistons are lubricated, reinsert the brake pads and check for wear.
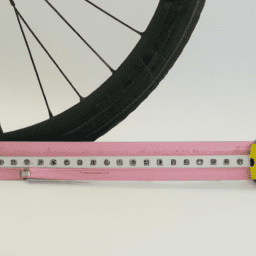
Check for Wear
Before moving on, it’s crucial to inspect your rotor for signs of wear and tear to ensure optimal braking performance. To do this, you’ll need a caliper to measure the thickness of the rotor.
Here are a few things to keep in mind during this process:
-
Measuring thickness: The minimum thickness for a rotor is typically stamped on it. You’ll want to measure the rotor’s thickness at several spots to ensure that it meets the minimum requirements. If the rotor is too thin, it can overheat and warp, leading to poor braking performance.
-
Replacement options: If your rotor is too thin or has any cracks or grooves, you’ll need to replace it. There are a variety of different rotor options available, including steel, aluminum, and ceramic. Be sure to choose the right type of rotor for your bike and your riding style.
Once you’ve inspected your rotor and determined that it’s in good shape, it’s time to move on to cleaning it.
Clean the Rotors
To properly clean your bicycle disc brakes, it’s important to regularly clean the rotors using rubbing alcohol and a clean cloth.
To begin, remove the wheels from your bike and use a clean cloth to wipe down the rotor surface. Be sure to remove any debris or dirt that may have accumulated on the rotor.
Next, apply rubbing alcohol to a separate clean cloth and gently wipe down the rotor surface. This will remove any remaining residue or oil on the rotor, which can affect the braking performance.
When cleaning your rotors, it’s important to use caution and avoid touching the rotor surface with your fingers. The oils from your skin can transfer to the rotor, which can also affect the braking performance.
Additionally, make sure that the rubbing alcohol has completely evaporated before reassembling your brakes. By incorporating these cleaning techniques and maintenance tips, you can help to prolong the lifespan of your bicycle disc brakes and ensure optimal performance.
Once the rotors are clean, it’s time to reassemble and test your brakes.
Reassemble and Test Your Brakes
Now it’s time to put everything back together and give those stoppers a test run to ensure they’re in tip-top shape. To reassemble the brakes, you’ll need to slide the pads back into the caliper and replace the retaining pin or bolt. Make sure the pads are seated correctly and that the retaining pin or bolt is tightened to the manufacturer’s specifications.
Then, reattach the brake cable to the caliper and adjust the cable tension as needed.
Once everything is back in place, it’s important to test the effectiveness of your brakes. Before hitting the road, squeeze the brake lever to ensure that the pads make contact with the rotor and that there’s no rubbing or grinding noises.
Take your bike for a spin and test the brakes at various speeds and in different conditions, such as downhill or wet roads. If you notice any issues with your brakes, such as poor stopping power or excessive noise, you may need to repeat the cleaning and reassembly process or consult a professional mechanic.
Frequently Asked Questions
How often should I clean my bicycle disc brakes?
I maintain my bicycle disc brakes regularly to ensure they are in top condition. The frequency of cleaning and maintenance depends on usage and environmental factors. I generally clean them every 2-3 weeks to prevent build-up and maintain optimal performance.
Can I use any type of cleaner on my brake pads and rotors?
I once made the mistake of using a degreaser on my brake pads, which greatly reduced their stopping power. When it comes to Cleaning Tips for bicycle disc brakes, it’s important to use Appropriate Cleaners such as isopropyl alcohol or specialized brake cleaners to avoid damaging the pads and rotors.
How do I know if my brake pads need to be replaced?
To determine if my brake pads need replacing, I check for wear and consult the replacement indicators. Regular brake pad maintenance, such as cleaning and inspecting, can extend their lifespan and prevent unnecessary replacements.
Is it necessary to remove the brake pads from the caliper when cleaning the rotors?
Why risk contaminating new brake pads with old debris? Removing brake pads is necessary to thoroughly clean rotors. I use rubbing alcohol and a lint-free cloth in a circular motion for best results.
Will cleaning my disc brakes affect their performance or lifespan?
Cleaning disc brakes will not affect their performance or lifespan if done correctly. However, using harsh chemicals or abrasive tools can damage the rotor and pads. Regular cleaning with mild soap and water can prolong the life of your brakes.
Conclusion
Well, that’s it folks. You now have all the information you need to clean your bicycle disc brakes like a pro.
Remember, cleaning your brakes is an essential part of maintaining your bike’s performance and safety. By following the steps outlined in this article, you can ensure that your brakes remain in top working condition and ready for your next ride.
As the saying goes, "an ounce of prevention is worth a pound of cure."Taking the time to clean your brakes now will save you from potential problems down the road.
So, grab your supplies, remove those wheels, and get to work! Your bike (and your safety) will thank you.
Happy riding!