I genuinely enjoy crafting distinctive and unforgettable presents for baby showers. A diaper cake shaped like a bicycle is one of my top choices to create.
Not only is it adorable and practical, but it’s also a fun and creative way to present a lot of diapers in a unique way.
In this article, I will take you step-by-step through the process of creating your own bicycle diaper cake.
First, we’ll gather all the necessary supplies. This includes diapers, rubber bands, a baby bottle, ribbon, scissors, and any additional decorations you may want to add.
Then, we’ll move onto building the wheels and constructing the frame of the bicycle. I’ll provide detailed instructions and tips to ensure your diaper cake is sturdy and visually appealing.
Finally, we’ll add personalized touches to make the gift extra special for the parents-to-be.
By the end of this article, you’ll have all the knowledge and inspiration you need to create your own bicycle diaper cake and impress at your next baby shower.
Key Takeaways
- A bicycle diaper cake is a unique and memorable gift for baby showers.
- The diaper cake can be personalized with matching fabrics, decorations, and small details.
- The frame, wheels, and base of the cake should be constructed using sturdy cardboard or foam board.
- The finished creation can be presented in a unique and eye-catching way to impress the recipient.
Gather Your Supplies
Now it’s time to get all the stuff you need, so grab your shopping list and let’s go! When choosing fabrics for your bicycle diaper cake, you want to consider the colors and patterns that match the theme of the baby shower or nursery.
You can choose a mix of solid colors and patterns, or go for a cohesive look with all one pattern. Some popular choices include polka dots, stripes, and floral prints. You can also incorporate the baby’s name or initials into the fabric by using iron-on letters or stencils.
Once you have your fabrics picked out, it’s time to think about some decorating ideas. You can add some cute embellishments like ribbon, buttons, or bows to give your diaper cake some extra pizzazz. You can also add some fun toys or accessories to the top of the cake, like a small stuffed animal or a pair of baby socks.
Alright, now that we’ve got all our supplies, let’s move on to building the wheels.
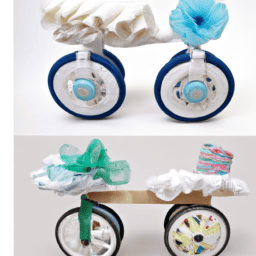
Build the Wheels
First, you’ll grab two round objects – maybe large mixing bowls or even pizza pans – and stack them on top of each other. These will serve as the base for your bicycle wheels.
Then, cut out strips of cardboard or foam board and wrap them around the stacked bowls to create the tire shape. You can secure them with glue or tape, making sure they’re tight and sturdy.
Once you have your two wheels, it’s time to decorate them! You can use ribbon, paper, or fabric to cover the cardboard or foam board, giving your wheels a more polished look. You can also add some fun accents, like mini toy cars or bicycle spokes made out of pipe cleaners.
If you don’t have cardboard or foam board, there are alternative materials you can use, such as Styrofoam or even paper plates. Get creative and have fun with your decorations!
Now that the wheels are complete, it’s time to construct the frame.
Construct the Frame
As you start building the frame, you’ll feel like a real mechanic working on a vintage ride.
First, you’ll need to choose the materials for the frame. I suggest using sturdy cardboard or foam board. Cut out two identical rectangles and score them down the middle. Attach them together using hot glue or double-sided tape, creating a triangular shape. This will be the base of the frame.
Next, cut out two identical smaller rectangles and attach them to the top of the base, creating the upper portion of the frame. You can add stability by attaching a thin dowel or wooden skewer to the center of the frame.
Now comes the fun part – decorating the frame! You can use ribbon, stickers, or paint to add some personality to the cake.
One technique I love to use is to wrap the frame with ribbon or twine, creating a rustic look. Another technique is to paint the frame a bright color and add stickers of bicycles or cute baby animals.
Whatever you choose, make sure it complements the rest of the cake.
As you finish decorating the frame, you’ll be ready to add personalized touches to the cake, making it a truly special gift.
Add Personalized Touches
To truly make the frame unique, it’s important to incorporate DIY decorations and creative customization that will add that extra special touch to the bicycle diaper cake.
One idea is to use ribbons or fabrics in the recipient’s favorite color scheme to wrap around the frame. You can also add personalized touches, such as letters of the baby’s name or a special symbol that represents the family.
Another idea is to use small toys or trinkets that are meaningful to the parents, such as a favorite sports team or a character from a beloved book or movie.
In addition, you can also add small details to the bicycle diaper cake that will make it stand out. This could include adding flowers or other small items to the wheels to make them look like real bicycle wheels. You can also add a small basket to the front of the bike that can hold baby items, such as pacifiers or small toys.
With a little creativity and some thoughtful customization, the bicycle diaper cake can be transformed into a unique and special gift that the recipient will truly appreciate.
Now, let’s move on to the next section to learn how to present and impress with your finished creation.
Present and Impress
Ready to show off your finished creation? Here are some tips to present and impress with your personalized and unique baby gift.
Firstly, consider the occasion you’re gifting the bicycle diaper cake for. Is it for a baby shower, a first birthday, or a welcome-home celebration? Depending on the event, you can add creative variations to your diaper cake. For example, you can incorporate a theme, such as jungle animals or princesses, and add matching accessories like ribbons, toys, and pacifiers. You can also include items that are useful for the parents, such as baby wipes, diaper cream, and baby clothes. By tailoring your diaper cake to the occasion, you show that you put thought and effort into your gift, and make it more meaningful for the recipient.
Secondly, think about the way you present your diaper cake. You can place it on a decorative platter or tray, or wrap it in cellophane and tie it with a bow. You can also attach a personalized note or card, expressing your congratulations and well wishes. If you want to go the extra mile, you can even create a diaper cake centerpiece, using flowers, balloons, and other decorations.
By presenting your diaper cake in a unique and eye-catching way, you not only impress the recipient, but also create a memorable moment that they’ll cherish for years to come.
With these tips, you can turn your bicycle diaper cake into a one-of-a-kind gift that stands out from the rest!
Frequently Asked Questions
How long will the diaper cake last?
Like any cake, a diaper cake won’t last forever. However, with creative ways to display it and proper storage, you can make it last for weeks. Keep it in a cool, dry place to avoid any damage or spoilage.
Can I use cloth diapers instead of disposable ones?
I’ve used cloth diapers for my children and the pros include cost savings and less waste. However, they require more laundry and may not be as convenient as disposable diapers. Alternatives to disposable diapers include biodegradable disposables and diaper services.
How many diapers do I need to make a bicycle diaper cake?
To make a bicycle diaper cake, I need to consider my budget and the quantity of diapers required. Depending on the size of the cake, I may need 50-100 diapers. It’s important to plan ahead and purchase diapers in bulk to save money.
Is it safe to place the diaper cake on a table without a base?
I wouldn’t recommend placing a diaper cake on a table without a stable base. To ensure table stability, consider using a cake board or placing the cake on the floor. Other alternative placements include a sturdy shelf or a countertop with secure edges.
Can I add other baby items besides diapers to the cake?
Adding toys and clothes to customize your diaper cake is a terrific way to make it unique. You can also use recycled materials to create eco-friendly designs. These are just a couple of the many ways to add personality to your cake.
Conclusion
Well, there you have it, folks – making a bicycle diaper cake is easier than you think! With just a few supplies and some creativity, you can create a unique and personalized gift that any new parent will love.
As I mentioned earlier, I love making diaper cakes because they’re not only practical, but they also make a great centerpiece or decoration at a baby shower. And with a bicycle diaper cake, you can add an extra touch of fun and whimsy to your creation.
So why not give it a try? Gather your supplies, follow the steps outlined in this article, and let your imagination run wild as you add your own personal touches.
Your friends and family will be impressed with your crafting skills, and the new parents will appreciate the thoughtful and practical gift.
Happy crafting!