Before you start your cycling adventures with your new bike, it’s important to ensure that your bicycle stem is properly measured.
It may seem like a small and insignificant part, but the stem plays a crucial role in your bike’s stability and handling. In this article, I’ll guide you through the precise and technical process of measuring a bicycle stem, ensuring that you choose the right size and achieve optimal performance.
Let’s dive in and get your bike stem measurement on point!
Key Takeaways
- The stem length affects bike handling and riding posture, with benefits and drawbacks to both shorter and longer stems.
- The stem angle impacts handlebar height, reach, and riding position, and a proper stem angle enhances aerodynamics and riding comfort.
- The handlebar clamp diameter should be measured to ensure compatibility with the stem, as this can affect bike handling, stability, and responsiveness.
- It is important to seek professional advice when measuring and choosing the right stem size, as different handlebar types require specific stem types, and personalized recommendations based on individual needs and preferences can ensure proper stem selection.

TST Electric Bike for Adults 1500W Peak 20" Fat Tire All- Terrain E-Bike 60 Miles 28 MPH Electric Dirt Bike - 48V 15 AH Battery Tested to Safety Tested to UL 2849 Powered Electric Bicycle
𝗣𝗼𝘄𝗲𝗿𝗳𝘂𝗹 𝗘𝗹𝗲𝗰𝘁𝗿𝗶𝗰 𝗕𝗶𝗸𝗲: This adult electric bike is equipped with a 1500W peak power motor and 90N.M torque,...
As an affiliate, we earn on qualifying purchases.
Gather the Necessary Tools
Before you start, make sure you have all the necessary tools. Selecting the appropriate tools is crucial when measuring a bicycle stem. This ensures accurate measurements and prevents any errors in the process.
Understanding the importance of accurate measurements is essential because it directly affects the performance and comfort of your bike. To measure a bicycle stem, you will need a ruler or tape measure, a caliper or vernier gauge, and a torque wrench.
The ruler or tape measure will help you determine the length of the stem, while the caliper or vernier gauge allows for precise measurements of the diameter. The torque wrench is necessary for correctly tightening the stem bolts.
Once you have gathered these tools, you can proceed to understand the different parts of a bicycle stem and how they contribute to the overall performance of your ride.
Jasion Thunder Electric Bike for Adults,1800W Peak Fat Tire E Bikes,26''x 4'',80 Miles with 864Wh Removable Battery Ebike, 30+MPH Max Speed Bicycles,Hydraulic Brakes,Front Suspension
【Jasion Electric Bike 1800W Peak Power & 80+ Mile Range】Command the road with a 1800W peak motor delivering...
As an affiliate, we earn on qualifying purchases.
Understand the Different Parts of a Bicycle Stem
To understand the different parts of a bicycle stem, you should start by familiarizing yourself with its various components. Here are three key elements to consider:
-
Different stem materials: Bicycle stems can be made from various materials such as aluminum, carbon fiber, or steel. Each material has its own unique characteristics, which can affect the overall performance and weight of the bike.
-
Benefits and drawbacks of different stem lengths: Stem length refers to the distance from the center of the handlebars to the steerer tube. A shorter stem offers quicker handling and a more aggressive riding position, while a longer stem provides stability and a more relaxed riding posture. It’s important to choose a stem length that suits your riding style and preferences.
Now that you understand the different parts of a bicycle stem, let’s move on to measuring the stem length.

DEEPOWER QS7 Electric Bike for Adults, 2000W Peak Power 28MPH E-Bike, 48V 20Ah/35Ah/60Ah Battery Options, 35–180 Mile Range, 20” Fat Tire Ebike, 7-Speed All-Terrain Electric Bicycle
【High-Torque Electrified Thrills】 The Deepower electric motorcycle for adults delivers unmatched power with its Peak 2000W motor, reaching...
As an affiliate, we earn on qualifying purchases.
Measure the Stem Length
Start by determining the length of the handlebars to get an accurate measurement of the stem length. To choose the right stem material, consider factors such as weight, stiffness, and durability.
A lightweight stem made of carbon fiber can provide better vibration absorption and improved performance. On the other hand, a stem made of aluminum may be more affordable and still offer sufficient strength.
Understanding the impact of stem length on bike handling is crucial. A shorter stem will result in quicker steering response, while a longer stem provides more stability at high speeds. Take into account your riding style and preferences when deciding on the stem length.
To measure the stem angle, use a protractor to determine the angle between the stem and the steerer tube. This will help you achieve the desired riding position.

Funhang Electric Bike for Adults, 1000W Peak Ebike, 25MPH 60Miles Electric Mountain Bike, 26" Fat Tire Electric Bicycle with 48V 13AH Battery, Front Suspension,7 Speed, Rear Rack, UL 2849 Certified
1000W Peak Strong Motor: Funhang electric bike features a powerful 500W motor with 66.6 N·m of torque and...
As an affiliate, we earn on qualifying purchases.
Measure the Stem Angle
Using a protractor, determine the angle between the stem and the steerer tube to achieve your desired riding position. Measuring the stem angle is crucial for finding the optimal handlebar height and reach. Adjusting the stem angle can greatly impact your riding comfort and overall performance.
Here are some important points to consider:
- Proper stem angle can enhance aerodynamics, minimizing wind resistance and improving efficiency.
- An aggressive stem angle can provide a more aerodynamic position, ideal for speed-focused riding.
- A more upright stem angle can offer better stability and control, suitable for endurance or casual riding.
By measuring the stem angle accurately, you can fine-tune your bike’s fit to match your riding style and preferences.
Now, let’s move on to the next step and measure the handlebar clamp diameter.
Measure the Handlebar Clamp Diameter
To accurately measure the handlebar clamp diameter, simply place a tape measure around the area where the handlebar and stem meet, ensuring a snug fit. The handlebar clamp diameter is a crucial measurement as it determines the compatibility of different handlebars and stems. It is essential to compare handlebar clamp diameters for different types of bicycles, as they can vary depending on the bike’s intended use and design. For example, a mountain bike may have a larger handlebar clamp diameter compared to a road bike, which allows for more stability and control when navigating rough terrains. Additionally, the handlebar clamp diameter can have an impact on bike handling and comfort. A wider diameter can provide better stability and control, while a narrower diameter may offer more responsiveness. Understanding this measurement is key to selecting the right stem for your bike. Moving forward, let’s explore how to measure the steerer tube diameter.
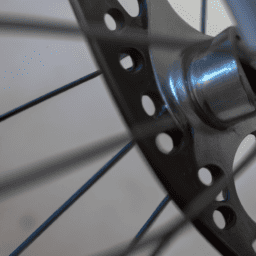
Measure the Steerer Tube Diameter
First, you’ll need to identify the steerer tube on your bike. The steerer tube is the long, cylindrical tube that connects the fork to the frame of the bike.
To measure the steerer tube diameter, you will need a caliper or a ruler. Place the caliper or ruler across the top of the tube and measure the distance between the inner edges.
It’s important to properly measure the steerer tube diameter because an incorrectly sized stem can affect the handling and stability of your bike. Common mistakes when measuring the steerer tube diameter include measuring the outer diameter instead of the inner diameter and not ensuring that the measurement is accurate and precise.
Now, let’s move on to determining the compatibility of the stem with your bike.
Determine the Compatibility
Now, you’ll want to check if the stem is compatible with your bike. This can be determined by considering factors such as the handlebar diameter and the steerer tube diameter.
Stem compatibility with different handlebar types is crucial for a proper bike fit and comfort. There are various handlebar types, including drop bars, flat bars, and riser bars. Each of these handlebar types requires a specific stem type for optimal performance.
When choosing a stem, there are several factors to consider for bike fit and comfort. One important factor is the handlebar clamp diameter, which should match the handlebar diameter. This ensures a secure and stable connection between the stem and handlebar.
Additionally, the length and angle of the stem can affect the bike’s handling and the rider’s position. It’s important to choose a stem length and angle that suits your riding style and preferences. This will help you achieve the desired fit and optimize your comfort and control while riding.
Moving forward to choosing the right stem size, it’s important to consider both the length and rise of the stem. The length of the stem determines the reach to the handlebars, while the rise affects the height of the handlebars. By carefully considering these factors, you can find the right stem size to achieve the desired fit and comfort on your bike.
Choose the Right Stem Size
When choosing the right stem size for my bicycle, I first compare my measurements to the available options. This ensures that I find a stem that fits my bike properly and provides the desired riding position.
If I am unsure about which stem size to choose, I seek professional advice from a bike shop or a knowledgeable cyclist who can guide me in making the right decision.
Compare Your Measurements to Available Options
To compare your measurements to the available options, you’ll need to take note of the stem length and diameter. Proper stem measurements are important because they directly affect the fit and handling of your bike.
When choosing a stem size, there are several factors to consider. First, consider your riding style and preferences. If you prefer a more aggressive riding position, you may opt for a shorter stem. On the other hand, if you prefer a more upright position, a longer stem may be more suitable.
Second, consider your body proportions. Longer torsos may require a longer stem, while shorter torsos may benefit from a shorter stem.
Finally, consider the bike’s geometry and intended use. Different bike styles and disciplines may require different stem lengths and angles.
Remember, seek professional advice if needed to ensure the best fit for your bike.
Seek Professional Advice if Needed
After comparing your measurements to the available options, it’s crucial to seek professional advice if needed.
While you may have a good understanding of your bike and the stem measurements, a professional can offer valuable insights and guidance. They have the expertise to identify potential issues that you may have missed and can help ensure that you make the right decision.
Seeking professional help can also save you time and money in the long run, as they can help you avoid costly mistakes. Whether it’s a local bike shop or a professional bike fitter, their knowledge and experience can be invaluable in finding the perfect stem for your bike.
Once you have sought professional advice and are confident in your choice, you can move on to the next section: installing the new stem.
Install the New Stem
First, make sure you have all the necessary tools to install the new stem. You’ll need an Allen wrench, a torque wrench, and some grease.
Begin by removing the old stem from the handlebars and fork steerer tube. Clean any dirt or debris from the surfaces before installing the new stem.
Apply a thin layer of grease to the steerer tube to prevent corrosion and ease future adjustments.
Carefully align the stem with the handlebars and steerer tube, making sure it sits evenly.
Tighten the stem bolts gradually and evenly, using the torque wrench to ensure proper torque.
Check for any movement or misalignment and make adjustments as necessary.
Once the stem is securely fastened, you can proceed to test and adjust as needed for optimal comfort and performance.
Test and Adjust as Needed
Now, I’ll want to take the bike for a test ride and make any necessary adjustments to ensure optimal comfort and performance.
Start by riding the bike on a flat surface and pay attention to how the new stem feels. If you notice any discomfort or handling issues, it may be necessary to make some adjustments.
Begin by loosening the stem bolts slightly and repositioning the stem to a different angle or height. Then, tighten the bolts back up and test ride the bike again.
Repeat this process until you find the optimal position that provides both comfort and control.
Keep in mind that adjusting the stem may also affect the bike’s handling, so it’s important to seek professional advice if you’re unsure about making any major changes.
Frequently Asked Questions
What are the common materials used in bicycle stems?
There are two common materials used in bicycle stems: carbon fiber and aluminum. Carbon fiber stems are lightweight and provide excellent vibration damping, but they are more expensive. Aluminum stems are affordable, durable, but slightly heavier.
Can I use any stem length and angle for my bike?
Choosing the right stem length and angle is crucial for proper bike fit. Improper stem dimensions can lead to discomfort, inefficient power transfer, and even injury. Understanding the importance of these factors is key to optimizing your riding experience.
Are there any specific tools required for measuring the stem angle?
To accurately measure the stem angle, a protractor or angle measuring tool is essential. The stem angle is important for bike fit as it affects the rider’s posture and comfort on the bike. To measure the stem length accurately, a ruler or tape measure can be used.
How can I determine the handlebar clamp diameter without specialized tools?
To determine the handlebar clamp diameter without specialized tools, I investigate the truth of a theory. By measuring the stem angle without specialized tools, I can then calculate the handlebar clamp diameter using specific formulas and measurements.
What are the consequences of using a stem with an incompatible steerer tube diameter?
Using a stem with an incompatible steerer tube diameter can lead to steering instability, loss of control, and potential damage. It is crucial to ensure proper steerer tube compatibility to ensure safe and efficient bicycle operation.
Conclusion
After carefully measuring and choosing the right bicycle stem, it’s time to install it and hit the road.
As I tightened the bolts and adjusted the angle, I could feel the solid grip of the handlebars in my hands.
The new stem fit perfectly, enhancing the overall stability and control of my ride.
With each pedal stroke, I could sense the improved power transfer and responsiveness.
It’s amazing how a simple measurement can make such a difference in the performance of my bike.