As someone who rides bikes, I understand how crucial it is to have handlebars at the correct height for both comfort and effectiveness during a ride. However, occasionally, it’s necessary to tweak the height of the handlebars on our bicycles to suit our preferences better. This is when it becomes useful to be familiar with the process of raising the handlebars on a bike.
In this article, I will guide you through the process of:
- Assessing your current handlebar height
- Gathering the necessary tools
- Loosening the stem bolts
- Adjusting the handlebar height
- Testing and refining until you achieve the perfect fit.
With a few simple steps, you can make your ride more comfortable and enjoyable, and avoid unnecessary strain on your back, neck, and shoulders. So, let’s get started!
Key Takeaways
- Proper handlebar height is important for comfortable and efficient riding.
- Adjusting handlebar height can alleviate strain and discomfort.
- Handlebar height affects bike fit, handling, and ability to turn.
- Experimenting with adjustments and paying attention to body’s response can lead to the perfect fit for maximum comfort and performance.

Schwinn Network 1 Hybrid Bike, 700c Mens and Womens Bike, 21-Speed Hybrid Bicycle, Aluminum Frame, Suspension Fork, Alloy Linear Pull Brakes, Adult Bicycle
HYBRID BICYCLE: Ride confidently on or off the pavement in the Network 1 by Schwinn. With 700c wheels,...
As an affiliate, we earn on qualifying purchases.
Assess Your Current Handlebar Height
You’ll want to take a moment to assess where your handlebars sit currently, so you can determine how much you need to adjust them.
The importance of posture cannot be overstated when it comes to cycling. If your handlebars are too low, you may find yourself hunching over, which can lead to back pain and discomfort. On the other hand, if your handlebars are too high, you may find yourself leaning back too far, which can cause you to lose control of your bike.
It’s important to find the right balance between comfort and control. Another potential risk of having handlebars that are too low is that it can put more strain on your wrists and hands. This can lead to numbness or tingling in your fingers, which can be uncomfortable and even dangerous if you lose feeling in your hands while riding.
By raising your handlebars, you can alleviate some of this strain and make your ride more comfortable. Now that you understand the importance of assessing your current handlebar height, it’s time to gather the necessary tools to make the adjustment.

Schwinn GTX 1 Hybrid Bike, 700c Mens and Womens Bike, 21-Speed Hybrid Bicycle, Aluminum Dual-Sport Frame, Suspension Fork, Front and Rear Linear Pull Brakes, Adult Bicycle
DUAL SPORT HYBRID BICYCLE: Ride confidently on or off the pavement in the GTX 1 by Schwinn. With...
As an affiliate, we earn on qualifying purchases.
Gather the Necessary Tools
To get started, you’re gonna want to grab a few tools that you might already have lying around your garage. Proper tool selection is crucial to ensure that you don’t accidentally damage any parts of your bike during the process of raising the handlebars. Here’s a quick rundown of the tools that you’ll need:
| Tool | Description |
|---|---|
| Allen wrench | Used to loosen and tighten bolts |
| Screwdriver | Used to adjust the angle of the handlebars |
| Spacer | Used to fill the gap between the stem and the top of the headset |
Before you begin, make sure to take some safety precautions. Ensure that your bike is secure and won’t fall over during the process. It’s also important to wear gloves to protect your hands from any sharp edges or rough surfaces. With the right tools and safety measures in place, you’ll be ready to move on to the next step of the process: loosening the stem bolts.
Transition: Now that you have the proper tools and have taken the necessary precautions, it’s time to loosen the stem bolts and prepare to adjust the height of your handlebars.
Schwinn Suburban Hybrid Bike, 26 Inch Mens and Womens Bike, 7-Speed Hybrid Bicycle, Front and Rear Linear Pull Brakes, Ergonomic Grips, Comfort Frame, Large Cushioned Seat, Fenders, Adult Bicycle
HYBRID BICYCLE: Throwback style meets modern comfort in the Suburban by Schwinn. With 26-inch wheels, this mens and...
As an affiliate, we earn on qualifying purchases.
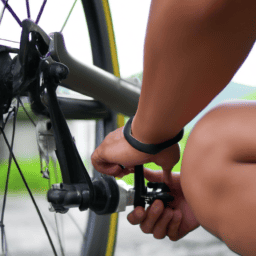
Loosen the Stem Bolts
First things first, it’s important to loosen the stem bolts before adjusting the height of your handlebars. Start by using the appropriate wrench to loosen the bolts located on the top of the stem. Make sure to loosen them evenly to avoid damaging the stem or the handlebars.
Once the bolts are loosened, you can adjust the angle and height of the handlebars to your desired position.
Proper tightening of the stem bolts is crucial to ensure the handlebars stay in place and prevent potential risks while riding. Tighten the bolts evenly and firmly, but not too tight to avoid damaging the threads.
It’s also important to consider the impact on bike fit and riding comfort when adjusting the handlebar height. A comfortable riding position can reduce fatigue and prevent injuries, so take your time to find the right height for your body.
With the stem bolts properly tightened, you can now move on to the next step of adjusting the handlebar height.

Wide Bike Seat for Women Men, Comfortable Soft Classic Vintage Padded Bicycle Saddle Cushion, Large Comfort Replacement Seat for City, Beach Cruiser, Hybrid, Ebike, Mountain, Stationary Bike (Brown)
Wide Bike Seat for Women Men, Comfortable Soft Classic Vintage Padded Bicycle Saddle Cushion, Large Comfort Replacement Seat...
As an affiliate, we earn on qualifying purchases.
Adjust the Handlebar Height
Don’t be afraid to make a small tweak to the height of your trusty steed’s steering mechanism. Adjusting the handlebar height is a simple process that can greatly impact your bike fit and riding comfort. However, it is important to follow proper technique and avoid common mistakes to ensure a safe and effective adjustment.
To adjust the handlebar height, start by loosening the stem bolts as discussed in the previous subtopic. Once the bolts are loose, you can adjust the height of the handlebars by either raising or lowering them as desired. It is important to make small adjustments and test the fit before tightening the bolts to avoid over-tightening or an unstable ride. Keep in mind that changing the height of the handlebars can have an effect on your bike fit and riding comfort, so it is important to make adjustments carefully and deliberately.
Remember to test and refine your adjustment before hitting the road. Pay attention to how the new height feels while riding and make additional small adjustments as needed. In the next section, we will discuss how to properly tighten the stem bolts to ensure a secure and safe ride.
Test and Refine
Now that I’ve adjusted the handlebar height on my bicycle, it’s time to test ride and refine.
I’ll take the bike for a spin around the block to see how it feels.
If I notice any discomfort or issues, I’ll make further adjustments as needed until I find the perfect fit for me.
Test Ride
Hop on your bike and take it for a spin to see if the handlebar height feels comfortable and suits your riding needs. Consider if the height is impacting your performance or if it’s making it easier for you to ride.
If the handlebars are too low, it can cause discomfort in the neck, shoulders, and wrists. On the other hand, if the handlebars are too high, it can have an impact on handling and make it difficult to ride in a straight line or make sharp turns.
During your test ride, pay close attention to how the bike feels and how your body responds to the new handlebar height. Are you able to maintain a comfortable posture while riding? Is it easier to control the bike and make turns?
If the handlebars still feel uncomfortable or if they’re negatively impacting your performance, it may be necessary to make further adjustments as needed.
Make Further Adjustments as Needed
Once you’ve completed your test ride, it’s important to assess whether any additional adjustments need to be made to ensure maximum comfort and performance while riding. Here are some things to consider when fine-tuning your handlebar height:
-
Grip Comfort: One of the most important things to consider when adjusting your handlebar height is grip comfort. If you find that your hands and wrists are experiencing discomfort or pain, it may be a sign that your handlebars are too low or too high. Adjust the height of your handlebars accordingly to find the perfect level of comfort.
-
Handlebar Width Customization: Another important factor to consider when adjusting your handlebar height is handlebar width customization. Depending on your body type and riding style, you may find that a wider or narrower handlebar is more comfortable and provides better control. Experiment with different handlebar widths to find the best fit for your needs.
By taking the time to fine-tune your handlebar height, you can enjoy a more comfortable and efficient riding experience. So don’t be afraid to experiment with different adjustments until you find the perfect fit for your body and riding style.
Frequently Asked Questions
Can I raise the handlebars on any type of bike?
Raising handlebars can vary based on bike compatibility and height adjustment. Not all bikes are created equal, so it’s important to research and understand the specific requirements before attempting any adjustments. Think of it like finding the right key to unlock a door.
How do I know if my handlebars are too low or too high?
To determine if my handlebars are too low or high, I sit in my riding position and observe my body posture. Adjusting handlebar height can improve comfort and control. Improper handlebar height can cause discomfort, pain, and even injuries.
Do I need to replace any parts when raising my handlebars?
To raise handlebars, I need a stem riser and possibly longer cables. First, loosen stem bolts and remove old spacers. Then, add new spacers and stem riser, tighten bolts, and adjust handlebar angle. Tips: test ride for optimal comfort and safety. Tools needed: wrench, stem riser, spacers.
Can I raise the handlebars without affecting the bike’s stability?
Adjusting handlebars for comfort can be done without affecting the bike’s stability. Tips for raising handlebars safely include using spacers or a stem riser, adjusting the stem bolts evenly, and ensuring the handlebars are still aligned with the front wheel.
Is it possible to raise the handlebars without compromising the bike’s handling or performance?
I investigated the theory that raising handlebars may compromise bike performance. Adjusting handlebar height for comfort is essential, but it also impacts posture while cycling. Precise height adjustment is crucial to maintain stability and handling.
Conclusion
So there you have it, folks. Raising your handlebars on a bicycle may seem like a daunting task, but with the right tools and a little bit of know-how, it can be done in no time.
Remember to assess your current handlebar height, gather the necessary tools, and loosen the stem bolts before adjusting the height to your desired level. Once you’ve made the adjustments, be sure to test and refine until you find the perfect height for your riding style and comfort level.
And don’t forget to use a torque wrench to ensure that the stem bolts are tightened to the correct specifications. With these tips in mind, you’ll be able to ride in comfort and style, no matter the terrain or distance.
So hop on your bike and hit the road, because the world is your oyster or should I say, your bike trail.