Taking off a bike chain might appear challenging for those new to cycling, yet it becomes straightforward and quick when equipped with the appropriate tools and information. As an experienced rider, I’ve taken off and put back on numerous bike chains over my cycling career. In this article, I’m going to walk you through the detailed procedure for removing a bike chain, which encompasses recognizing the chain type, cleaning and upkeeping it, and putting it back on.
Before we dive into the specifics of removing a bicycle chain, its important to gather the necessary tools. You will need a chain breaker tool, which is a small device used to push out the pins that hold the chain links together. Additionally, you will need a pair of pliers and a rag or towel to clean the chain. Its also helpful to have a work stand or something to prop up your bike while you work on it.
With these tools in hand, youll be ready to tackle the task of removing your bike chain and ensuring its in good condition for your next ride.
Key Takeaways
- Identifying the type of chain is important before removing it, as there are different processes for single-speed, multi-speed, and half-link chains.
- The necessary tools for removing a bike chain include a chain breaker tool, pliers, and a rag/towel. Safety precautions should also be taken, such as securing the bike and wearing gloves.
- After removing the chain, it should be thoroughly cleaned and lubricated for smooth operation. Soaking in a degreaser solution and scrubbing with a brush can help remove dirt and grime.
- When removing the chain, it’s important to loosen the rear wheel skewer and push out one chain pin completely. The chain should be separated by pulling apart from the detached link, and removable chain links should be kept for reattachment.

WEIZE 700C Hybrid Bike for Adults, 14 Speed Road Bike, City Commuter Bicycle with Caliper Brakes, High-Carbon Steel Racing Adult Bike, Urban Adult Bicycle for Men and Women, White
Caliper brake system: The hybrid bike adopts a dual caliper brake design, making daily maintenance more convenient and...
As an affiliate, we earn on qualifying purchases.
Gather the Necessary Tools
You’re going to need a few tools to get this job done, but don’t worry, it’s as easy as riding a bike once you have them in your tool kit.
First, you’ll need a chain tool, which is used to push the pins that hold the chain links together. You’ll also need a pair of pliers to help with the removal process. Additionally, it’s recommended to have a rag or some paper towels on hand to keep everything clean and prevent any oil from getting on your hands or clothes.
Before getting started, it’s important to take a few safety precautions. Make sure your bike is secure and won’t move around while you’re working on it. Wear gloves to protect your hands from any sharp edges or potential chain grease.
Finally, be sure to read the instructions that came with your chain tool to ensure that you’re using it correctly.
Now that you have your tools and are ready to go, the first step is to identify the type of bike chain you have.

AVASTA 700C Road Adult Step-Over Hybrid Bike Bicycle for Men Woman Male Female,Lightweight Aluminum Alloy Frame with 21-Speed Gearing for City Commuting,Dual Disc Brakes,19 inch Frame,Chameleon Grey
🚴♂️【Durable Aluminum Alloy Frame】This lightweight yet strong frame is built to last, offering a perfect balance of durability...
As an affiliate, we earn on qualifying purchases.
Identify the Type of Bike Chain
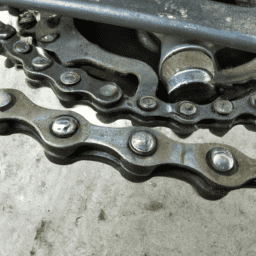
To properly identify the type of bike chain, it’s important to take note of the size and shape of the links. Different types of bike chains include the single-speed chain, the multi-speed chain, and the half-link chain. Each type has its own advantages and disadvantages.
The single-speed chain is the most common type of bike chain and is easy to maintain. However, it is not suitable for bikes with multiple gears.
The multi-speed chain is designed for bikes with multiple gears and is more durable than the single-speed chain. However, it requires more maintenance and is more expensive.
The half-link chain is a hybrid between the single-speed and multi-speed chains. It allows for more precise tension adjustment, but can be more difficult to find and is more expensive.
Identifying the type of bike chain is essential for removing it from the bike. By understanding the advantages and disadvantages of each type, you can determine the best method for removing the chain and ensure that your bike is running smoothly.

Schwinn Wayfarer Hybrid Bike, 700c Mens and Womens Bike, 7-Speed Hybrid Bicycle, Retro Steel Frame, Front and Rear Linear Pull Brakes, Fenders, Cargo Space, Adult Bicycle
HYBRID BICYCLE: Ride in comfort and vintage style with the Wayfarer by Schwinn. With 700c wheels, this mens...
As an affiliate, we earn on qualifying purchases.
Remove the Chain from the Bike
Now that we’ve identified the type of bike chain, it’s time to remove it from the bike.
First, I need to shift the gears to the smallest chainring and cog.
Then, I’ll position the chain tool over one of the chain links and break the chain.
Finally, I can remove the chain from the bike and proceed with any necessary maintenance or replacement.
Shift the Gears
First, it’s important to shift the gears to the smallest chainring and the smallest cog on the cassette. This will relieve the tension on the chain and make it easier to remove.
To do this, I use the adjusting derailleur located on the right side of the handlebars. I shift the chain to the smallest chainring by pushing the lever forward, and then use the same lever to shift the chain to the smallest cog on the cassette by pulling the lever back.
Once the chain is in the correct position, I can proceed with removing it from the bike. However, before I do that, I need to make sure that I’ve positioned the chain tool correctly. This will allow me to break the chain and remove it from the bike.
To position the chain tool, I align it with the chain pin and turn the handle to push the pin out. With the chain tool in place, I can now move on to the next step of removing the chain.
Position the Chain Tool
Before breaking the chain, it’s crucial to align the chain tool with the chain pin, like aiming a bow and arrow at a target, ensuring it’s in the correct position to push the pin out. Adjusting tension may be necessary to realign the chain tool if it’s not in the right position.
To adjust tension, rotate the handle of the chain tool counterclockwise until the pin aligns with the center of the chain tool. If the chain tool is misaligned, reposition it until it’s in direct contact with the chain pin. If the chain pin is damaged, replace it before proceeding.
Once the chain tool is in the correct position, push the pin out by rotating the handle clockwise. This will allow you to break the chain and remove it from the bike.
Break the Chain
To break the chain, you’ll need to use the chain breaker. First, position the chain in the tool so that the pin you want to remove is lined up with the punch. Then, rotate the handle clockwise until the punch is pushing the pin out. Keep turning the handle until the pin is completely pushed out and the chain is separated.
When using a chain breaker, it’s important to go slowly and apply even pressure to avoid damaging the chain or the tool. Also, be sure to remove any broken links or debris that may have caused the chain to break in the first place. These tips can help ensure a successful repair and prevent future issues.
Now that the chain is broken, we can move on to the next step of removing the chain entirely.
Remove the Chain
Now that you’ve successfully broken the chain, it’s time to take it off your bike and give it a proper cleaning. This step is crucial to ensure good chain maintenance and bike performance.
Removing the chain allows you to clean it thoroughly and inspect it for any damage or wear that may hinder its performance. To remove the chain, you’ll need a chain tool, which you used to break the chain in the previous step.
Start by loosening the rear wheel skewer to create slack in the chain. Then, use the chain tool to push out one of the chain pins completely. Once the pin is out, you can separate the chain by pulling it apart from the detached link.
Be sure to keep track of any removable chain links, as they’ll need to be reattached when you’re ready to put the chain back on your bike.
Now that the chain is off, it’s time to clean and maintain it to keep your bike running smoothly.

Young Electric E-Bike Rack with Ramp, Hitch 2 Bike Rack, 200 lbs Capacity Electric Bike Carrier, Foldable Platform Mount for Cars, Trucks, SUVs, Minivans, Up to 5-Inch Fat Tire for 2'' Receiver
200LBS CAPACITY & V-GROOVE RAMP: The electric bike rack weighing 66 pounds is built with durable steel and...
As an affiliate, we earn on qualifying purchases.
Clean and Maintain the Chain
Now that I’ve removed the chain from my bike, it’s time to clean and maintain it.
To start, I’ll soak the chain in a degreaser solution for at least 20 minutes to break down any built-up grime and grease. Then, I’ll scrub the chain using a chain cleaning tool and a brush to remove any remaining dirt.
Once the chain is clean, I’ll dry it thoroughly before applying a lubricant to ensure smooth and efficient operation.
Soak the Chain
Immerse your chain in a tub of degreaser, letting it soak until the gunk and grime dissolve away like a hot knife through butter. This will leave you with a gleaming, pristine chain that’s ready for removal.
Soaking the chain is an essential step in the process of cleaning and maintaining it. There are many benefits of soaking. For example, it removes the dirt and grime that may be stuck on the chain, which can cause it to wear out faster. Additionally, soaking helps to lubricate the chain, making it run smoother and quieter.
When it comes to choosing the best soaking solution, there are many options available. Some people prefer to use a commercial degreaser, while others opt for natural solutions like vinegar or lemon juice. Whatever solution you choose, it’s important to ensure that it’s safe for use on your particular type of chain.
Once you have chosen your solution, simply immerse the chain in the liquid and allow it to soak for the recommended amount of time. Once the chain has soaked, it will be ready for the next step in the cleaning process: scrubbing.
Scrub the Chain
To effectively clean your bike’s chain, you’ll want to start scrubbing it gently with a soft-bristled brush. Scrubbing the chain is an essential step in removing any dirt or grime that may have accumulated on it.
Not only does this help to ensure that your bike is running smoothly, but it also helps to prolong the life of your chain. When scrubbing the chain, it’s important to use the right techniques to get the best results.
First, start by applying a degreaser to the chain to help break down any stubborn dirt or grease. Then, using a soft-bristled brush, gently scrub the chain in a back and forth motion, making sure to get all the nooks and crannies.
Be sure to avoid using a wire brush, as this can damage the chain and cause it to wear down more quickly. Now that the chain has been scrubbed, the next step is to dry it off.
This is an important step to prevent any rust or corrosion from forming on the chain.
Dry the Chain
After scrubbing, make sure to give your chain a thorough drying with a clean rag. There are several methods for drying your chain, including air drying, using a hair dryer, or even a heat gun. However, it’s important to note that excessive heat can damage the chain, so it’s best to use a low heat setting or simply let it air dry.
The importance of drying time can’t be stressed enough. Moisture left on the chain can lead to rust or corrosion, which will lead to a shorter lifespan for your chain. Make sure to take the time to dry your chain properly to ensure it stays in good condition for as long as possible.
Once your chain is dry, it’s time to move on to the next step: lubricating the chain.
Lubricate the Chain
Now that the chain’s dry, it’s time to lubricate it. Proper lubrication’s crucial to ensure a smooth and efficient ride. It reduces friction and wear, prevents rust and corrosion, improves shifting performance and overall drivetrain efficiency, and provides a smooth and quiet ride.
To choose a lubricant for your bike chain, options include wet lubricants for wet/muddy conditions, dry lubricants for dry/dusty conditions, ceramic lubricants with ceramic particles for extra protection, and wax-based lubricants for a clean and low-maintenance option.
After lubricating the chain, it’s time to reinstall it onto the bike.
Reinstall the Bike Chain
Now that I’ve removed and cleaned the bike chain, it’s time to reinstall it.
The process involves threading the chain back onto the bike’s gears, reconnecting it, and testing the chain tension.
First, I’ll need to ensure that the chain is properly aligned and threaded through the derailleur and chainring.
Once the chain is in place, I’ll need to reconnect it using a chain tool and then check the tension to ensure that it’s not too loose or too tight.
Thread the Chain
First, loosen the quick release or use a chain tool to disconnect the chain from the derailleur.
Once you’ve taken off the chain, it’s time to re-thread it. It’s important to follow correct techniques to avoid issues with the bike’s functionality. Make sure the chain is aligned properly with the gears and that it’s not too tight or too loose.
One common mistake to avoid when threading the chain is not aligning it with the gears properly. This can cause the bike to not shift gears smoothly or at all. Also, don’t over-tighten the chain as it can cause damage to the bike’s components.
Once you’ve successfully threaded the chain, you can move on to reconnecting it to the derailleur.
Reconnect the Chain
To properly complete the chain re-threading process, it’s crucial to ensure a secure connection between the derailleur and the chain, so don’t forget to give it a little tug and check for any loose links.
Once you’ve confirmed that everything is in place, it’s time to reconnect the chain. Begin by threading the chain through the derailleur and onto the cassette. Make sure that the chain is properly aligned with the gears by visually inspecting its position.
Next, it’s important to consider the chain length. If the chain is too long, it won’t be able to maintain proper tension, which can result in poor shifting performance and potential damage to the bike. Conversely, if the chain is too short, it won’t be able to reach all gears, which can also lead to poor shifting performance.
Take the time to ensure that the chain length is appropriate for your bike before continuing. With the chain properly aligned and the appropriate length, you’re ready to move on to testing the chain tension.
Test the Chain Tension
Ensure your bike’s shifting performance is at its best by testing the tension of the reconnected chain. This step is crucial to prevent slipping or jumping of gears while cycling.
To test the chain tension, shift your bike to the smallest chainring and the smallest cog. Use a ruler to measure the distance between the chain and the bottom of the chainring. The distance should be around 5mm. If the distance is less or more than this, adjust the chain tension accordingly by loosening or tightening the rear derailleur.
Once you’ve achieved the correct tension, shift through all the gears to ensure the chain moves smoothly and quietly.
It’s also important to check the wear of the chain. Over time, the chain wears out and stretches, which can cause the gears to slip.
To check the wear, use a chain wear indicator tool. Place the tool on the chain and if it fits between the links easily, then the chain is worn and needs to be replaced. If you don’t have a chain wear indicator tool, you can also check for wear by measuring the length of 12 links. If the length is more than 12 and 1/8 inches, then the chain needs to be replaced.
By following these steps, you can ensure that your bike’s chain is in good condition and ready for your next ride.
Frequently Asked Questions
How often should I remove and clean my bike chain?
I clean my bike chain once a week, as studies show that a dirty chain can decrease efficiency by up to 12%. Regular maintenance not only improves performance but also prolongs the lifespan of the chain. Tips for upkeep include using a degreaser and lubricant.
Can I use any type of degreaser to clean my bike chain?
Yes, you can use any type of degreaser to clean your bike chain, but some are better than others. I recommend using a specialized bike chain degreaser and following proper chain cleaning techniques to ensure the best results.
Is it necessary to replace my bike chain after removing it for cleaning?
It’s not always necessary to replace your bike chain after removing it for cleaning. However, frequent cleaning can extend its lifespan. Tips for maintenance include using a proper lubricant and avoiding cross-chaining.
How do I know if my bike chain needs to be replaced?
To know if my bike chain needs replacing, I check for signs of wear such as elongation, rust, or stiff links. Best practices for maintaining bike chains include regular cleaning, lubrication, and avoiding extreme conditions.
Can I use a quick link to reinstall my bike chain or do I need to use a chain tool?
For reinstalling a bike chain, a quick link is a convenient alternative to a chain tool. However, make sure to use a compatible quick link and follow the manufacturer’s instructions. Chain tool alternatives include pliers and a hammer and punch.
Conclusion
Removing a bicycle chain may seem daunting, but with the right tools and some basic knowledge, it can be done easily and quickly. I can confidently say that mastering this skill will make you feel like a true bicycle mechanic, capable of fixing any issue that may arise on your trusty two-wheeler.
Once you have successfully removed the chain, it’s important to clean and maintain it to ensure its longevity and efficiency. By following these steps, you can ensure that your bike chain is always in top condition, allowing you to enjoy a smooth and safe ride every time.
So, go ahead and give it a try! You may just find that removing and maintaining your bike chain is just as satisfying as riding it!