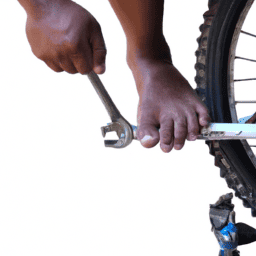
I’ve dedicated years to enthusiastic cycling, and a valuable lesson from this journey is the occasional necessity to detach bike pedals. This might be for the sake of upgrading to a better set or perhaps to swap out a damaged crank arm. Regardless of the motivation, taking off bike pedals is a fairly straightforward process, achievable with a small selection of tools and some basic understanding.
Before we dive into the specifics of how to remove bicycle pedals, it’s important to understand that there are two main types of pedals: platform pedals and clipless pedals. Platform pedals are the most common type and are typically found on recreational and commuter bikes. Clipless pedals, on the other hand, are used by more serious cyclists and require special shoes that clip into the pedal.
The process for removing both types of pedals is similar, but there are a few key differences to keep in mind. With that said, let’s get started!
Key Takeaways
- Pedal maintenance is important for both performance and safety.
- The necessary tools for pedal removal include a pedal wrench and Allen key.
- Left pedal removal requires counterclockwise turning, while right pedal removal requires clockwise turning.
- Troubleshooting tips for common issues with pedal removal include using penetrating oil and longer wrenches, and stripped threads may require crank arm replacement.
Understand the Different Types of Pedals
Before you can remove your bicycle pedals, it’s important to understand the different types of pedals you may encounter. Pedal maintenance is crucial for optimal performance and safety, and choosing the right pedal type is equally important.
There are two main types of pedals: clipless and platform. Clipless pedals require special cycling shoes with cleats that attach to the pedal. The cleat-release mechanism allows you to clip in and out of the pedal quickly and easily. They’re popular among road cyclists and mountain bikers for their efficiency and power transfer.
To remove clipless pedals, you’ll need a pedal wrench or Allen key to loosen the pedal spindle.
On the other hand, platform pedals are flat and do not require special shoes. They’re commonly found on recreational bikes and BMX bikes. Removing platform pedals is relatively easy and only requires a wrench or Allen key to loosen the pedal spindle.
Once you understand the type of pedals on your bike, you can gather the necessary tools for removing them.
Gather the Necessary Tools
First, you’ll need to grab a few tools to get started. Here are the four items you’ll need to remove your bicycle pedals with a proper grip and safety precautions:
-
Pedal wrench: This special wrench is designed to fit around the flats on the axle of the pedal, providing a secure grip to loosen or tighten the pedal.
-
Allen key: Depending on the type of pedal you have, you may need an Allen key to remove the pedal spindle from the crank arm.
-
Grease: Applying grease to the threads of the pedal spindle before installation can help prevent it from seizing in the future.
-
Rag: Always keep a clean rag handy to wipe off any excess grease and to protect your hands from sharp edges.
To ensure a successful and safe pedal removal, it is crucial to have the right tools and take the necessary safety precautions. Proper grip is important to avoid any accidental injuries during the process. In addition to using the right tools, wearing gloves can provide an extra layer of protection.
Before starting, make sure your bike is secure and stable. Now that you have gathered all the necessary tools, it’s time to prepare your bike for pedal removal.
Prepare Your Bike for Pedal Removal
Now that I’ve got all the necessary tools at hand, it’s time to give my bike the attention it deserves and ensure it’s ready for the pedal removal process.
Before I start, I need to make sure my bike is in good condition. This means checking for any damage on the frame, the pedals, and the crank arms. I also need to make sure the bike is clean and free from any dirt or debris that may interfere with the removal process.
Bike maintenance is important especially when it comes to DIY repairs such as removing the pedals. To prepare my bike for the pedal removal process, I need to ensure that the bike is secure and stable. This means placing it on a bike stand or using a workbench to hold it steady.
Once I’m sure that my bike is clean, free from damages, and securely positioned, I can now move on to the next step, which is to remove the pedals.
Remove the Pedals
Okay, now it’s time to remove the pedals from your bike. First, I’ll focus on removing the left pedal. This can be a bit trickier than the right pedal due to the reverse threading.
Then, I’ll cover the right pedal removal which is a straightforward process.
Finally, I’ll go over some troubleshooting tips in case you run into any issues during the process.
Left Pedal Removal
To remove the left pedal, you’ll need to turn the wrench counterclockwise. Here are the steps to follow:
-
Position the bike: Place the bike on a stand or turn it upside down so that it’s stable and easy to work on.
-
Secure the pedal: Use a pedal wrench to secure the pedal. Place the wrench on the flat part of the pedal axle and turn it counterclockwise to loosen the pedal.
-
Remove the pedal: Once the pedal is loose, unscrew it with your hand until it comes off completely.
Common mistakes when removing the left pedal include turning the wrench clockwise instead of counterclockwise and not securing the pedal properly before trying to unscrew it. An alternative method to using a pedal wrench is to use a 15mm wrench or an adjustable wrench, but be careful not to damage the pedal or the crank arm.
Now that the left pedal is removed, it’s time to move on to the right pedal removal.
Right Pedal Removal
First, you’ll need to make sure the right pedal is facing the correct direction for removal. To do this, locate the ‘R’ or ‘right’ marking on the pedal and ensure that it’s facing towards the back of the bike. Once you’ve confirmed this, you can begin the process of removing the pedal.
Pedal maintenance is an important aspect of bike upkeep, and removing the right pedal is no exception. One of the most common mistakes made during this process is trying to turn the pedal in the wrong direction. Remember that the right pedal has a standard, clockwise thread, so you’ll need to turn it counterclockwise to remove it.
By being mindful of these details, you can successfully remove your right pedal and move on to the next step of troubleshooting any issues with your bike.
Troubleshooting
If you’re experiencing issues with your ride, don’t panic! Troubleshooting is the next step in getting your bike back in top shape. When it comes to removing bicycle pedals, there are some common issues that you may encounter. Here are some troubleshooting tips to help you overcome these problems and get those pedals off:
| Common Issue | Troubleshooting Tips |
|---|---|
| Pedal won’t budge | Try applying some penetrating oil to the threads and wait a few minutes before trying again. Use a longer wrench for more leverage. |
| Stripped threads | Use a pedal wrench with a longer handle for more leverage. If the threads are severely stripped, you may need to replace the crank arm. |
| Pedal spins freely | This could be a sign that the threads are stripped. Try tightening the pedal in the opposite direction to see if it catches. If not, you may need to replace the crank arm. |
| Pedal falls off | Check the tightness of the pedal regularly. If it continues to fall off, the threads may be stripped and you may need to replace the crank arm. |
With these troubleshooting tips, removing bicycle pedals should be a breeze. Once you’ve successfully removed the pedals, it’s time to move on to the next step: reinstalling them.
Reinstalling Pedals
Now that I’ve successfully removed my bicycle pedals, it’s important to know how to reinstall them properly. Whether you’re reinstalling your pedals after pedal maintenance or pedal replacement, the process is relatively straightforward.
The first step in reinstalling your pedals is to ensure that the threads on the pedal spindle and crank arm are clean and free of debris. Then, apply a small amount of grease to the threads to ensure a smooth and easy installation.
Next, align the pedal with the crank arm and begin threading it in by hand. Once the pedal is started, use a pedal wrench or Allen key to tighten it securely, but be careful not to overtighten as this can strip the threads.
Repeat the process for the other pedal and your bike is ready to ride!
Frequently Asked Questions
Can I remove bicycle pedals without any tools?
Unfortunately, it is not possible to remove bicycle pedals without any tools. However, there are various pedal removal techniques that can be used with the right tools. Removing pedals can provide benefits for maintenance purposes, such as easy access for cleaning and lubrication.
How do I know which pedal is the left or right side?
To identify which pedal is left or right, check for markings on the pedals or crank arms. Alternatively, look at the threading on the pedals- left pedals have reverse threading.
Is there a specific way to loosen the pedals if they are stuck?
Pedal removal can be a nightmare, especially when they’re stuck. Pedal removal hacks can help, like using a penetrating oil or a heat gun. Troubleshooting pedal removal requires patience and caution to avoid damaging the bike.
Should I apply any lubricant before reinstalling the pedals?
Applying lubricant before reinstalling bicycle pedals is optional, but it can help prevent rust and make future removal easier. Before reinstalling, ensure the threads are clean and apply a small amount of grease to prevent seizing.
Can I reuse the same pedals on a different bike?
When considering pedal compatibility for a different bike, it’s important to research the specific model and brand to ensure a proper fit. If the original pedals don’t work, alternative options can be explored.
Conclusion
Well, that’s it! You’ve successfully removed your bicycle pedals. It may seem like a small feat, but it’s an essential part of maintaining and repairing your bike.
Remember, there are two main types of pedals, and they require different tools and techniques for removal. It’s always best to consult your bike’s manual or a professional mechanic if you’re unsure about anything.
Now that you know how to remove your pedals, you can easily switch them out for new ones or perform other repairs that require their removal. Just remember to always prepare your bike and use the correct tools to avoid causing any damage.
So, are you ready to take on the challenge of removing your bike pedals? Give it a try, and let me know how it goes!


