Taking off a bike’s sprocket might appear challenging, but if you have the appropriate equipment and some basic knowledge, it becomes a swift and straightforward process.
As an avid cyclist myself, I have had to remove and replace my fair share of sprockets over the years, and I am here to share my expertise with you.
Before we get started, it’s important to note that removing a sprocket requires some specialized tools. You will need a chain whip, a cassette lockring tool, and a wrench or socket that fits the lockring tool.
These tools may seem intimidating at first, but don’t worry – I will walk you through the process step by step to ensure that you feel confident and capable.
So let’s get started on removing that sprocket!
Key Takeaways
- Proper sprocket maintenance is crucial for bike drivetrain longevity.
- Use chain whip to remove sprocket by wrapping around gear and gripping with lockring tool.
- Cassette lockring tool removes lockring holding gear in place.
- Neglecting sprocket maintenance can lead to poor shifting and chain slip.
Amazon Product B0CTHJ4TG1
As an affiliate, we earn on qualifying purchases.
Gather the Necessary Tools
You’ll need to grab a couple of tools before you can start removing your bike sprocket, so head over to your toolbox and grab a wrench and a chain whip. The type of bicycle sprocket you have will determine the size of wrench you’ll need. It’s important to use the correct size wrench to avoid damaging the sprocket or the surrounding components. The chain whip is used to keep the sprocket from moving while you loosen the locking nut.
Proper sprocket maintenance is crucial for the longevity of your bike’s drivetrain. Neglecting to maintain your sprocket can lead to poor shifting performance and even chain slip. Before attempting to remove your sprocket, make sure you’ve properly cleaned and lubricated it. This will make the removal process easier and prevent any damage to the sprocket teeth.
Now that you have the necessary tools and have ensured proper sprocket maintenance, it’s time to move on to removing the rear wheel.
Amazon Product B0FH9MK4Y7
As an affiliate, we earn on qualifying purchases.
Remove the Rear Wheel
As the wheel spins, the chain glides over the teeth of the circular gear. Before removing the sprocket, it’s important to remove the rear wheel from the bike.
To do this, I begin by releasing the brake and shifting the chain to the smallest sprocket. Then, I use proper lifting techniques to remove the wheel from the frame. It’s important to be careful not to damage the bike or any of its components during this process.
In addition to removing the wheel, it’s also a good idea to inspect and perform any necessary wheel maintenance. This includes checking for any loose spokes or worn bearings. By taking the time to properly maintain the wheel, it’ll function better and last longer.
Once the wheel is removed and inspected, the next step is to use the chain whip to remove the sprocket.

Thule FastRide Roof Mounted Bike Rack
Fits 9mm standard quick-release bikes
As an affiliate, we earn on qualifying purchases.
Use the Chain Whip
To take off the gear, wrap the chain whip around it and grip it firmly with the lockring tool. This technique is used to prevent the gear from turning while you loosen the lockring.
The chain whip is designed with a chain that wraps around the gear and a handle to grip. It is used in conjunction with a lockring tool, which is a wrench specifically designed to remove the lockring that holds the gear in place.
There are alternatives to using a chain whip. Some people use a homemade version by using an old chain and a piece of pipe to grip it with. Others use a vice grip or pliers to hold the gear in place while they loosen the lockring.
Regardless of the method used, it is important to ensure that the gear is held firmly in place to prevent damage to the bike or injury to the person removing the gear. With the gear held securely in place, the next step is to use the cassette lockring tool to remove the lockring and take off the gear.

TOOENJOY Rooftop Bike Rack for Car SUV, Upright Roof Mount Bicycle Rack with 2 Arms for Movable Crossbar, 2 Bike Carrier
Enhanced Bike Security: The dual rotatable load arms securely grip the bike by the wheels, ensuring zero contact...
As an affiliate, we earn on qualifying purchases.
Use the Cassette Lockring Tool
I’ll now discuss how to use the Cassette Lockring tool to remove the cassette from the rear hub.
Firstly, position the tool onto the lockring, ensuring that it’s secured in place. Then, turn the tool counter-clockwise to loosen the cassette from the hub.
Remember to keep a firm grip on the tool to prevent any slipping or damage to the lockring or cassette.
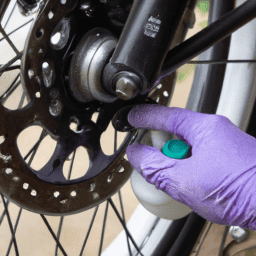
Position the Tool
First, you gotta get that tool in position to start removing that stubborn sprocket. How to properly position the tool for sprocket removal is crucial to avoid damaging the wheel hub. Here are some tips to help you do it right:
-
Before attaching the tool, make sure the wheel is firmly secured in a bike stand or with a friend holding it steady.
-
Align the tool with the lockring on the cassette, making sure it’s fully engaged before applying any force.
-
Use a wrench or pliers to hold the tool in place while turning it counter-clockwise to loosen the lockring.
By following these steps, you can confidently position the tool on the lockring and start removing the sprocket without damaging the wheel hub.
Once you have the tool in position, it’s time to turn it counter-clockwise and remove the lockring.
Turn the Tool Counter-Clockwise
Now that you have the tool in position, it’s time to turn it counter-clockwise and loosen the lockring. Make sure to keep the tool straight and apply pressure evenly to avoid stripping or damaging the lockring. Utilize these technique tips to make the process smoother:
| Technique Tips | Common Mistakes |
|---|---|
| Use a sturdy wrench or pliers for a better grip | Applying too much force and damaging the tool |
| Work in a well-lit area to avoid mistakes | Forgetting to secure the bike in place, causing it to move |
| Rotate the tool slowly and steadily | Forgetting to wear gloves and injuring your hands |
| Check the lockring frequently to see if it’s loosening | Forgetting to clean the area before starting the process |
| Use a penetrating oil to help loosen the lockring | Rushing the process and causing damage to the bike |
Don’t rush the process and take your time to remove the lockring carefully. Once the lockring is loosened, remove it from the sprocket and move on to the next step of removing the sprocket from the wheel hub.
Remove the Sprocket
To remove the bicycle sprocket, you’ll need a chain whip and a cassette lockring tool. The first step is to insert the cassette lockring tool into the center of the sprocket and turn it counterclockwise to loosen the lockring. Once the lockring is loose, you can remove it by hand. Be sure to keep the lockring in a safe place, as you’ll need it to reattach the sprocket.
Next, take the chain whip and wrap it around the sprocket you want to remove. Hold the chain whip in place with one hand and attach a wrench to the lockring tool with the other hand. Turn the lockring tool clockwise while holding the chain whip in place. This will loosen the sprocket from the wheel hub.
Once the sprocket is loose, you can remove it from the wheel hub and replace it with a new one or perform sprocket maintenance. This process can also be used if you’re upgrading sprocket sizes. Remember to reattach the lockring tightly before using the bike again.
Frequently Asked Questions
What should I do if my sprocket is stuck and won’t come off?
It’s frustrating when a sprocket won’t budge, but did you know that over 40% of bike maintenance issues involve stuck parts? To loosen a stuck sprocket, try using penetrating lubricants and heat, or a sprocket removal tool with leverage.
Can I remove the sprocket without removing the rear wheel?
Removing a sprocket without removing the rear wheel has pros and cons. Pros: quicker, easier, and less disassembly. Cons: limited access, potential for damage. Tools required: chain whip, lockring tool, and wrench.
How often should I replace my sprocket?
As the saying goes, "An ounce of prevention is worth a pound of cure."When to replace a sprocket depends on the type of riding and maintenance routine. Signs of a worn sprocket include skipping chains and teeth with sharp edges.
Is it possible to remove a sprocket without a chain whip?
Alternative methods for removing a bicycle sprocket without a chain whip exist, but they have advantages and disadvantages. A strap wrench or adjustable wrench can work, but may damage the teeth or slip. Using a vise also risks damage and requires a way to secure the wheel.
Can I reuse the cassette lockring tool for other bicycle maintenance tasks?
I often repurpose my cassette lockring tool for various bike maintenance tasks, as it’s a versatile tool. However, when removing a bicycle sprocket, there are alternative methods that do not require this tool.
Conclusion
So, you’ve learned how to remove a bicycle sprocket. It may seem like a daunting task, but with the right tools and a bit of patience, it can be done easily.
Remember to gather all the necessary tools before starting. Remove the rear wheel, use a chain whip to hold the sprocket in place, and finally, use a cassette lockring tool to remove the sprocket itself.
But, let’s investigate the truth of a theory that many cyclists may have heard – that removing the sprocket can improve your bike’s performance. While it may seem logical that removing weight from your bike could make it faster, the truth is a bit more complicated.
In fact, removing the sprocket could actually have a negative impact on your bike’s performance, as it can affect the chain tension and gear ratios. Ultimately, the decision to remove a sprocket should be based on personal preference and specific riding needs.
It’s important to remember that any modifications to your bike should be done carefully and with consideration for the overall impact on its performance. So, while removing a sprocket may not necessarily make you faster, it’s still a useful skill to have in your arsenal of bike maintenance knowledge.