For someone who loves biking, finding rust on your cherished bicycle is incredibly aggravating. Rust not only diminishes the visual attractiveness of your bike but can also undermine its strength and durability, potentially resulting in safety risks.
But fear not, with the right tools and techniques, removing rust from your bike can be an easy and rewarding process.
In this article, I will guide you through the steps to remove rust from your bike in a methodical and precise manner. From inspecting your bike for rust to preventing future rust formation, I will provide you with the knowledge and tools necessary to restore your bike to its former glory.
So, grab your tools and lets get started!
Key Takeaways
- Rust can compromise the structural integrity of a bike and pose safety hazards.
- There are different levels of rust and corresponding removal techniques, ranging from sandpaper and steel wool to rust converter or professional restoration.
- Preventative measures should be taken to avoid future rust formation, such as regular cleaning, storage in a dry location, and the use of rust inhibitors or protective coatings.
- Regular maintenance is important for keeping a bike in top shape, including inspecting tools and materials, avoiding harsh chemicals, drying the bike thoroughly, and regularly checking and lubricating the chain.

Kryptonite Folding Bike Lock, Compact Lightweight High Security Anti-Theft Foldable Bicycle Lock with 2 Keys and Mount for E-Bikes Scooter Road Mountain Bikes, 88.4cm (34.8 in)
HIGH-SECURITY DESIGN: This Anti-Theft folding bike lock is made from 3mm hardened steel bars with tightened rivets for...
As an affiliate, we earn on qualifying purchases.
Gather Your Tools and Materials
Gather all the tools and materials you’ll need before you start removing rust from your bike. You’ll need a few basic items, including a wire brush, sandpaper, rust remover, a rag, and some lubricant. It’s also helpful to have some rubber gloves to protect your skin from the chemicals in the rust remover.
Before you get started, take a moment to inspect your tools to make sure they’re in good condition. A rusty wire brush won’t be very effective at removing rust, so make sure your tools are well-maintained. Additionally, consider using some rust prevention techniques to keep your bike rust-free in the future.
This might involve applying a rust inhibitor or storing your bike in a dry place when it’s not in use. With your tools and materials prepped and your bike inspected for rust, you’re ready to start removing rust from your bicycle.

Seatylock FoldyLock Compact Folding Bike Lock - Award Winning Patented Lightweight High Security Bicycle Lock - Heavy Duty Anti Theft Smart Secure Guard with Keys & Case for Bikes or Scooters
TOP RATED LIGHTWEIGHT COMPACT BIKELOCK - Best Light Weight Folding Bike Lock. Portable Solid Key Bike Lock Protects...
As an affiliate, we earn on qualifying purchases.
Inspect Your Bike for Rust
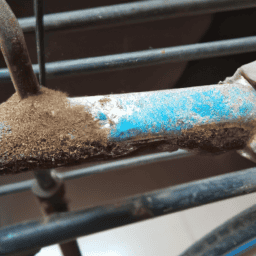
Before you start, take a good look at your trusty two-wheeler and see if any unsightly patches of orange have taken hold. It’s essential to identify the areas where rust has formed so that you can focus your efforts on removing them. Common rust spots on a bike include the chain, handlebars, pedals, and rims.
To determine the severity of the rust, you can use a simple table to classify the rust spots on your bike. The following table outlines the different levels of rust and the corresponding rust removal techniques. Knowing the right technique to use will help you remove rust effectively and prevent further damage to your bike. Once you have identified the rust spots and determined the appropriate technique to use, you can move on to the next section and remove the rust from your bike.
| Rust Level | Rust Description | Rust Removal Technique |
|---|---|---|
| Level 1 | Minimal surface rust | Sandpaper or steel wool |
| Level 2 | Slightly deeper rust | Metal polish and a cloth |
| Level 3 | Pitted rust | Rust converter or rust dissolver |
| Level 4 | Deep rust with metal corrosion | Replacement or professional restoration |
Removing rust from your bike may seem like a daunting task, but by following the right techniques, you can restore your bike to its former glory.

RAINCORE Light Weight Bike Cable Lock for Heavy Duti Anti Theft - 39inch (100cm) - 0.33lb (151g) - Bike Chain Lock with Chain Cutter Proof Fiber - Patented Korea - Security Cable (39 inches)
Crafted from patented Korean bulletproof fiber our cable is more flexible than steel chains Perfect for your kids...
As an affiliate, we earn on qualifying purchases.
Remove Rust from Your Bike
As I’m examining my bike, I notice that the rust has penetrated deep into the metal, making it difficult to restore the original shine and luster. However, with the right tools and techniques, rust removal can be a DIY project that’ll save money and extend the life of the bike.
Here are four steps to remove rust from your bike:
- Use a wire brush or sandpaper to remove any loose rust from the affected areas.
- Apply a rust remover solution to the rusted parts, following the manufacturer’s instructions carefully.
- Let the solution sit for the recommended amount of time, then scrub the area with a wire brush or steel wool.
- Rinse the areas with water and dry thoroughly.
In addition to knowing how to remove rust from your bike, it’s important to take steps to prevent future rust formation. This includes regular cleaning, storing the bike in a dry location, and applying a rust inhibitor or protective coating to vulnerable areas.

Seatylock FoldyLock Compact Folding Bike Lock - Award Winning Patented Lightweight High Security Bicycle Lock - Heavy Duty Anti Theft Smart Secure Guard with Keys & Case for Bikes or Scooters
TOP RATED LIGHTWEIGHT COMPACT BIKELOCK - Best Light Weight Folding Bike Lock. Portable Solid Key Bike Lock Protects...
As an affiliate, we earn on qualifying purchases.
Prevent Future Rust Formation
To keep your trusty two-wheeled steed looking its best, it’s imperative that you shield it from the elements with a protective layer that acts as a coat of armor, keeping the metal safe from harm. Choosing the proper lubricant is key to preventing rust formation. Look for a lubricant that is specifically made for bicycles and can withstand harsh weather conditions. Apply the lubricant to all moving parts, such as gears and chains, to protect them from moisture and rust.
Cleaning and drying your bike after rainy rides is also crucial to prevent rust formation. Use a gentle soap and water to clean your bike, avoiding harsh chemicals that can damage the metal. After cleaning, make sure to dry your bike thoroughly with a clean towel, paying special attention to the hard-to-reach areas. By taking these preventative measures, you can ensure that your bike stays rust-free and in top condition for years to come. Enjoy your newly restored bike!
Enjoy Your Newly Restored Bike!
Now that your bike’s been restored and protected from future damage, it’s time to hit the road and enjoy the ride with peace of mind.
However, to ensure that your newly restored bike stays in top shape, there are a few tips for bike maintenance that you should keep in mind.
Firstly, it’s important to regularly clean your bike, especially after a ride in wet or muddy conditions. This can be as simple as wiping down the frame, wheels, and other components with a dry cloth or using a gentle cleaning solution.
Additionally, make sure to regularly check and lubricate your bike’s chain, as a dry or rusty chain can cause unnecessary wear and tear on your bike’s drivetrain.
Finally, don’t be afraid to get creative with your bike after removing rust. Whether it’s adding colorful accessories or customizing the frame with a new paint job, there are plenty of ways to make your bike uniquely yours.
Frequently Asked Questions
Are there any safety precautions I should take when removing rust from my bicycle?
When working with rust removal, I always suit up in protective gear and ensure proper ventilation. It’s like going to battle, where I need to protect myself and be strategic in my actions.
Can I use regular household items to remove rust from my bike?
Yes, I have found that the baking soda method or vinegar method can effectively remove rust from my bike. By following the proper steps, I have been able to restore the appearance and functionality of my bicycle.
How often should I inspect my bike for rust?
Oh, sure, let me just add "inspect bike for rust"to my list of fun activities. But to answer your question, rust prevention is key. Regular cleaning and dry storage are effective measures. Signs of rust damage include discoloration and roughness. Address promptly to avoid further damage.
Is there a specific type of lubricant I should use to prevent rust formation?
The best lubricants for preventing bike rust are silicone-based or Teflon-based products. To apply, clean the bike thoroughly and evenly distribute the lubricant on all metal parts. Reapply every few months for optimal protection.
How can I tell if the rust on my bike is too severe to be removed?
Assessing rust severity on a bike involves checking for deep pitting, corrosion, and weakened structural integrity. If rust is too severe, seek professional rust removal services to avoid further damage.
Conclusion
Well, there you have it! Removing rust from a bicycle isn’t as daunting as it may seem.
By following the steps outlined in this article, you can restore your bike to its former glory and prevent future rust formation.
It’s important to remember that rust is a natural process that occurs when metal is exposed to oxygen and moisture. So, it’s important to regularly inspect your bike and take preventative measures, such as applying a protective coating or storing it in a dry place.
By taking care of your bike, you can extend its lifespan and ensure that it’s always ready for your next adventure.
Happy biking!