As someone who is passionate about cycling, I recognize the significance of maintaining my bicycle in pristine condition. Taking off the back wheel is one of the most essential aspects of its upkeep, whether that’s for a swift fix or an in-depth clean. Although this chore might appear intimidating to some, I can assure you it’s simpler than it looks.
Removing the rear wheel of a bicycle involves a few steps, but with the right tools and a bit of patience, anyone can accomplish it. In this article, I will guide you through the process of removing the rear wheel of your bike, from gathering the necessary tools to inspecting and repairing the wheel.
So, let’s get started and learn how to remove the rear wheel of a bicycle like a pro!
Key Takeaways
- Removing the rear wheel of a bicycle is a crucial maintenance task that requires specific tools such as a wrench and screwdriver.
- The process can be made easy with the right tools and patience, and involves flipping the bike over to access the rear wheel, loosening the chain tension, and lifting the wheel off the bike frame.
- It is important to clean and inspect the hub and bearings, as well as the tire and rim, for any damage or wear.
- Properly aligning and tightening the wheel, as well as testing for any issues with bearings or unusual noises, ensures a safe and smooth ride.
Gather the Necessary Tools
Before we can start removing the rear wheel of your bike, let’s make sure you have all the necessary tools. You’ll need a wrench and a screwdriver, with the type of wrench depending on the type of bicycle you have. If you have a road bike or a mountain bike, you’ll most likely need a 15mm wrench. However, if you have a BMX bike or a cruiser bike, you may need a different size wrench. It’s important to check your bike’s manual or consult a professional to ensure you have the correct size.
In addition to the wrench, you’ll also need a screwdriver to remove any bolts or screws that are holding the wheel in place. It’s important to have these tools on hand not just for removing the rear wheel, but also for essential bicycle maintenance. Regularly checking and tightening bolts and screws can prevent accidents and prolong the life of your bike.
Now that we have all the necessary tools, let’s move on to preparing the bike for wheel removal.
Prepare the Bike
First things first, it’s important to get your ride in the right position for easy maintenance. Start by checking the tire pressure and making sure it’s at the recommended level. This will help prevent any damage to the rims or spokes during the process.
Next, give your bike a thorough cleaning to remove any dirt or debris that may have accumulated on the frame, chain, and cassette.
Once you’ve completed these steps, flip the bike over onto its handlebars and seat. This will allow you to easily access the rear wheel and prepare it for removal.
With the bike in this position, you can now move on to the next step of removing the rear wheel.
Remove the Rear Wheel
Now that you’ve got your trusty steed perched upside down like a bat hanging from a cave ceiling, it’s time to loosen up that back end and set it free from the rest of the bike.
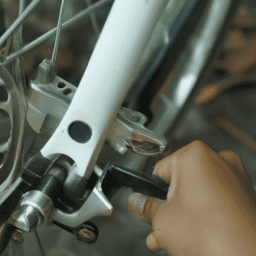
First, locate the quick-release lever or nuts that hold the wheel in place. Depending on your bike, there may be one or two nuts holding the wheel on. If you have a quick-release lever, flip it open. If you have nuts, use a wrench to loosen them.
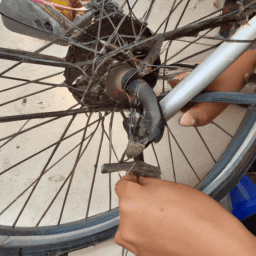
Once the nuts or lever are loose enough, slide the wheel slightly forward or backward to loosen the chain tension. Then, lift the wheel up and off the bike frame.
If you don’t have a quick-release lever or nuts, you may need to remove the axle from the bike frame by unscrewing it. This requires a bit more work, but it’s still doable by the average cyclist.
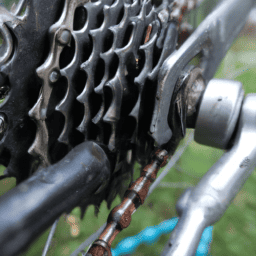
Once you have the wheel off, take a moment to clean and inspect the hub and bearings. If there’s any dirt or debris, wipe it away with a clean cloth. If the bearings feel gritty or rough, it may be time for some rear wheel maintenance.
Before reinstalling the wheel, make sure to inspect the tire and rim for any damage or wear.
With your wheel removed, it’s time to move on to the next step: inspect and repair the wheel.
Inspect and Repair the Wheel
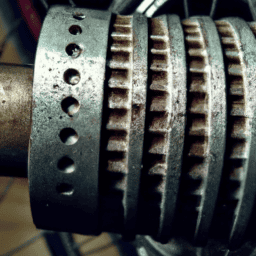
Once you’ve got the wheel off, take a closer look at the hub and bearings to see if they need any attention. Common issues with the rear wheel include loose spokes, worn bearings, and a bent axle.
To diagnose these problems, spin the wheel and listen for any unusual sounds or wobbles. Check the spokes to make sure they’re all tight and evenly tensioned. If the bearings feel gritty or don’t spin smoothly, they may need to be repacked or replaced. A bent axle can cause the wheel to wobble or rub against the frame, and may need to be straightened or replaced.
If you encounter any of these issues, don’t worry – there are troubleshooting tips that can help. For loose spokes, use a spoke wrench to tighten them evenly around the wheel. For worn bearings, remove the old ones and replace them with new ones, making sure to pack them with fresh grease. If the axle is bent, you can try to straighten it using a vice or pliers, or take it to a bike shop for professional repair.
Once you’ve inspected and repaired the wheel, you’re ready to reinstall it onto the bike frame.
Reinstall the Rear Wheel
Now that I’ve removed the rear wheel of my bicycle, it’s time to reinstall it.
The first step is to align the wheel properly with the brake pads and the frame.
Once aligned, I’ll tighten the axle nuts to secure the wheel in place.
Finally, I’ll test the wheel to ensure that it spins smoothly and that there are no wobbles or rubbing against the brake pads.
Align the Wheel
To get the wheel aligned properly, you should adjust it slowly, like a surgeon performing a delicate operation.
First, make sure the wheel is centered within the frame by checking the distance between the tire and the frame on both sides. If the wheel isn’t centered, adjust the spokes on the appropriate side until it is.
Next, check the alignment of the wheel with the brake pads. If the wheel isn’t centered between the brake pads, adjust the spokes on the side where the wheel is closer to the brake pad until it’s centered. If the wheel rubs on the brake pads when it’s spinning, adjust the spoke tension until the rubbing stops.
These wheel alignment tips will help you avoid common alignment issues and ensure that your wheel is running smoothly. Now, let’s move on to tightening the axle nuts.
Tighten the Axle Nuts
You’re almost finished with the wheel alignment process, so it’s time to make sure the axle nuts are tightened securely. Proper tightening techniques are crucial to ensure that the wheel stays in place during your ride. Here’s a table outlining the torque specifications for common axle sizes:
| Axle Size | Torque Specification |
|---|---|
| 9mm | 30-40 Nm |
| 10mm | 40-50 Nm |
| 12mm | 50-70 Nm |
| 15mm | 70-100 Nm |
It’s important to note that over-tightening the axle nuts can cause damage to the wheel or hub, while under-tightening can lead to the wheel coming loose while riding. Common mistakes to avoid include using pliers or a wrench on the quick release lever, which can damage it or cause it to slip. It’s also important to avoid using excessive force when tightening the nuts, as this can lead to damage to the threads or the axle itself.
Now that the axle nuts are tightened to the correct specification, it’s time to test the wheel to ensure it’s secure and aligned properly.
Test the Wheel
After ensuring the axle nuts are properly torqued, it’s crucial to test the alignment and stability of the wheel before riding. Checking balance is an important step to ensure that the wheel is properly aligned and functioning.
Start by placing the bike on a level surface and spinning the wheel. If the wheel wobbles, it may indicate an issue with the alignment. Check the spokes and make any necessary adjustments to straighten the wheel.
Next, troubleshoot any issues with the wheel. If there’s excessive play in the bearings, they may need to be adjusted or replaced. If the wheel is making unusual noises, it may indicate a problem with the hub or bearings.
Inspect these parts and make any necessary repairs before riding. By testing the wheel and addressing any issues, you can ensure a safe and smooth ride.
Frequently Asked Questions
How do I know if the rear wheel needs to be removed?
To inspect the rear wheel for damage, check for any wobbling or misalignment. Troubleshoot common issues such as loose spokes or a worn-out cassette. Proper maintenance can prevent the need for removal.
Can I remove the rear wheel without a bike stand or workbench?
For DIY bike repair, removing the rear wheel without a bike stand or workbench is possible. Lift the bike onto its handlebars and saddle, shift to the smallest cog, release the brake, and unscrew the quick-release skewer.
Do I need to remove the cassette or freewheel when removing the rear wheel?
Coincidentally, I recently had to remove my rear wheel and faced the same dilemma. The pros and cons of removing the cassette vs freewheel depend on your bike’s setup. To avoid damage when removing a stubborn cassette/freewheel, use a chain whip and cassette lockring tool.
What should I do if the quick release lever is too tight or too loose?
To adjust tension on a quick release lever, make sure it is fully closed. Then, use a 5mm Allen key to loosen the bolt on the non-lever side. Lubricate the lever and tighten the bolt until there is sufficient tension.
How do I adjust the rear derailleur after reinstalling the wheel?
To adjust gears properly after reinstalling the rear wheel, first check the alignment of the derailleur and ensure it’s not bent. Then, shift through all gears to find the right gear ratio. Lastly, fine-tune the derailleur using barrel adjusters until shifting is smooth.
Conclusion
In conclusion, removing the rear wheel of a bicycle is a task that requires patience, attention to detail, and the right tools. It resembles the delicate process of untangling a knot in a string, where one wrong move can cause more damage than good. However, with the proper steps and techniques, anyone can successfully remove and repair their rear wheel.
As I reflect on the process of removing the rear wheel, I’m reminded of the intricate workings of a clock. Each piece serves a purpose and must be handled with care to ensure the clock runs smoothly. Similarly, every part of the bike must be inspected and maintained regularly to ensure optimal performance.
By following the steps outlined in this guide, you’ll not only be able to remove and repair your rear wheel but also gain a deeper understanding of how your bike works. So, grab your tools and get ready to tackle this challenge with confidence!