Giving your bicycle a new coat of paint can transform its appearance and vibe. Having repainted numerous bicycles myself, I can assure you that the process is easier than it appears. Equipped with the appropriate equipment, materials, and a touch of patience, you can revitalize your old bicycle with a new beginning.
The first step in repainting a bicycle is choosing the right type of paint. There are many options available, from spray paints to brush-on paints, and each has its pros and cons.
Once you’ve selected the paint, you need to prepare the surface of the bike by removing the old paint, cleaning the frame, and sanding it down. Then, you can apply the paint, add custom touches, and reassemble the bike.
In this article, I’ll guide you through each step of the process, so you can repaint your bicycle with confidence.
Key Takeaways
- Choosing the right type of paint is crucial for achieving the desired look and durability.
- Proper preparation, including removing old paint and rust, and cleaning the surface, is important for a smooth finish.
- Spray painting is faster and easier for an even application, while brush painting allows for more precision and a thicker coating.
- Reassembling the bike carefully and correctly, with attention to torque specifications, is important for a safe and functional ride.
Choose the Right Type of Paint
You don’t want to end up with a cheap, chipped paint job – make sure you’re choosing the right type of paint for your ride!
When it comes to repainting a bicycle, there are a few things to consider. First, decide whether you want to use spray or brush application. Spray painting is faster and easier, but requires more skill to execute properly. Brush painting is more time-consuming, but allows for more precision and control.
Another consideration is whether you want a matte or glossy finish. Matte paint looks more understated and hides imperfections better, while glossy paint gives a more polished and eye-catching look. Keep in mind that glossy paint can show more scratches and imperfections, so it may require more maintenance.
Once you’ve decided on your preferred application method and finish, you’re ready to move on to preparing the surface.
Prepare the Surface
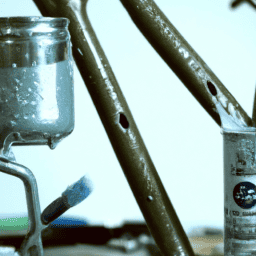
First, make sure that all the rust and old paint has been completely removed from the frame and any other parts you plan on painting to achieve a smooth surface that will make your new paint job look incredible. Using sandpaper, start by removing any stubborn rust or old paint from the frame, handlebars, and any other areas you plan on painting. It’s important to be thorough and remove all of the old paint to ensure that your new paint job will adhere correctly.
Once you’ve sanded down the frame and other parts, use a clean cloth and a mild cleaning solution to thoroughly clean the surface. You want to make sure that there is no debris or dirt on the surface before painting to ensure a smooth finish. I recommend using a degreaser to remove any oil or grease that may be present on the surface. Cleaning the surface is a crucial step in preparing your bike for a new coat of paint, so don’t skip this step!
Now that the surface is cleaned and prepped, it’s time to move on to applying the paint. But before that, it’s important to ensure that you have all the necessary tools and paint materials for the job.
Apply the Paint
To paint your pedal-powered ride in a pleasingly pristine way, pick up a paintbrush and start applying the paint. Before you begin, consider the method of application: spray or brush. Spray application can be faster and more even, but it requires more equipment and may not be practical for small or intricate areas. Brush application may take longer and require more precision, but it can result in a thicker, more durable coating.
When applying the paint, start with a thin, even coat and work your way up to a thicker layer. This will prevent drips and ensure an even coating. Pay close attention to corners and edges, where drips and uneven coating are more likely to occur. If you do notice drips or uneven coating, use a brush or roller to smooth them out before they dry.
With these tips, you’ll be on your way to a freshly painted bicycle in no time.
For those who want to add custom touches, there are plenty of options available. From decals and stencils to hand-painted designs, there are endless ways to make your bicycle uniquely yours.
Add Custom Touches
Get creative and personalize your ride with unique custom decals, stencils, or a hand-painted design to make your bike stand out from the rest. There are many painting techniques you can use to achieve the look you want. One popular method is to use custom vinyl decals, which can be purchased online or created with a vinyl cutter. Simply apply the decal to the desired area of the bike, following the instructions provided with the decal.
Another option is to create your own stencils and use them to paint custom designs onto your bike. This requires a bit more skill and patience, but the results can be stunning. To create a stencil, simply draw your design onto a piece of cardstock or plastic, then cut out the design using a sharp utility knife. Once you have your stencil, use spray paint or acrylic paint to transfer the design onto your bike. Experiment with different colors and designs until you find the perfect look for your ride.
Now that you have added your custom touches to your bike, it’s time to reassemble it and take it for a spin.
Reassemble the Bike
Now that I’ve repainted my bicycle, it’s time to reassemble it.
The first step is to allow the paint to dry completely. This is important to ensure that the paint doesn’t get damaged during the reassembly process.
Once the paint is dry, I can reattach any parts that were removed, such as the wheels, pedals, and handlebars.
Finally, I can enjoy my newly painted bike and take it for a spin!
Allow the Paint to Dry Completely
Once the paint’s applied, you’ll need to be patient and let it dry completely before moving on to the next step in repainting your bicycle. The benefits of patience can’t be overstated when it comes to allowing the paint to dry. Rushing the process can lead to smudging, smearing, or even damage to the paint job.
Therefore, it’s important to give the paint enough time to dry completely, which typically takes at least 24 hours. Proper ventilation is also critical during the drying process. This ensures that the paint dries evenly and doesn’t become damaged by moisture or other environmental factors.
To ensure proper ventilation, consider opening windows or using fans to circulate air around the bike. Additionally, avoid touching or moving the bike until the paint has completely dried. Once the paint has dried, it’s time to reattach any parts that were removed, such as the wheels or pedals, to complete the repainting process.
Reattach Any Parts That Were Removed
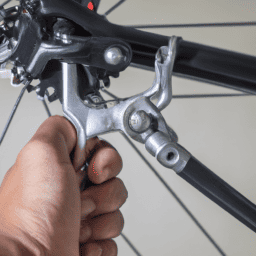
Before you know it, you’ll be back on the road with your newly painted ride, but first, don’t forget to put the finishing touches on by reattaching all the parts that were taken off during the painting process. It’s important to take your time and make sure everything is properly reattached to ensure a safe and functional ride. Here are some reattaching tips to help you get started:
First, make sure all the parts are clean and free of any debris or old paint residue. This can be done by using a degreaser and a clean cloth. Then, refer to your notes or photos from the disassembly process to help guide you in the reattachment of each part. Take extra care with any bolts or screws to ensure they are tightened to the correct torque specifications. Once everything is reattached, give your bike a final once-over to make sure nothing was missed. With all the parts securely back in place, you’re ready to enjoy your newly painted bike!
Enjoy Your Newly Painted Bike!
Get ready to cruise in style with your freshly painted ride! Repainting your bicycle comes with numerous benefits, such as giving it a fresh and updated look. It also helps to protect the frame from rust and other corrosion.
The process of repainting a bike may seem daunting, but with the right tools and patience, it’s definitely achievable. One important thing to consider before repainting your bike is choosing a color scheme that suits your style and personality. You can opt for a bold and vibrant color or a classic and timeless one. Whatever color scheme you choose, make sure it complements the overall look of your bike.
Once you have chosen your color scheme, it’s time to start painting. Remember to follow the proper steps and use the correct type of paint for your bike’s frame material. Take your time and apply several thin coats, allowing each coat to dry completely before applying the next one.
When the painting process is complete, reattach any parts that were removed and give your bike a final inspection. With your newly painted bike, you’ll be able to cruise the streets in style and turn heads along the way.
Enjoy your newly painted bike!
Frequently Asked Questions
Can I use regular car paint for my bike?
Oh sure, using regular car paint for your bike is a fabulous idea. Car paint alternatives? Who needs ’em! Just ignore the fact that it’s heavier, less flexible, and prone to chipping. Pros and cons of using car paint for bikes? None whatsoever.
Do I need to remove all the old paint before repainting?
To ensure a smooth and lasting finish, removing all old paint is recommended. Sandblasting or chemical stripping are effective methods. Benefits of repainting a bike include protection from rust and a fresh, personalized look.
How long should I wait before riding my bike after repainting?
After repainting my bike, I wait for proper drying time and favorable weather conditions before riding. Maintenance after repainting is important to prevent any damage.
Can I use spray paint instead of brush-on paint?
I prefer using spray paint over brush-on paint for repainting my bike. Spray paint is faster and easier to apply, but can result in a less even finish. Some of the best spray paint brands for bike repainting include Rust-Oleum and Krylon.
What kind of protective gear should I wear while painting my bike?
When painting my bike, I always wear appropriate clothing, like a long-sleeved shirt and pants, to protect my skin from paint. Eye protection is also important. I use safety glasses or goggles to keep my eyes safe from paint splatters.
Conclusion
Phew! After hours of hard work, my bicycle looks as good as new! Repainting a bicycle is a fun and exciting project for anyone who loves their two-wheeler.
The process can be daunting, but with the right tools and a bit of patience, you can achieve a professional finish.
In conclusion, repainting a bicycle is not for the faint-hearted. It requires a lot of attention to detail and patience. But, the end result is worth all the effort. You’ll have a bike that looks brand new and stands out from the crowd.
So, if you’re up for a challenge and want to make your bicycle look fabulous, give it a go! Trust me; you won’t be disappointed.