
Do you want to take off your bike’s crank but are unsure how to begin? Fear not, armed with the proper tools and a little bit of instruction, you can smoothly take the crank off your bicycle on your own. Taking off the crank is an essential step when you’re doing regular upkeep on your bicycle or when you’re swapping out components.
In this article, we’ll walk you through step-by-step instructions on how to remove your bicycle crank. Before we dive into the process, it’s important to gather the necessary tools and prepare your bike. You’ll need a bike stand or a way to elevate your bike, a crank puller tool, a wrench, and some grease.
Once you have these tools ready, you can begin the process of removing your bicycle crank. Follow the steps carefully to ensure a seamless removal process and to avoid any damage to your bike.
Key Takeaways
- Proper tools and technique are necessary to loosen crank bolts and use a crank puller tool to remove the arms from the bottom bracket.
- Attention to torque settings is crucial to avoid damage to the bike.
- Neglecting maintenance can lead to premature wear and damage, while regular maintenance can save money in the long run.
- Installing a new crankset requires proper tools and equipment, and compatibility with the bike’s bottom bracket and chainring size should be checked.

ROCKBROS Bike Multitool Lightweight 16-in-1 MTB Bicycle Multitool Compact Portable Bike Repair Tool Kit With Allen Wrench, Tire Levers-1 Pack
16-in-1 Bike Multitool: Includes essential repair tools for everyday use: ① Allen wrenches: 2 / 2.5 / 3...
As an affiliate, we earn on qualifying purchases.
Gather the Necessary Tools
You’ll need a few tools to get started, but once you have them, removing your bicycle crank will be a breeze.
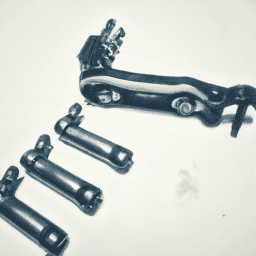
First, you’ll need a crank puller tool, which is specifically designed to remove the crank from the bottom bracket spindle. Make sure to invest in a high-quality tool, as proper tool maintenance is crucial for optimal performance.
Secondly, it’s important to pay attention to the torque settings when removing your bicycle crank. Torque is the amount of force required to tighten or loosen a bolt, and it’s critical to follow the manufacturer’s recommended torque settings. This will ensure that you don’t damage any of the components of your bike.
With the right tools and proper attention to detail, removing your bicycle crank will be a straightforward process. Now, let’s move onto preparing your bike for the crank removal.

PXZBLG Bike Repair Kit, Bike Frame Bag with 1.6L Capacity, Waterproof Tube Bag Compatible Phone Under 7”, 16-in-1 Bike Multitool, Bicycle Tire Repair Kit, 4mm and 5mm Allen Wrenches
【High Sensitive Touch Screen】- Bike frame bag is designed with a high-sensitivity and HD transparent film, which provides...
As an affiliate, we earn on qualifying purchases.
Prepare Your Bike
Before getting started, make sure your bike is ready to have its crank taken off by giving it a thorough inspection. This is important to ensure that the process goes smoothly and there are no issues or damages to the bike. Firstly, inspect the bearings of the bike. Check for any wear and tear, and make sure they are still in good condition. If there are any signs of damage or wear, it is recommended to replace them before proceeding with removing the crank.
Additionally, it is important to check the chain wear of the bike. If the chain is worn out, it could cause issues when removing the crank. A worn-out chain can also cause damage to the chainrings, which could result in the need for expensive repairs. To check the chain wear, use a chain wear gauge or ruler. If the chain wear is beyond the recommended limit, it is best to replace the chain before proceeding with removing the crank. Once you have inspected the bearings and checked the chain wear, you can move on to loosening the crank bolts.
Without further ado, it’s time to loosen the crank bolts.

Chumxiny Bike Repair Kit Contains 16-in-1 Tool, 120Psi Mini Bicycle Pump, Tire Patch, Used for Mountain/Road Bike.(Blue)
Bicycle Repair Bag: With aluminum alloy mini bicycle pump, trachea, 2* screws, tire patch, 3*stainless steel bicycle levers,...
As an affiliate, we earn on qualifying purchases.
Loosen the Crank Bolts
Now that your bike is primed and ready, it’s time to give those crank bolts a little wiggle. Loosening the crank bolts is the first step towards removing your bicycle crank.
To do this, you’ll need the right tools and proper technique. Firstly, identify the type of crank bolts on your bike. Different types of crank bolts require different tools to loosen them. Some common types of crank bolts include hex bolts, Torx bolts, and self-extracting crank bolts.
Once you’ve identified the type of crank bolts, use the correct tool to begin loosening them. Be sure to apply even pressure and avoid overtightening or undertightening the bolts. One common mistake is to use the wrong tool, which can damage the bolts or the tool itself. By using the proper technique and tool, you can easily loosen the crank bolts and move onto the next step of removing the crank.
With the crank bolts loosened, you’re now ready to remove the crank.

Topeak Ratchet Rocket Lite DX Bike Repair and Maintenance Tool, 16 Functions, Includes Nylon Bag, Black
Fine tooth ratchet mechanism with reverse lever and thumb wheel
As an affiliate, we earn on qualifying purchases.
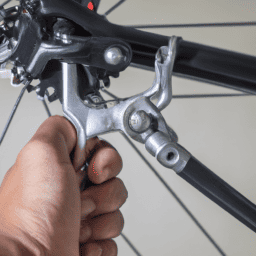
Remove the Crank
To get the job done, it’s time to take the next step and detach the arm from the bottom bracket. This requires proper technique and safety measures to avoid any damage to your bike or injury to yourself. Here are the steps you need to follow:
-
Use a crank puller tool: This tool is specifically designed to remove cranks from the bottom bracket without causing any damage to the bike. Make sure to select the right size of the tool that fits your crankset.
-
Remove the dust cap: If your bike has a dust cap, take it off using a flathead screwdriver or any other appropriate tool.
-
Insert the crank puller tool: Insert the tool into the crank arm and tighten it until it’s snug.
-
Turn the tool: Turn the tool clockwise until the crank arm comes off the bottom bracket spindle.
-
Repeat the process: Repeat the same process for the other crank arm.
After removing the cranks, it’s time to reassemble your bike. This involves putting everything back together in the reverse order of the steps you followed to remove the crank.
Reassemble Your Bike
Now that you’ve successfully removed the crank from your bike, it’s time to reassemble it.
One important step is to clean and lubricate the bottom bracket. This will ensure that your bike runs smoothly and efficiently.
If you’re also installing a new crankset, make sure to follow the manufacturer’s instructions carefully to ensure proper installation.
Remember, attention to detail is key in ensuring your bike runs at its best.
Cleaning and Lubricating the Bottom Bracket
Regular cleaning and lubrication of the bottom bracket can significantly extend the lifespan of your bicycle’s crankset. Neglecting this maintenance can lead to premature wear and even damage to the crankset. It’s important to use proper lubricants to ensure maximum protection against dirt and moisture.
Here are three benefits of regular maintenance and the importance of using the right lubricants:
-
Reduced friction: Lubricating the bottom bracket reduces friction between the crankset and the bearings, resulting in a smoother pedal stroke and improved performance.
-
Protection against corrosion: Moisture and dirt can cause rust and corrosion on the bottom bracket, leading to damage and failure. Regular cleaning and lubrication can help prevent this.
-
Longer lifespan: Well-maintained cranksets can last up to five times longer than those that are neglected. Regular maintenance can save you money in the long run by delaying the need for costly replacements.
Cleaning and lubricating the bottom bracket is an essential part of bike maintenance that shouldn’t be overlooked. Once you’ve completed this step, you can move on to installing the new crankset (if applicable).
Installing the New Crankset (if applicable)
Before you begin installing the new crankset, make sure you have the proper tools and equipment to ensure a successful installation and optimal performance. Check that the new crankset is compatible with your bike’s bottom bracket, and that the chainring is the right size for your riding needs.
It’s important to have a torque wrench to properly tighten the bolts on the crankset to prevent over-tightening or under-tightening, which can cause damage or failure.
When installing the new crankset, it’s crucial to ensure proper alignment. The crank arms should be parallel to the chainstays, and the chainring should be centered between the front derailleur and the frame. Use a chainring alignment tool if necessary to make sure the chainring is perfectly straight.
Double check that all components are properly tightened and secured before taking your bike out for a ride. By following these steps, you can successfully install a new crankset for optimal bike performance.
Frequently Asked Questions
How often should I remove and clean my bicycle crank?
To maintain optimal performance, it’s recommended to clean your bicycle crank regularly. Benefits of regular crank maintenance include smoother shifting and longer-lasting components. Best cleaning methods for bike cranks involve using degreaser and a brush to remove dirt and grime buildup.
Will removing the crank affect the bike’s performance in any way?
Removing the crank can affect durability if done improperly. Use a crank puller to avoid damaging the bottom bracket. Reinstall correctly to prevent play or wobbling. Proper technique ensures optimal performance.
Can I use regular household tools to remove the crank or do I need specialized tools?
Contrary to popular belief, removing a bike crank doesn’t require specialized tools. With a few household tools, you can easily remove the crank. Tips for beginners include proper positioning and using the correct tools.
How can I tell if my bike’s crank is damaged and needs to be replaced?
To determine if your bike’s crank needs replacing, look for signs of damage such as cracks, bends, or excessive wear. Replacement options include purchasing a new crankset or individual components. Consult a bike mechanic for assistance.
Is there a particular brand or type of crank that is easier to remove than others?
When it comes to crank removal, there is no particular brand or type that is easier to remove than others. Best practices include using a crank puller and avoiding common mistakes like stripping the threads.
Conclusion
Congratulations! You’ve successfully removed your bicycle crank! Think of it like a puzzle – each step is important and must be done with care. Just as you wouldn’t force a puzzle piece into the wrong spot, you shouldn’t force any part of your bike during the removal process.
Remember, safety is key. Always wear protective gear and follow the instructions carefully.
And just like a puzzle, reassembling your bike is just as important as taking it apart. Take your time and make sure everything is back in its proper place before taking your bike for a spin.
With these steps, you’ll be able to confidently remove and reattach your bicycle crank like a pro.