As an experienced bike rider, I understand that changing the chain is crucial for bike maintenance. Similar to the gears of a clock, the chain plays a vital role in the bike’s operation, facilitating smooth and effective movement. With prolonged usage, the chain becomes worn, resulting in decreased power, gear slippage, and potentially a broken chain. Mastering the skill of replacing a bike chain can help you save both time and money, while keeping your bike in prime condition.
Replacing a bike chain may seem like a daunting task, but with the right tools and knowledge, it can be a quick and easy process. In this article, I will guide you through the steps of replacing your bike chain, including how to recognize when it’s time for a replacement, choosing the right replacement chain, removing the old chain, installing the new chain, and maintaining the new chain to ensure its longevity.
Whether you’re a seasoned cyclist or just starting, knowing how to replace your bike chain is an essential skill that will keep your bike running smoothly.
Key Takeaways
- Regular maintenance and cleaning can prolong the lifespan of a bike chain.
- Choosing the right replacement chain involves determining the correct length, understanding chain compatibility, and selecting the right speed.
- A chain tool is necessary for removing and installing a bike chain.
- Regularly replacing the chain can prevent decrease in shifting performance and even damage to other components.

WEIZE 700C Hybrid Bike for Adults, 14 Speed Road Bike, City Commuter Bicycle with Caliper Brakes, High-Carbon Steel Racing Adult Bike, Urban Adult Bicycle for Men and Women, White
Caliper brake system: The hybrid bike adopts a dual caliper brake design, making daily maintenance more convenient and...
As an affiliate, we earn on qualifying purchases.
Signs that Your Bike Chain Needs Replacing
If you’re feeling a lot of chain slippage or hearing a grinding noise when pedaling, it’s time to replace your bike chain. Neglecting the warning signs of a worn-out chain can lead to other problems, such as damaged gears, which will cost you more in repairs or replacement parts.
That’s why it’s important to perform regular maintenance on your bike and check the condition of your chain periodically to prolong its lifespan. The importance of maintenance cannot be overemphasized when it comes to bike chains.
Dirt, grime, and rust can cause your chain to wear out faster, so it’s essential to keep it clean and lubricated. Additionally, using the right lubricant for your chain and avoiding using too much can help prevent premature wear.
By taking the time to care for your chain, you can prolong its lifespan and save money in the long run. So, let’s move on to the next step and choose the right replacement chain for your bike.

AVASTA 700C Road Adult Step-Over Hybrid Bike Bicycle for Men Woman Male Female,Lightweight Aluminum Alloy Frame with 21-Speed Gearing for City Commuting,Dual Disc Brakes,19 inch Frame,Chameleon Grey
🚴♂️【Durable Aluminum Alloy Frame】This lightweight yet strong frame is built to last, offering a perfect balance of durability...
As an affiliate, we earn on qualifying purchases.
Choosing the Right Replacement Chain
When it comes to choosing the right replacement chain for my bike, I always make sure to keep these key points in mind:
- Determining the correct length
- Understanding chain compatibility
- Selecting the right speed
It’s important to measure the length of the old chain and match it with the new one to ensure a proper fit. I also take into consideration the manufacturer’s compatibility recommendations and choose a chain that matches the number of gears on my bike.
Determining the correct length
First, measure your old chain and use the same number of links to ensure the correct length for your new chain. You can use a chain checker tool to measure the wear on your old chain and determine if it needs to be replaced. If the wear is significant, it’s better to replace the entire chain rather than just a few links.
Once you have determined the correct length, you can remove the old chain using a chain tool and install the new chain. It’s important to ensure proper tensioning of the new chain to prevent it from slipping or skipping gears. To do this, follow these steps:
- Adjust the rear derailleur to the smallest cog and the front derailleur to the smallest chainring.
- Thread the new chain through the rear derailleur and around the smallest cog.
- Pull the chain taut and connect the ends using a chain tool.
- Check the tension by pushing down on the chain at the midpoint between the front and rear sprockets. The chain should move slightly, but not too much. Adjust the tension as necessary by moving the rear wheel forward or backward in the dropouts.
Now that you have determined the correct length and tension for your new chain, it’s important to understand chain compatibility with your bike’s drivetrain.
Understanding chain compatibility
Before purchasing a new chain, it’s important to understand chain compatibility issues. Different drivetrain manufacturers have their own specific chain designs that are intended to work optimally with their systems. Compatibility issues can arise if you don’t choose the right chain for your bike.
Chain wear is also an important factor to consider when selecting a new chain. As chains wear over time, they elongate and can no longer mesh properly with the gears, leading to poor shifting and other issues. Replacing the chain before it becomes too worn can help prevent compatibility issues and extend the life of your drivetrain.
With these factors in mind, it’s important to select the right speed when choosing a new chain.
Selecting the right speed
It’s crucial to choose the perfect speed for your bike’s drivetrain if you want to experience a smooth and efficient ride. Understanding gear ratios is essential in selecting the right speed for your bike.
The gear ratio is the relationship between the number of teeth on the front chainring and the rear cog. The higher the number of teeth on the front chainring or the lower the number of teeth on the rear cog, the harder it is to pedal, but the faster you can go. On the other hand, the lower the number of teeth on the front chainring or the higher the number of teeth on the rear cog, the easier it is to pedal, but the slower you’ll go.
Adjusting chain tension is also critical in ensuring a smooth ride. A loose chain can jump off the chainring or cassette, causing your bike to jerk and skip gears, while an overly tight chain can cause excessive friction, leading to premature wear and tear.
Choosing the right speed and adjusting the chain tension will help prolong the life of your new chain. Before we get into the process of removing the old chain, it’s essential to ensure that you have the right tools for the job.

Schwinn Wayfarer Hybrid Bike, 700c Mens and Womens Bike, 7-Speed Hybrid Bicycle, Retro Steel Frame, Front and Rear Linear Pull Brakes, Fenders, Cargo Space, Adult Bicycle
HYBRID BICYCLE: Ride in comfort and vintage style with the Wayfarer by Schwinn. With 700c wheels, this mens...
As an affiliate, we earn on qualifying purchases.
Removing the Old Chain
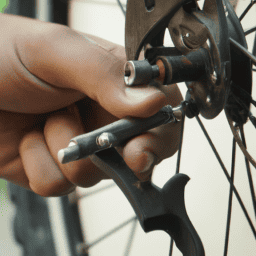
To remove the old chain, I’ll be using a chain tool specifically designed for this task. Firstly, I’ll position the tool on the chain’s pin and rotate it until the pin is pushed out.
Next, I’ll locate the quick link and remove it by pressing the link’s plates together while simultaneously sliding the link out of the chain.
Finally, I’ll clean the entire drivetrain thoroughly to ensure optimal performance of the new chain.
Using a chain tool
Using a chain tool is like performing surgery on your bike, carefully removing the damaged chain links and replacing them with fresh ones. It’s an essential tool for any cyclist who wants to perform chain maintenance or replace a worn-out chain.
Here are some tips to keep in mind when using a chain tool:
- Make sure to properly align the chain tool with the chain to avoid damaging either the tool or the chain.
- Start by loosening the pin on the link you want to remove, then use the chain tool to push the pin through the link until it pops out.
- Be careful not to push the pin all the way through the link, as it can be difficult to get it back in place.
- Before installing the new chain link, make sure to properly lubricate it to reduce friction and promote smooth operation.
One common mistake when using a chain tool is to apply too much force, which can bend or break the chain. Remember to work slowly and carefully, applying only enough force to push out the pin.
Once you have removed the damaged links and installed the new ones, you can move on to removing the quick link.
Removing the quick link
Once you’ve successfully performed chain surgery with your trusty chain tool, it’s time to tackle the quick link removal process.
First, it’s important to note that not all chains have quick links, so you’ll need to check if your chain has one. If it does, you’ll need to use pliers to squeeze the two plates of the quick link together while simultaneously pushing the link in the opposite direction of the chain. This will release the link from the chain.
It’s important to properly lubricate the chain after removing the quick link and before reusing it. This will ensure that the chain runs smoothly and lasts longer.
If you plan on reusing the quick link, make sure to inspect it for any damage or wear. If it looks good, you can use the same quick link to reconnect the chain. Otherwise, it’s best to replace the quick link to ensure the safety of your ride.
Now, let’s move on to cleaning the drivetrain.
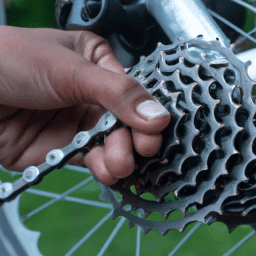
Cleaning the drivetrain
After successfully removing the quick link and inspecting it for damage, the next step is to thoroughly clean the drivetrain to ensure optimal performance.
Degreasing the chain is an important step in this process. To do this, I recommend using a degreaser that’s specifically designed for bicycle chains. Apply the degreaser to the chain and let it sit for a few minutes to allow it to penetrate the dirt and grease. Then, use a brush to scrub the chain thoroughly, making sure to get all the dirt and grime off.
In addition to degreasing the chain, it’s important to clean the rest of the drivetrain components, such as the cassette and chainrings. A good cleaning product for this is a biodegradable all-purpose cleaner. Apply the cleaner to a brush or rag and scrub the components thoroughly.
After cleaning, make sure to rinse everything off with water and dry it thoroughly before moving on to the next step of installing the new chain.
With the drivetrain now clean and free of dirt and grime, it’s time to move on to installing the new chain.

VEVOR Hybrid Bike, Lightweight Aluminum Frame Bike, 700c Wheel Men Women Hybrid Bicycle, Step-Over Adult Urban City Commuter Bikes, with 24-Speed Shimano Drivetrain, Alloy Adjustable Stem, Dual Brakes
Hybrid Bike: The bicycle is made with a lightweight aluminum alloy frame, offering durability and a weight capacity...
As an affiliate, we earn on qualifying purchases.
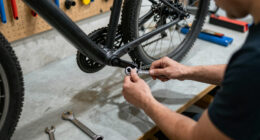
Installing the New Chain
To put on the new chain, start by threading it through the derailleur and around the cassette. Make sure the chain is the proper size for your bike by counting the number of gears on the cassette and matching it to the number of links in the chain. If the chain is too long, use a chain tool to remove links until it fits correctly. Once the chain is the right length, lubricate it with proper chain lubricant. This will help it move smoothly and prevent wear and tear.
When threading the chain, make sure it passes through the derailleur correctly. The chain should be on the smallest chainring and the smallest cog on the cassette. Once the chain is in place, use a chain tool to connect the ends of the chain together. Make sure the pin is fully inserted and that the chain is properly tensioned. Finally, test the new chain by shifting through all the gears to ensure it runs smoothly. With proper sizing and lubrication, your new chain should be a reliable component of your bike’s drivetrain for many miles to come.
To maintain your new chain, it is important to regularly clean and lubricate it. This will prevent wear and tear and ensure a longer lifespan for your chain.
Maintaining Your New Chain
Now that I’ve installed my new bike chain, it’s important to maintain it properly.
This means regularly cleaning and lubricating it to prevent rust and corrosion.
It’s also important to check for wear and tear, and replace the chain regularly to prevent damage to other bike components, such as the cassette or chainring.
By staying on top of these key maintenance tasks, I can ensure that my bike chain lasts longer and performs at its best.
Regular cleaning and lubrication
Maintaining your bicycle chain is like watering a plant – it needs regular attention to ensure it stays healthy and functions properly. One of the most important aspects of chain maintenance is lubrication. A well-lubricated chain reduces friction, prevents rust, and extends the lifespan of your bike’s drivetrain.
There are many types of lubricants on the market, but for most riders, a light oil or wax-based lubricant is sufficient. Avoid using thick or heavy lubricants as they can attract dirt and debris, leading to a dirty and noisy chain.
In addition to lubrication, regular cleaning is also essential for chain maintenance. Dirt, dust, and grime can accumulate on the chain, causing it to wear out faster and even damage other parts of the bike. There are many types of cleaning solutions available, including degreasers and chain cleaning brushes.
When cleaning your chain, be sure to remove all dirt and debris, and dry it thoroughly before applying lubricant. With proper lubrication and cleaning, your chain will function smoothly and reliably, ensuring a better cycling experience. Checking for wear and tear on your chain is the next step to keep your bike running smoothly.
Checking for wear and tear
When you ride your bike frequently, it’s important to keep an eye on how much your chain has worn down over time. Inspecting links should be part of your regular maintenance routine, and it’s a simple task that can help avoid bigger problems down the road.
Here are some things to look for when checking for wear and tear:
- Check for elongation: Over time, the pins and bushings on your chain will wear down, causing the chain to elongate. If your chain has elongated more than 1%, it’s time to replace it.
- Look for rust or corrosion: If your chain has been exposed to moisture or salt, it may start to rust or corrode. This can cause weak spots in the chain, leading to breakage.
- Check for kinks: Kinks in your chain can cause it to skip or even break. If you notice any kinks, it’s time to replace your chain.
- Measure chain wear: You can use a chain wear indicator tool, or simply measure your chain with a ruler. If your chain has stretched beyond the manufacturer’s recommended length, it’s time to replace it.
Inspecting your chain regularly can help you catch any issues before they become bigger problems. Remember to replace the chain regularly to prevent damage to other bike components.
Replacing the chain regularly to prevent damage to other bike components
Just like how a healthy heart is crucial for the overall well-being of your body, a well-maintained chain is vital for the smooth functioning of your bike’s components. As a cyclist, it is important to understand that the chain is one of the most critical parts of your bike. It is responsible for transferring power from the pedals to the wheels, and any wear and tear can lead to a decrease in performance and even damage to other components. Therefore, it is essential to replace the chain regularly to prevent chain wear and maintain the overall health of your bike.
To prevent chain wear, it is recommended to replace the chain every 2,000 to 3,000 miles or every six months, whichever comes first. Neglecting to replace the chain can lead to it stretching and causing damage to the cassette and chainrings. This can result in a decrease in shifting performance and even cause the chain to slip or skip gears. By regularly replacing the chain, you can prevent these issues and ensure that your bike is functioning at its best.
| Importance of Chain Maintenance | Benefits of Regular Chain Replacement | |||
|---|---|---|---|---|
| Prevents chain wear | Maintains overall health of bike | |||
| Increases performance | Prevents damage to other components | |||
| Improves shifting performance | Ensures smooth functioning of bike | Reduces risk of accidents | Protects the rider and others on the road |
Frequently Asked Questions
What tools do I need to replace a bicycle chain?
For bicycle chain maintenance, I need a chain tool, quick-link pliers, and a chain checker. Different types of bicycle chains may require specific tools. It’s important to have the right tools to ensure proper chain installation and performance.
How often should I replace my bicycle chain?
Ah, the age-old question of chain maintenance! As a seasoned cyclist, I can tell you that it’s wise to replace your chain every 2,000-3,000 miles to avoid wear and tear. Keep an eye out for signs of a worn out chain, such as skipping or slipping gears.
Can I replace my bicycle chain without removing the rear wheel?
Yes, I can replace my bicycle chain without removing the rear wheel. However, I must measure the chain length and use proper lubrication techniques to ensure smooth operation.
Are all bicycle chains the same size?
Like snowflakes, no two bicycle chains are the same. Chain compatibility is crucial, and chain length calculation is essential for optimal performance. A slight difference in size can cause problems, so be sure to choose the right chain for your bike.
What should I do if my new chain is skipping or slipping?
If my new chain is skipping or slipping, I troubleshoot by checking the cassette and chainrings for wear, as well as ensuring proper chain lubrication. It’s important to address these issues before attempting to replace the chain.
Conclusion
Well, folks, that’s it. You now know how to replace your bicycle chain. Congratulations! Your bike will thank you for the new chain, and you’ll notice a significant improvement in your ride quality.
Remember, always pay attention to the signs that your chain needs replacing and choose the right replacement chain for your bike.
Removing the old chain and installing the new one can be a bit tricky, but with patience and the right tools, you can do it. And once your new chain is in place, make sure to maintain it properly to ensure it lasts as long as possible.
Happy cycling!