
Replacing the on/off switch on the throttle of your electric bike may seem daunting at first, but fear not! With a few simple steps and the right tools, you’ll have a fully functional switch in no time.
In this article, I will guide you through the process, from identifying the faulty switch to securely installing the new one.
So, put on your DIY hat and get ready to enjoy a smooth and hassle-free ride on your electric bike.
Key Takeaways
- The on/off switch is important for complete control over the electric bike’s power, preventing accidental power surges or unexpected shutdowns.
- Choosing a high-quality on/off switch guarantees durability, longevity, and compatibility with the throttle and electrical system.
- Replacing the on/off switch can enhance the riding experience by ensuring a reliable and seamless on/off functionality for convenience.
- Seeking professional help or following manufacturer’s instructions is recommended for troubleshooting and replacing the on/off switch to avoid potential damage or incorrect adjustments.

Schwinn Network 1 Hybrid Bike, 700c Mens and Womens Bike, 21-Speed Hybrid Bicycle, Aluminum Frame, Suspension Fork, Alloy Linear Pull Brakes, Adult Bicycle
HYBRID BICYCLE: Ride confidently on or off the pavement in the Network 1 by Schwinn. With 700c wheels,...
As an affiliate, we earn on qualifying purchases.
Identify the faulty on/off switch
You need to identify the faulty on/off switch. Troubleshooting common issues with on/off switches can help you pinpoint the problem.
First, check if the switch is loose or damaged. Make sure it is securely connected to the throttle.
If the switch is tight and intact, the issue may lie within the wiring or connections. Inspect the wires for any signs of damage or fraying. Additionally, check if the switch is receiving power by testing it with a multimeter.
To maintain the longevity of on/off switches, avoid exposing them to water or extreme temperatures. Regularly clean the switch and throttle to prevent dust and debris buildup.
Now that you have identified the faulty switch, let’s move on to gathering the necessary tools for replacement.

Schwinn GTX 1 Hybrid Bike, 700c Mens and Womens Bike, 21-Speed Hybrid Bicycle, Aluminum Dual-Sport Frame, Suspension Fork, Front and Rear Linear Pull Brakes, Adult Bicycle
DUAL SPORT HYBRID BICYCLE: Ride confidently on or off the pavement in the GTX 1 by Schwinn. With...
As an affiliate, we earn on qualifying purchases.
Gather the necessary tools for replacement
To gather all the tools needed for the replacement, make sure you have everything on hand. Start by gathering a small flathead screwdriver, a set of Allen wrenches, and a pair of needle-nose pliers. These tools will be essential for removing the old on/off switch and installing the new one.
Additionally, you will need a multimeter to test the functionality of the new switch before reconnecting the throttle to the electric bike. Make sure to have a clean and well-lit workspace to work in, as this will make the process easier and more efficient.
Once all the tools are gathered, you can proceed to the next step of disconnecting the throttle from the electric bike.

TOBWOLF 1 Pair MTB Disc Brake Set, Hydraulic Disc Brake Kit with 160mm Rotors, Left Front 81cm & Right Rear 147cm, Aluminum Oil Pressure Calipers Levers for Mountain Bike E-Bike Fat Bike Road Bike
【Important NOTE】-- This set works on the principle of Left Front and Right Rear, which means the left...
As an affiliate, we earn on qualifying purchases.
Disconnect the throttle from the electric bike
First, disconnect the throttle from your e-bike to prepare for the replacement process. To properly clean the throttle for electric bikes, start by locating the connection point between the throttle and the main wiring harness. This connection is usually found near the handlebars or on the side of the bike frame.
Carefully unplug the throttle from the wiring harness, ensuring not to damage any of the wires or connectors. Once disconnected, inspect the throttle for any signs of dirt or debris. If necessary, use a soft cloth or a mild cleaner to gently wipe away any grime. This will help ensure a smooth and reliable connection when installing the new on/off switch.
Troubleshooting common issues with bike throttles, such as unresponsiveness or erratic behavior, may also involve cleaning the throttle.
Now, let’s move on to removing the old on/off switch from the throttle.
JFOYH zoom HB876 4-Piston Pre-Bled Hydraulic Disc Brake Set for Mountain Bike, Bike Disc Brake Kit with 160mm Rotors, Front and Rear Levers(PM Adapter Included) - Left-Front&Right-Rear
Experience Powerful Braking: Our 4-piston dual-way brake system provides exceptional braking force, allowing you to stop on a...
As an affiliate, we earn on qualifying purchases.
Remove the old on/off switch from the throttle
Now, it’s time to take off the old on/off switch from your e-bike’s throttle. Here’s a step-by-step guide to help you through the process:
-
Locate the on/off switch on your throttle. It is usually located near the handlebar grip and is connected to the throttle cable.
-
Use a small screwdriver to remove the screws holding the on/off switch in place. Be careful not to lose any screws.
-
Once the screws are removed, gently pull the on/off switch away from the throttle. It may be attached with adhesive, so be patient and apply gentle pressure if necessary.
-
Disconnect the wires from the old on/off switch by carefully unplugging them from the connectors.
Now that you have successfully removed the old on/off switch, you can move on to the next step of installing the new one. But before that, it’s important to ensure you have the correct replacement parts and troubleshoot any common throttle issues to avoid future problems.
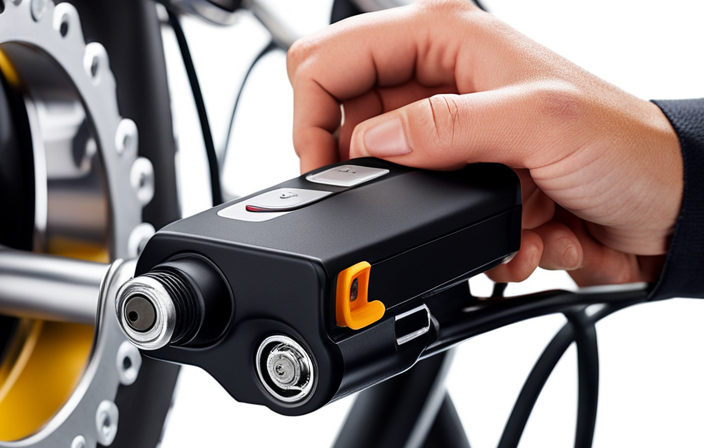
Install the new on/off switch onto the throttle
Once you have successfully removed the old on/off switch, it’s time for you to install the new one onto your e-bike’s throttle. To ensure that you install the switch correctly, follow the steps below:
- Position the new on/off switch in the designated area on the throttle, making sure it aligns properly.
- Use a small screwdriver to secure the switch in place by tightening the screws.
- Double-check that the switch is firmly attached and does not move around.
- Connect the wires from the switch to the corresponding terminals on the throttle. Refer to the manufacturer’s instructions for proper wire connection.
- Once the wires are connected, gently tug on them to make sure they are securely fastened.
By following these steps, you will have successfully installed the new on/off switch onto your e-bike’s throttle. If you encounter any issues during the installation process, refer to the troubleshooting section in the manufacturer’s manual for assistance.
Now that the switch is installed, we can move on to reconnecting the throttle to the electric bike.
Reconnect the throttle to the electric bike
To reconnect the throttle to your e-bike, follow these steps:
- Carefully reattach the wires from the throttle to their corresponding terminals.
- Identify the wires that were disconnected during the switch replacement process.
- Usually, there are two wires: one positive and one negative, connecting the throttle to the bike’s electrical system.
- Inspect the wires for any signs of damage or wear.
- If necessary, trim the ends and strip the insulation for a clean connection.
- Match the positive wire to the positive terminal and the negative wire to the negative terminal.
- Securely tighten the terminals to ensure a solid connection.
- If you encounter any issues, refer to the troubleshooting section of your e-bike’s manual.
- Once the throttle is successfully reconnected, it’s time to test the functionality of the new on/off switch.
Test the functionality of the new on/off switch
First, check if the new on/off switch is working properly. It is important to regularly maintain the on/off switch on your electric bike throttle to ensure its functionality. By troubleshooting common issues with on/off switches, you can identify any problems and address them promptly. Here are some steps to test the functionality of the new switch:
- First, make sure the electric bike is turned off.
- Connect the new on/off switch to the throttle according to the manufacturer’s instructions.
- Turn on the electric bike.
- Gently press the on/off switch to activate the throttle.
- Observe if the throttle responds smoothly and consistently.
- Check if the on/off switch properly turns off the throttle when released.
Regular maintenance and testing of the on/off switch is crucial for safe and efficient operation of your electric bike. Once you have tested the new switch, you can move on to the next step of securing any loose connections or wires.
Secure any loose connections or wires
Make sure to secure any loose connections or wires to ensure the proper functioning of the on/off switch.
Begin by checking the battery connection, ensuring that it is securely connected to the switch. Inspect the wires leading to the switch and make sure they are firmly connected and not frayed or damaged. If any wires are loose or damaged, tighten or replace them as necessary.
Additionally, ensure that all connections are properly insulated to prevent any short circuits or electrical hazards. Use electrical tape or heat shrink tubing to wrap exposed wires and provide a protective barrier.
Once all connections are secure and insulated, you can proceed to the next step, which is adjusting the throttle settings if necessary.
Adjust the throttle settings if necessary
If you need to, you can adjust the throttle settings to your liking. Here are three important things to consider when adjusting the throttle sensitivity:
-
Sensitivity levels: Most electric bike throttles come with adjustable sensitivity settings. You can increase or decrease the throttle response based on your preference. Higher sensitivity means the bike will respond quickly to your input, while lower sensitivity provides smoother and more controlled acceleration.
-
Deadzone adjustment: The deadzone refers to the initial movement of the throttle before it starts registering any input. If you find that your throttle has too much play or doesn’t respond immediately, adjusting the deadzone can help eliminate this issue.
-
Troubleshooting common issues: If you experience any throttle-related problems, such as inconsistent response or sudden jerks, adjusting the throttle settings can often resolve these issues. It’s a good idea to consult the manufacturer’s instructions or seek professional help if you’re unsure how to troubleshoot specific problems.
With these adjustments, you can fine-tune your throttle for optimal performance and enjoy a fully functional on/off switch on your electric bike’s throttle!
Enjoy a fully functional on/off switch on your electric bike’s throttle!
To fully utilize your electric bike’s throttle, you can now enjoy the convenience of a functional on/off control. Troubleshooting common issues with electric bike throttles is essential for a smooth riding experience.
When it comes to replacing the on/off switch on your throttle, opting for a high-quality switch is crucial. A reliable on/off switch ensures that you have complete control over your electric bike’s power, allowing you to easily turn it on or off as needed. This eliminates the risk of accidental power surges or unexpected shutdowns during your ride.
Investing in a top-notch on/off switch guarantees durability, longevity, and peace of mind. With a fully functional on/off switch on your electric bike’s throttle, you can confidently enjoy your rides without any interruptions or concerns.
Frequently Asked Questions
Can I use any type of on/off switch as a replacement for my electric bike’s throttle?
Yes, compatibility issues may arise when using different types of on/off switches interchangeably on electric bike throttles. The choice of switch can impact the overall functionality and performance of the throttle.
How do I identify if the on/off switch is the actual problem with my electric bike’s throttle?
To troubleshoot throttle issues on an electric bike, look for common signs of a faulty on/off switch. These signs include a lack of response when pressing the switch, inconsistent power delivery, or the switch feeling loose or unresponsive.
Can I replace the on/off switch without disconnecting the throttle from the electric bike?
Yes, the on/off switch can be replaced without disconnecting the throttle from the electric bike. However, it is important to troubleshoot the throttle connection first to ensure that the switch is indeed the problem.
Are there any specific safety precautions I should take while replacing the on/off switch on my electric bike’s throttle?
When replacing the on/off switch on your electric bike’s throttle, it is crucial to prioritize proper wiring to ensure a safe and functional replacement. Neglecting this step can lead to potential risks of electrical shock.
Is it possible to repair the old on/off switch instead of replacing it?
Repairing the old on/off switch on an electric bike throttle is possible, but it has pros and cons. Common issues with these switches include wear and tear, water damage, and malfunctioning internal components.
Conclusion
After successfully replacing the on/off switch on my electric bike’s throttle, I can confidently say that the process was worth the effort.
The faulty switch was causing inconvenience and frustration, but now, with the new switch in place, I feel a sense of relief and satisfaction.
The contrast between the old, malfunctioning switch and the new, fully functional one is striking. I can now effortlessly control the power of my electric bike, allowing me to enjoy smooth and exhilarating rides.