In the realm of biking, possessing a bike in good working condition is vital for ensuring both safety and pleasure. A component of the bike that frequently gets ignored is the chain. It’s imperative to have a chain that’s correctly fitted and well-kept for seamless gear changes and effective power transmission.
In this article, I will guide you through the process of sizing a bicycle chain, from measuring your current chain to installing a new one. Choosing the correct chain size may seem like a small task, but it can make a big difference in the performance of your bike.
A chain that is too short can cause premature wear on the drivetrain and make shifting difficult, while a chain that is too long can result in poor power transfer and increased chain slap. By taking the time to properly size your chain, you can ensure that your bike operates smoothly and efficiently, allowing you to focus on the ride ahead.
So, let’s get started on the process of sizing a bicycle chain.
Key Takeaways
- A properly sized chain is crucial for smooth shifting and efficient power transfer.
- Measuring the current chain involves counting the links and measuring the pitch.
- Chain wear indicators should be taken into account when counting links.
- Chain compatibility isn’t solely dependent on the number of gears on the cassette.

Kryptonite Folding Bike Lock, Compact Lightweight High Security Anti-Theft Foldable Bicycle Lock with 2 Keys and Mount for E-Bikes Scooter Road Mountain Bikes, 88.4cm (34.8 in)
HIGH-SECURITY DESIGN: This Anti-Theft folding bike lock is made from 3mm hardened steel bars with tightened rivets for...
As an affiliate, we earn on qualifying purchases.
Understand the Importance of Choosing the Correct Chain Size
Choosing the right bike chain size is crucial for a smooth and safe ride, so it’s essential to understand the importance of selecting the correct size. A correctly sized chain offers numerous benefits, including better shifting performance, reduced chain wear, and increased efficiency.
On the other hand, a chain that is too loose or too tight can cause mechanical problems, such as skipping gears, premature wear, and even chain breakage. One of the most common mistakes in selecting a bike chain is assuming that all chains are the same. However, bike chains come in different lengths and widths, and choosing the wrong size can lead to significant issues.
For instance, a chain that is too long can sag and cause unnecessary friction, while a chain that is too short can overstress the chainrings and cause them to wear out faster. To avoid these problems, it’s crucial to measure your current chain and select a replacement chain that matches its length and width.
Measuring your current chain is a straightforward process that involves counting the number of links and measuring the distance between them. By doing so, you can determine the correct chain length and width for your bike and ensure a smooth and safe ride.

Seatylock FoldyLock Compact Folding Bike Lock - Award Winning Patented Lightweight High Security Bicycle Lock - Heavy Duty Anti Theft Smart Secure Guard with Keys & Case for Bikes or Scooters
TOP RATED LIGHTWEIGHT COMPACT BIKELOCK - Best Light Weight Folding Bike Lock. Portable Solid Key Bike Lock Protects...
As an affiliate, we earn on qualifying purchases.
Measure Your Current Chain
To measure my current bicycle chain, I need to count the links and measure the pitch.
Counting the links involves counting the number of inner and outer plates that make up the chain.
Measuring the pitch requires measuring the distance between the center of two adjacent pins.
These steps are important in ensuring that I choose the correct replacement chain size for my bike.
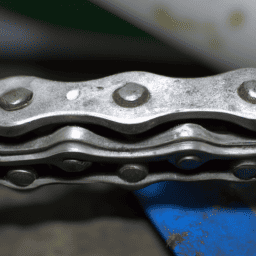
Count the Links
First, you’ll want to count the links on your current chain to determine the correct size for your replacement chain. This is a simple process that can prevent common mistakes when sizing a new chain.
To count the links, start by finding the master link or connecting rivet on your current chain. This is the link that can be easily disconnected and removed. Once you have identified the master link, count the number of links on the chain, including both inner and outer links. Be sure to count only the links and not the rivets.
Common mistakes when counting the links include counting the rivets instead of the links, forgetting to include both inner and outer links, or miscounting the total number of links. Additionally, chain wear indicators can also affect the overall length of the chain and should be taken into account when counting links.
Once you have accurately counted the links on your current chain, you can move on to the next step of measuring the pitch to ensure a proper fit for your replacement chain.
Next, we’ll need to measure the pitch of the chain to ensure that the replacement chain is the correct size. By measuring the pitch, we can determine the distance between each pin in the chain. To do this, measure the distance between any two adjacent pins on your current chain. Make sure to measure from the center of the first pin to the center of the second pin.
This measurement will give you the pitch of your current chain, which will be the same pitch you’ll need for your replacement chain.
Measure the Pitch
Measuring the pitch of your current chain is crucial for ensuring a proper fit of the replacement, so let’s get started. First, it’s important to understand that the pitch refers to the distance between the pins on the chain. This measurement will determine the size of the chain you need.
To measure the pitch, you’ll need a ruler or tape measure. Here are the steps to follow:
-
Determine the type of chain you have. There are different chain types, such as 1/8’and 3/32′, and each has a different pitch measurement.
-
Measure the distance between the center of one pin to the center of the next pin.
-
If you’re unsure about the measurement, double check to avoid common mistakes, such as measuring the wrong distance or counting the wrong number of links.
Now that you have the pitch measurement, it’s time to determine the correct chain size for your bike.

Seatylock FoldyLock Compact Folding Bike Lock - Award Winning Patented Lightweight High Security Bicycle Lock - Heavy Duty Anti Theft Smart Secure Guard with Keys & Case for Bikes or Scooters
TOP RATED LIGHTWEIGHT COMPACT BIKELOCK - Best Light Weight Folding Bike Lock. Portable Solid Key Bike Lock Protects...
As an affiliate, we earn on qualifying purchases.
Determine the Correct Chain Size
You can easily identify the correct chain size by counting the number of gears on your bike’s cassette. Most modern bikes have either 9 or 10 gears on the cassette, which require a 9-speed or 10-speed chain, respectively.
However, it’s important to note that chain compatibility isn’t solely dependent on the number of gears on the cassette. Common mistakes when sizing a chain include assuming that all 9-speed or 10-speed chains are compatible with all cassettes of the same speed. It’s crucial to check the manufacturer’s specifications for both the cassette and the chain to ensure compatibility.
In addition to the number of gears, other factors such as the chain’s length and width should also be considered when sizing a chain. It’s important to measure the chain properly and ensure that it’s not too long or too short for the bike’s specific needs.
Once the correct chain size has been determined, it’s time to install your new chain and get back on the road.

Master Lock Black Hardened Steel Link Folding Bike Lock with Key, Heavy Duty Anti-Theft Lock for Bicycles, Electric Scooters, 2-3/4ft (84cm) Length x 0.13 in (3.5 mm), 8335EC
HARDENED STEEL SECURITY: The folding bike lock has hardened steel links that resist cutting, sawing, and prying
As an affiliate, we earn on qualifying purchases.
Install Your New Chain
I’ll guide you through the process of installing a new bicycle chain. First off, I’ll show you how to remove the old chain.
Next, I’ll explain how to install the new chain and ensure it’s the correct length. If needed, I’ll also walk you through the steps to adjust the chain length.
With these key points in mind, you’ll be able to confidently replace your bicycle chain and get back to riding smoothly and efficiently.
Remove the Old Chain
To remove the old chain, simply loosen the quick link and slide it off the cassette. Before taking off the old chain, it’s important to inspect it for wear and stretch. A worn chain can cause a variety of issues, including skipping gears, noisy shifting, and even chain breakage.
If you’ve been experiencing any of these symptoms, it may be time to replace your chain. Regular chain maintenance and replacement can save you money in the long run by preventing more expensive repairs down the line.
Once the old chain has been removed, it’s time to install the new chain. But before we get to that, it’s important to properly clean and lubricate your cassette and chainrings to ensure a smooth and efficient ride.
By taking the time to troubleshoot chain issues and properly maintain your drivetrain components, you’ll be able to enjoy your bike for years to come.
Install the New Chain
Once the old chain’s been removed, it’s time to get your bike running smoothly again by installing a fresh new chain. Here are the steps to follow for a successful installation:
-
Proper lubrication: Before installing the new chain, make sure to apply lubricant to each link. This will help the chain function smoothly and prevent wear and tear. Use a high-quality lubricant and apply it liberally, making sure to cover every link.
-
Chain tension: Once the lubricant’s applied, it’s time to install the chain. Start by threading the chain onto the smallest chainring and the smallest cog. Then, pull the chain tight and fasten it using the master link. Make sure the chain’s not too tight or too loose. The proper tension is when the chain has about 1/2 inch of up-and-down play in the middle.
-
Double-check: After the chain’s installed, double-check the tension by turning the pedals by hand. Make sure the chain’s not skipping or catching on anything. If everything looks good, you’re ready to move on to the next step of adjusting the chain length.
With the new chain installed and properly lubricated, it’s time to adjust the chain length to ensure maximum performance.
Adjust the Chain Length
Now that the new chain is properly installed and lubricated, it’s time to adjust its length. To do this, you’ll need chain pliers, a chain checker, and a chain tool.
The first step is to measure the length of the old chain and compare it to the new one. If the new chain is longer, you’ll need to remove some links to match the old chain’s length. If the new chain is shorter, you’ll need to add links.
To remove links, use the chain pliers to break the chain at the rivet. Be careful not to damage the neighboring links or the chain itself. Once you have removed the necessary links, use the chain tool to reconnect the chain.
To add links, you’ll need to use a spare chain link and a chain tool to connect it to the chain.
Common mistakes when adjusting chain length include not measuring the old chain length, removing too many links, or not properly connecting the chain after removing or adding links. Make sure to double-check the length and connection of the chain before riding to avoid any accidents or damage to your bike.
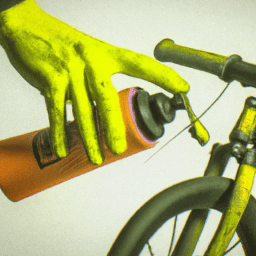
Maintaining your chain is crucial for optimal performance and safety. One way to do this is by regularly cleaning and lubricating the chain. This will prevent rust and corrosion and ensure smooth and efficient riding.
Maintain Your Chain
Keeping your chain well-maintained is crucial for the longevity and performance of your bike, advises the mechanic. Regular chain lubrication is essential to ensure smooth and efficient pedaling. A dry and dirty chain can cause unnecessary wear and tear, leading to poor shifting and even chain failure.
Before lubricating your chain, it’s important to clean it thoroughly. Use a chain cleaning tool or a rag with degreaser to remove any dirt, grime, or old lubricant from the chain. Once the chain is clean, apply lubricant to each link, ensuring that it penetrates the rollers and pins. Wipe off any excess lubricant with a clean rag, as too much lubricant can attract dirt and cause the chain to wear out faster.
With consistent cleaning and lubrication, your chain will last longer and your bike will perform at its best.
Frequently Asked Questions
How often should a bicycle chain be replaced?
How often should a bicycle chain be replaced? It depends on factors affecting bicycle chain wear, such as riding conditions and maintenance. Signs of a worn out bicycle chain include elongation and skipping gears. Regular chain inspection and replacement can prevent drivetrain damage.
Can different brands of chains be used on the same bike?
I can use interchangeable brands of chains on my bike, but compatibility concerns exist. Different chains have varying designs and link shapes, so check the manufacturer’s recommendations and ensure the new chain matches your bike’s specifications.
How do I know if my chain is too loose or too tight?
To determine if my bicycle chain is too loose or too tight, I check the chain tension adjustment. If it’s too loose, the chain may skip or fall off, and if it’s too tight, it can cause excessive wear and tear. Common chain wear signs include elongation, rust, and kinks.
What type of lubricant should I use on my chain?
I prefer using a wax-based lubricant on my chain as it provides a clean, long-lasting coating that reduces friction and wear. Oil-based lubricants attract dirt and grime, leading to a shorter lifespan. Avoid lubricating your chain in wet or dusty conditions.
Can I use a chain that is longer or shorter than the recommended size?
Using a chain that is longer or shorter than the recommended size can cause problems with chain compatibility. Adjusting chain tensioning techniques may not be enough to prevent the chain from slipping or breaking. Always use the recommended chain size for optimal performance.
Conclusion
In conclusion, properly sizing your bicycle chain is crucial for a smooth and efficient ride. By measuring your current chain and determining the correct size, you can avoid unnecessary wear and tear on your bike and ensure a longer lifespan for your components.
Installing a new chain may seem daunting, but with the right tools and techniques, it can be a straightforward process. Remember to maintain your chain regularly by keeping it clean and lubricated. This will help prevent rust and corrosion, and keep your chain running smoothly.
By taking the time to properly size and care for your chain, you’ll be able to enjoy a comfortable and enjoyable ride on your bicycle for years to come. Happy cycling!