Have you ever been cycling and sensed that something wasn’t quite right? Perhaps your brakes didn’t respond as sharply as before, or your gears started to slip. Such problems can not only be annoying but also potentially hazardous if ignored. This is why understanding how to adjust your bicycle is crucial.
Tuning your bicycle may sound daunting, but it’s actually a relatively simple process that can be done with a few basic tools. By tuning your bicycle, you’ll not only improve its performance, but also extend its lifespan.
In this article, we’ll guide you through the steps to check and adjust your brakes, gears, tire pressure, and chain alignment. So, grab your tools and let’s get started!
Key Takeaways
- Tuning your bicycle is important for optimal performance, safety, and to prevent wear and tear on crucial components.
- Brake maintenance involves checking brake pad wear, adjusting cable tension, checking brake alignment, and keeping brakes clean to prevent buildup.
- Gear adjustment includes troubleshooting misaligned derailleur, adjusting cable tension using barrel adjuster, and controlling derailleur movement with limit screws.
- Tire pressure is important for a smooth ride and preventing flat tires, and should be checked before each ride. Chain maintenance involves lubricating, checking alignment, and adjusting tension for optimal performance and extended lifespan.

Road Bike, 700C Wheel City Commuter Bicycle, 16 Speed Drop Bar, Fast Acceleration, Racing Bike with Disc Brakes, with Light Weight Aluminum Alloy Frame, Sport Bike, Urban Adult Bicycle (Cream)
PERFECT FOR BOTH MEN AND WOMEN ROAD BIKE;Designed to meet the needs of both men and women, this...
As an affiliate, we earn on qualifying purchases.
Importance of Tuning Your Bicycle
Tuning your bicycle is an essential step in ensuring optimal performance, and neglecting it could lead to decreased efficiency and potential safety hazards down the road.
Regular maintenance of your bike can help prevent wear and tear on crucial components, such as the chain, brake pads, and tires. When these parts are functioning correctly, you’ll experience smoother shifting, better braking, and overall improved ride quality.
However, there are common tuning mistakes to avoid, such as over-tightening bolts, not properly aligning the derailleur, or neglecting to lubricate the chain. These errors can cause premature wear and tear on your bike and even lead to malfunctions while riding.
By taking the time to tune your bike correctly, you can avoid costly repairs and ensure that your bike is functioning at its best.
Now, let’s move on to checking and adjusting your brakes.

VEVOR Road Bike, 700C Wheels Racing Bike, Shimano 21 Speeds Drivetrain City Commuter Road Bicycle, Urban Adult Sport Bicycle with Carbon Steel Frame, Drop Bar, Caliper Brake, for Men and Women
Carbon Steel Frame: This road bike is built with a premium carbon steel frame and carbon steel front...
As an affiliate, we earn on qualifying purchases.
Checking and Adjusting Your Brakes
First, you need to make sure that your brakes are properly adjusted so that you can stop quickly and safely while riding. Here are some steps you can take to check and adjust your brakes:
-
Check your brake pad wear: Look at your brake pads to see if they’re worn down. If they’re, replace ’em.
-
Adjust your cable tension: If your brakes feel loose, you may need to adjust the cable tension. Use the barrel adjuster on your brake lever to do this.
-
Check your brake alignment: Make sure your brake pads are hitting the rim evenly on both sides. If not, adjust ’em until they are.
-
Test your brakes: Before riding, give your brakes a test to make sure they’re working properly. Squeeze the brake lever and make sure your bike comes to a complete stop.
-
Keep your brakes clean: Dirt and debris can affect your brakes’ performance. Clean your rims and brake pads regularly to prevent buildup.
Now that your brakes are properly adjusted, it’s time to move on to adjusting your gears.

KWOJU 700C Road Hybrid Bike for Adult, 21-Speed Road Bike Road Bicycle Carbon Steel Frame/Dual-Disc Brakes/Multiple Colors (Cream)
【700c Aluminum Alloy Tires】This flat handlebar road bike is equipped with 700c aluminum alloy wheels and 700x35c tires,...
As an affiliate, we earn on qualifying purchases.
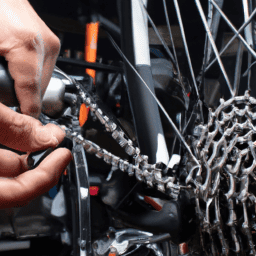
Adjusting Your Gears
Once you’ve got your brakes sorted, it’s time to get your gears running smoothly so you can ride like a pro. Don’t worry, adjusting them is easy as pie!
First, start by shifting your gears up and down while pedaling slowly. If you notice any hesitation or unusual noise when changing gears, it could indicate a problem. Common issues include a misaligned derailleur, a stretched chain, or a worn cassette. To troubleshoot, check that the derailleur is properly aligned with the chain, and adjust it if necessary. If the chain is stretched or the cassette is worn, it may be time to replace them.
Another technique to troubleshoot gear issues is to adjust the tension on the cable that connects the shifter to the derailleur. Use the barrel adjuster located near the shifter to fine-tune the tension until the gears shift smoothly. Remember to also check the limit screws on the derailleur, which control how far it can move inwards and outwards. Adjust them accordingly to prevent the chain from falling off or getting stuck between gears.
Once you’ve got your gears running like a dream, it’s time to move on to the next step: checking and adjusting tire pressure.

WEIZE Mountain Bike, 26 27.5 inch Outdoor Hybrid Bike,18-Speed/High-Carbon Steel/Dual Full Suspension, Adjustable Ergonomic Seat for Men Women Adult, MTB Bicycle with Suspension Fork,Sleek Colors
【Frame】: Durable steel dual suspension Mountain Bike frame. Featured with Front suspension fork and rear coil shock to...
As an affiliate, we earn on qualifying purchases.
Checking and Adjusting Tire Pressure
To ensure a smooth ride, you should regularly check and adjust your tire pressure – it’s like giving your bike a breath of fresh air. Start by measuring the PSI accurately using a tire pressure gauge. The recommended PSI is often printed on the side of your tire.
Make sure to use the right tire pressure for different terrains – a lower pressure can provide better grip and traction on rough surfaces, while a higher pressure is better for smooth roads and faster rides. Riding with incorrect tire pressure can lead to a bumpy and uncomfortable ride, as well as increasing the risk of flat tires.
Make it a habit to check your tire pressure before each ride and adjust as needed. With properly inflated tires, you’ll experience a smoother ride and prolong the life of your tires.
Moving on to the next step, it’s important to regularly lubricate your chain and check alignment for optimal performance.
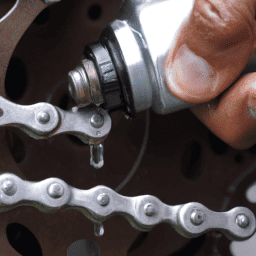
Lubricating Your Chain and Checking Alignment
Keeping your bike chain well-oiled and aligned is like giving it a soothing massage that helps it perform at its best. Here are some tips to help you lubricate your chain and check its alignment:
-
Start by cleaning your chain thoroughly with a degreaser and a chain cleaning tool. This will help remove any dirt or debris that may have accumulated on your chain and prevent it from wearing out prematurely.
-
Once your chain is clean, apply a proper lubricant to the chain. Be sure to choose a lubricant that’s appropriate for the conditions you’ll be riding in. For example, if you’ll be riding in wet conditions, choose a wet lubricant that’ll provide better protection against rust and corrosion.
-
Check your chain alignment by placing a ruler or straight edge next to the chain and checking for any deviations. Adjust the chain tension if needed to ensure that it runs straight and smoothly.
By following these steps, you can keep your bike chain well-oiled and aligned, which’ll help it perform at its best and extend its lifespan. Remember to always use the proper cleaning tools and lubricants to ensure that you’re taking the best possible care of your bike.
Frequently Asked Questions
How often should I tune my bicycle?
To maintain optimal performance, you should tune your bicycle at least once a year. Regular maintenance is important to prevent wear and tear, increase longevity, and ensure safety. Don’t neglect the frequency of bicycle tuning.
Can I tune my bicycle myself or should I take it to a professional?
You can absolutely tackle DIY bicycle tuning with some basic knowledge and tools. However, the benefits of professional tuning, including expert knowledge and specialized equipment, cannot be overstated. Consider your skill level and needs before deciding.
What tools do I need to tune my bicycle?
To tune your bicycle, essential equipment includes bicycle tuning tools such as a wrench set, tire pump, and a chain tool. These tools allow you to adjust and fine-tune various components of your bike for optimal performance.
How do I know if my bicycle needs tuning?
To know if your bicycle needs tuning, pay attention to common problems like difficulty shifting gears, squeaky brakes, or wobbly wheels. Troubleshooting tips involve checking for loose bolts, adjusting cable tension, and ensuring proper tire pressure.
What are the signs that my bicycle is not properly tuned?
If your bicycle isn’t properly tuned, you may notice common issues like difficulty shifting gears, squeaking brakes, or wobbly wheels. Troubleshooting tips include adjusting cables, aligning brake pads, and tightening bolts.
Conclusion
Congratulations! You’ve successfully tuned your bicycle. You’re now ready to hit the road with a well-maintained machine that will take you on endless adventures.
By following the steps outlined in this guide, you’ve ensured that your brakes are responsive, your gears are smooth, your tires are properly inflated, and your chain is well-lubricated.
As you pedal forward, imagine the intricate parts of your bicycle moving in perfect harmony, like a finely-tuned orchestra. The brakes, like the conductor, direct and control your speed. The gears, like the musicians, work together to provide the perfect cadence. The tires, like the audience, support and cheer you on. And the chain, like the backbone of the bike, keeps everything in sync.
Remember, a well-tuned bicycle not only enhances your riding experience but also ensures your safety on the road. So, take the time to regularly check and maintain your bike to keep it in top shape.
Happy riding!