Have you ever wished for your bike to transform into an electric powerhouse, effortlessly gliding through the streets with a surge of power? Well, fellow cycling enthusiasts, get ready for your wildest dreams to come true!
[Translated into English (United States)]
In this article, I will guide you through the exhilarating process of turning your ordinary bike into an electrifying marvel. Get ready to embrace a whole new level of speed, convenience, and eco-friendly transportation as we delve into the intricate world of electric bike conversions.
Let’s get electrified!
Key Takeaways
- Power Assist Integration and Regenerative Braking enhance bike’s range and efficiency
- Accessories and Features transform regular bike into powerful electric ride
- Maintenance is important for optimal bike performance and safety
- Effortless Hill Climbing, Increased Speed, and Extended Range improve overall cycling experience

Young Electric E-Bike Rack with Ramp, Hitch 2 Bike Rack, 200 lbs Capacity Electric Bike Carrier, Foldable Platform Mount for Cars, Trucks, SUVs, Minivans, Up to 5-Inch Fat Tire for 2'' Receiver
200LBS CAPACITY & V-GROOVE RAMP: The electric bike rack weighing 66 pounds is built with durable steel and...
As an affiliate, we earn on qualifying purchases.
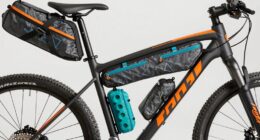
Assessing Your Bike’s Compatibility
You’ll need to assess if your bike is compatible for the conversion. Evaluating compatibility is crucial to ensure a successful electric bike transformation.
Start by identifying necessary modifications that may be required. First, examine the frame of your bike. It should be sturdy enough to support the added weight of the electric components. Check the spacing between the rear dropouts to confirm if it can accommodate the electric motor hub.
Next, evaluate the fork and make sure it has enough clearance for the front wheel motor or battery pack. Assess the brakes and determine if they are compatible with the increased speed and weight of the electric bike. Additionally, consider the drivetrain and gears, as they may need adjustments to handle the added power.
By thoroughly evaluating compatibility and identifying necessary modifications, you can proceed confidently with your bike-to-electric conversion project.

GPUTEK Mini Bike Tire Air Pump: Fast Inflate Portable Small Bicycle Electric Pump for Presta and Schrader Valves, 120 Psi High Pressure Pump with Digital Gauge for Road Bike, Mountain Bike, E-Bike
Portable and Lightweight Design: The GPUTEK bike electric pump measures a compact 2.81 x 1.77 x 1.25 inches...
As an affiliate, we earn on qualifying purchases.
Choosing the Right Electric Conversion Kit
When selecting the appropriate electric conversion kit, it’s important to consider the specific features that best suit your needs. Here are four key factors to consider when comparing different types of electric conversion kits:
-
Motor power: Different kits offer varying power outputs, ranging from 250 watts to 1000 watts. Consider your intended use and terrain to choose the right power level for optimal performance.
-
Battery capacity: The capacity of the battery determines the range of your electric bike. Higher capacity batteries allow for longer rides but may also increase the weight of your bike.
-
Controller system: The controller manages the flow of power from the battery to the motor. Look for a kit with a reliable and efficient controller system for smooth operation.
-
Cost and performance: Understand the cost implications of the conversion kit, including the initial purchase price and potential maintenance costs. Additionally, consider the performance implications, such as the top speed and acceleration capabilities of the kit.
By carefully considering these factors, you can choose the right electric conversion kit that meets your specific requirements.

HOTO Mini Bike Tire Pump, 25s Fast Inflate Bicycle Pump with Guage, 150PSI Portable Electric Bike Air Pump with Presta and Schrader Valve for Road Bike, Motorcycle, Mountain Bike, BMX, Sports Ball
NOTICE: The Presta valve adapter is a separate accessory, always attach the Presta adapter securely to the tire...
As an affiliate, we earn on qualifying purchases.
Gathering the Necessary Tools and Equipment
To gather the necessary tools and equipment, start by making a list of items needed for the electric conversion. The key to a successful conversion is choosing the appropriate battery and finding the best conversion kit supplier. When it comes to selecting the battery, consider factors such as voltage, capacity, and weight. A higher voltage will give your bike more power, while a higher capacity will allow for longer rides. It’s important to find a battery that fits securely on your bike and is compatible with the conversion kit. As for the conversion kit supplier, look for a reputable company that offers a wide range of options and has good customer reviews. Research and compare different suppliers to find the best one for your needs.
| Item | Description | Supplier |
|---|---|---|
| Electric Conversion Kit | Includes motor, controller, and cables | XYZ Electric |
| Lithium-ion Battery | 48V, 15Ah | Battery World |
| Battery Mount | Securely attaches battery to bike frame | Bike Accessories Co. |
| Battery Charger | Charges the battery | Power Tech |
| Conversion Kit Tools | Wrenches, screwdrivers, pliers, etc. | Tool Time |
| Wiring Harness | Connects the components | Electric Bike Parts Unlimited |

CYCPLUS Electric Air Compressor Portable Bicycle Pump Car Tire Inflator, Max 150 PSI, Auto Shut-Off Air Pump with Presta and Schrader Valves for All Bicycles Motorcycles and Cars
【150PSI Fast Inflation】CYCPLUS Portable Air Compressor delivers 𝟏𝟓𝟎 𝐏𝐒𝐈/𝟏𝟎.𝟑 𝐁𝐚𝐫, allowing you to fully inflate a bike tire...
As an affiliate, we earn on qualifying purchases.
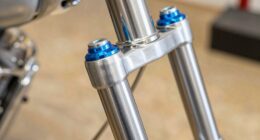
Removing Existing Bike Components
Start by removing the existing bike components that will be replaced during the electric conversion. This process requires a careful approach to ensure the bike frame remains intact.
Begin by loosening and removing the pedals using a pedal wrench.
Next, detach the front and rear brakes by loosening the bolts and removing the brake calipers.
Take off the chain by using a chain tool to push out the pins and separate the links.
Remove the derailleur by unscrewing the bolts that hold it in place.
Finally, detach the handlebars by loosening the stem bolts and sliding the handlebars out.
Throughout this process, it’s crucial to handle the bike components with care to avoid any damage or misalignment.
Installing the Electric Conversion Kit
Now, you can begin installing the electric conversion kit by following the provided instructions. The first step is to install the motor onto the bike frame. Make sure to secure it tightly using the provided mounting brackets. Next, connect the motor to the controller using the appropriate wiring harness. The controller is the brain of the electric system and will control the speed and power output of the motor. Once the motor and controller are connected, it’s time to program the controller. This step is crucial as it allows you to customize the performance of your electric bike. Follow the instructions to set the desired speed limits, acceleration, and other parameters. After programming, double-check all the connections and make sure everything is secure before testing the electric system.
Connecting the Wiring and Battery
After securing the motor onto the bike frame, the next step is to connect the wiring and battery.
This is a crucial part of the electric conversion process as it ensures that the motor receives the necessary power to function.
To start, I carefully route the wiring from the motor to the battery location. I make sure to secure the wiring using zip ties to prevent any loose connections.
Next, I connect the positive and negative wires from the motor to the corresponding terminals on the battery. It is important to double-check the polarity and ensure that the connections are tight and secure.
Once the wiring is properly connected, I install the battery onto the bike frame using the provided mounting brackets. This ensures that the battery is securely in place and protected during rides.
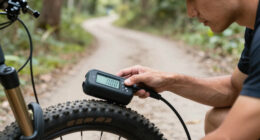
Testing and Fine-Tuning the Electric System
After connecting the wiring and battery, the next step in turning your bike into an electric one is to test and fine-tune the electric system. This crucial phase involves evaluating the system’s performance and making any necessary adjustments to optimize its efficiency. To help you with this process, I have created a table outlining different testing methods and performance analysis techniques:
| Testing Methods | Performance Analysis |
|---|---|
| Range testing | Battery capacity |
| Speed testing | Motor power output |
| Hill climbing | Torque |
| Acceleration | Efficiency |
By conducting range testing, you can determine the distance your electric bike can travel on a single charge. Speed testing allows you to assess the motor’s power output, while hill climbing tests the torque capabilities. Additionally, analyzing acceleration and efficiency provides insights into the overall performance of your electric bike. Utilizing these testing methods and performance analysis techniques will ensure that your electric conversion is successful and meets your expectations.
Adding Additional Accessories and Features
To enhance your electric ride, you can add extra accessories and features.
One way to improve your electric bike is by adding power assist. This feature allows you to pedal with less effort, especially when going up hills or against strong headwinds. By integrating power assist, you can increase your bike’s range and make your ride more enjoyable.
Another useful feature to consider is regenerative braking. This technology allows you to convert the energy produced during braking into electrical energy, which can then be stored in the battery for later use. Not only does this extend your bike’s battery life, but it also provides a more efficient and eco-friendly riding experience.
By adding these accessories and features, you can truly transform your regular bike into a powerful and efficient electric ride.
Maintaining and Troubleshooting Your Electric Bike
Make sure you regularly check for any maintenance issues or troubleshoot any problems that may arise with your electric bike. Proper maintenance and troubleshooting can help ensure that your bike continues to perform optimally and extend its lifespan. When it comes to troubleshooting the battery, there are several common issues to look out for. These include checking the battery connections, inspecting for any physical damage, and monitoring the battery voltage. Additionally, troubleshooting the motor involves checking the motor connections, inspecting for any physical damage, and listening for any unusual noises during operation. It is also important to refer to the manufacturer’s manual for specific troubleshooting steps and recommendations. Remember, a well-maintained and properly troubleshooted electric bike will provide you with a smooth and enjoyable riding experience.
| Troubleshooting Battery | Troubleshooting Motor |
|---|---|
| Check battery connections | Check motor connections |
| Inspect for physical damage | Inspect for physical damage |
| Monitor battery voltage | Listen for unusual noises |
Enjoying the Benefits of Electric Cycling
One of the greatest benefits of electric cycling is the ability to effortlessly cruise up steep hills. With an electric bike, you can say goodbye to the struggle of pedaling uphill and enjoy a smooth, effortless ride.
Here are some advantages and benefits of electric cycling:
-
Increased speed: Electric bikes allow you to travel at faster speeds than traditional bikes, making your commute or leisurely ride more efficient.
-
Extended range: The electric motor assists you in pedaling, extending your range and allowing you to go further without getting tired.
-
Reduced effort: Electric bikes make cycling easier on your joints and muscles, reducing the strain and effort required to pedal.
-
Eco-friendly transportation: By choosing to ride an electric bike, you are contributing to a greener environment by reducing your carbon footprint.
-
Healthy lifestyle: Electric cycling allows you to incorporate physical activity into your daily routine, helping you stay fit and active.
Embracing the electric bike lifestyle offers numerous advantages, from effortless hill climbing to a more environmentally friendly mode of transportation.
Experience the ease and enjoyment of electric cycling while reaping the benefits for your health and the environment.
Frequently Asked Questions
Can I convert any type of bike into an electric bike?
Yes, you can convert most types of bikes into electric bikes. However, there may be compatibility issues depending on the bike’s design. The conversion process involves adding a motor and battery to enhance the bike’s performance.
How much does an electric conversion kit typically cost?
An electric conversion kit typically costs between $400 and $1000, depending on various factors such as the quality of components, battery capacity, and additional features like regenerative braking or throttle control.
Do I need any specialized tools or equipment to complete the conversion?
To complete the conversion process, specialized tools and equipment are required. Common challenges include bike compatibility and the time required for the conversion. The cost may vary depending on the specific components needed.
What are the potential challenges or difficulties I may encounter during the installation process?
During the installation process of converting a bike into electric, potential safety risks include electrical shock, overheating of components, and injury from moving parts. Common mistakes include incorrect wiring, improper battery installation, and inadequate insulation.
How long does it typically take to convert a bike into an electric bike?
The installation time to convert a bike into an electric bike depends on various factors such as experience, tools, and the complexity of the project. It typically takes several hours to a few days. Necessary components include a motor, battery, controller, and wiring.
Conclusion
In conclusion, converting my bike into an electric one has been a game-changer. The process, although technical and detailed, was surprisingly enjoyable and relatable.
It allowed me to explore the world of electric cycling and experience the euphoria of effortless rides. With the right conversion kit and a little maintenance, my bike now offers a whole new level of convenience and efficiency.
So, hop on your own electric bike and discover the delightful world of pedal-assisted adventures!