Do you find yourself constantly needing to inflate your bike tire? Is it frustrating that regardless of how often you pump it up, the air just seems to leak out? Dealing with a flat tire can be annoying, particularly when you depend on your bicycle for getting around or for your fitness routine.
Fortunately, there are several reasons why your tire may be losing air, and most of them can be easily fixed.
First, it’s important to understand that a flat tire is not always caused by a puncture or tear in the rubber. While these are common causes, there are other factors that can contribute to a leaky tire.
In this article, we’ll explore some of the most common reasons why your bicycle tire keeps going flat, and provide tips on how to prevent it from happening in the future. By the end of this article, you’ll be equipped with the knowledge and tools you need to keep your tires inflated and your bike running smoothly.
Key Takeaways
- Proper tire maintenance, including checking for wear and tear and maintaining proper pressure, is crucial in preventing flat tires.
- Using puncture-resistant tires or tire liners can also help reduce the risk of flat tires.
- Recurring flat tires can be addressed through preventative measures and regular maintenance.
- Consider using a tubeless tire system or tire sealant for added protection.

Schwinn Sporterra RX Gravel Bike, 700c Mens and Womens Bike, 14-Speed Drop Bar Gravel Bicycle, Mechanical Disc Brakes, Rigid Fork, Aerodynamic Riding Position, Quick Release Seat Post, Adult Bicycle
GRAVEL BICYCLE: Enjoy next level riding with the Sporterra RX by Schwinn. With 700c wheels, this mens and...
As an affiliate, we earn on qualifying purchases.
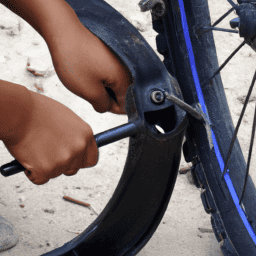
Check for Punctures or Tears in the Rubber
You gotta check for any punctures or tears in the rubber, ’cause those sneaky little holes can cause your tire to keep going flat and ruin your ride.
Start by removing the tire from the rim and inspecting both sides of the tube for any holes or tears. If you find a puncture, don’t worry; you can easily fix it with a patch kit. Simply locate the hole, rough up the area with sandpaper, apply some adhesive, and place the patch over the hole. Wait for it to dry, reinsert the tube, and inflate the tire to the recommended pressure.
If you find multiple punctures or tears, it may be time to consider alternative tires. There are many different types of tires available, each with their own strengths and weaknesses. For example, some tires are designed for rough terrain, while others are optimized for speed and performance. Consider your typical riding conditions and choose a tire that best suits your needs.
But before you do that, don’t forget to ensure proper tire pressure to avoid any future punctures or flats.

SAVADECK T800 Carbon Gravel Bike, with Shimano GRX610 12-Speed, Hydraulic Disc Brakes, 700x40c Tires for Road & Off-Road Adventure, Men's/Women's Bicycle(Elegant White, 51cm)
【With SHIMANO GRX Drivetrain Setup】Equipped with SHIMANO GRX610 shifters and RX822 rear derailleur, matched with a 12-speed M6100...
As an affiliate, we earn on qualifying purchases.
Ensure Proper Tire Pressure
Maintaining the correct air pressure in your bike’s tires not only prevents flats but also ensures a smoother and more efficient ride. It’s essential to check your tire pressure regularly as underinflated or overinflated tires can cause many problems.
The Importance of inflation can’t be overstated as it affects how your bike handles, how well it brakes, and how much energy you exert while pedaling. Below are two sub-lists that explain the effects of improper inflation:
-
Effects of Underinflated Tires:
-
Increases rolling resistance
-
Makes pedaling harder
-
Increases the risk of pinch flats
-
Causes premature wear on the tire’s edges
-
Effects of Overinflated Tires:
-
Reduces traction and control
-
Makes the ride uncomfortable and bumpy
-
Increases the risk of blowouts
-
Causes premature wear on the tire’s center
Ensuring proper tire pressure is an easy way to prolong the life of your tires and avoid unnecessary flats. After checking your tire pressure, the next step is to inspect valve stems.
WTB Riddler Gravel Bike Tire (700 x 37) Tubeless Folding - Light & Fast Rolling - Bikepacking (Black)
SUBSTANTIAL CORNERING KNOBS meet a low-profile center tread, making the Riddler an excellent choice for gravel grinding or...
As an affiliate, we earn on qualifying purchases.
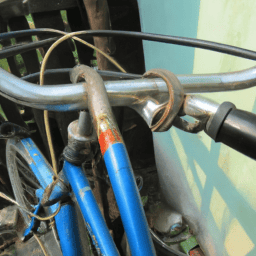
Inspect Valve Stems
When inspecting your valve stems, you should look for signs of wear and tear that may lead to air leaks. These signs include cracks, tears, or punctures in the rubber. If you notice any of these signs, it may be time to replace your valve stems.
To do so, simply remove the old valve stem and insert the new one, making sure to tighten it securely.
Signs of Wear and Tear
If your bicycle tire has been in use for a while, you’ll likely notice signs of wear and tear that could lead to it going flat more frequently. Causes of deterioration can range from punctures caused by debris on the road to regular wear and tear from constant use.
To prevent your tire from going flat, it’s important to inspect it regularly and maintain it properly. Maintenance tips include keeping your tire inflated to the recommended pressure, avoiding overloading your bike, and replacing your tire when it becomes worn down.
Signs of wear and tear on a tire can include cracks, bulges, and thinning of the rubber. By keeping an eye out for these signs, you can catch any potential issues before they lead to a flat tire. With proper maintenance and care, you can extend the life of your bike tire and ride with confidence.
Now, let’s move on to how to replace valve stems.
How to Replace Valve Stems
To keep your bike rolling smoothly, it’s important to know how to replace valve stems. There are two types of valve stems – Schrader and Presta. Schrader valves are more common and found on most bikes, while Presta valves are usually found on road bikes.
To replace a valve stem, follow these steps:
-
Remove the old valve stem by unscrewing the locknut and unscrewing the valve stem from the rim.
-
Insert the new valve stem through the hole in the rim and screw it in place.
-
Tighten the locknut to secure the valve stem in place.
The valve stem installation process may seem simple, but it’s important to make sure the valve stem is installed correctly to avoid leaks and flats. After replacing the valve stem, examine the wheel rim to ensure there are no cracks or other signs of wear that could cause the tire to go flat.

Swagman Standard Fork Mount Rooftop Bike Carrier
EASY TO ASSEMBLE: The STANDARD is easy to assemble with no tools required, sets up in just minutes...
As an affiliate, we earn on qualifying purchases.
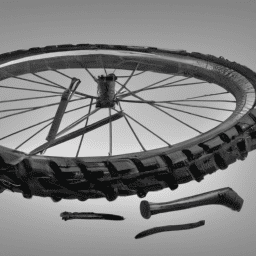
Examine the Wheel Rim
When examining your bicycle wheel rim, the first thing to look for are any signs of damage. This can include cracks, dents, or bends in the rim. If you notice any damage, it’s important to repair or replace the rim as soon as possible to avoid further issues.
Repairing or replacing a damaged rim can be done with the right tools and knowledge, and can help ensure the safety and longevity of your bicycle.
Signs of Damage
It’s no use beating around the bush, if your bicycle tire keeps going flat, there may be signs of damage such as cracks or punctures that need to be addressed.
When examining the wheel rim, it’s important to look for any visible signs of damage. Common causes of damage include hitting curbs, rocks, or other obstacles, as well as wear and tear over time.
If you notice any cracks or punctures in the rim, it’s important to address them immediately. Ignoring the damage could lead to further issues down the line, such as a complete blowout of the tire.
To prevent damage in the first place, be sure to regularly check your tire pressure and avoid riding over obstacles that could cause harm. With proper maintenance, you can prevent damage and ensure a safe and smooth ride.
Moving forward, let’s take a look at how to repair or replace a damaged rim.
How to Repair or Replace a Damaged Rim
If you’re dealing with a damaged rim on your bike, you may need to repair it or replace it altogether. Wheel maintenance is an important aspect of keeping your bike in top shape.
To repair a damaged rim, you’ll need to assess the level of damage and decide if it’s worth fixing or if a replacement is necessary. Small dents or bends can often be fixed with a spoke wrench and some patience. However, if there are larger cracks or the rim is severely bent, it may be time to invest in a new rim.
When looking for rim alternatives, consider the type of biking you’ll be doing. Alloy rims are a popular choice for road bikes since they’re lightweight and durable. Steel rims are often found on older bikes and are heavier but also sturdier. Carbon fiber rims are a high-end option for those looking for the ultimate in lightweight performance.
No matter which material you choose, make sure to check the rim’s compatibility with your bike’s brakes and tire size.
Now that you know how to repair or replace a damaged rim, let’s talk about preventative measures to keep your bike’s wheels in tip-top shape.
Preventative Measures
To prevent recurring flat tires, it’s essential to regularly inspect and maintain your bicycle’s tires. Regular maintenance can help identify and address potential issues before they become a problem. One common cause of flat tires is a lack of proper inflation. Make sure to check the pressure of your tires regularly and inflate them to the recommended PSI, which can be found on the sidewall of the tire.
Another way to prevent flat tires is to avoid riding over debris or obstacles that could puncture the tire. This includes things like broken glass, sharp rocks, and thorns. If you can’t avoid riding over these things, consider investing in tires with puncture-resistant material. Additionally, make sure to regularly check your tires for wear and tear, and replace them as needed. The table below provides some additional tips for preventing flat tires on your bicycle.
| Tip | Description |
|---|---|
| Check tire pressure | Regularly check and inflate your tires to the recommended PSI |
| Avoid debris | Avoid riding over sharp objects that could puncture your tire |
| Use puncture-resistant tires | Consider investing in tires with added protection against punctures |
| Inspect tires regularly | Check your tires for wear and tear, and replace them as needed |
Taking these preventative measures can help ensure that your bicycle tires stay in good condition and reduce the likelihood of recurring flat tires. Remember to always take the time to inspect and maintain your tires before hitting the road.
Frequently Asked Questions
Can a damaged valve stem cause a flat tire?
Yes, a damaged valve stem can cause a flat tire. Common causes of valve stem damage include wear and tear, corrosion, and improper installation. Replacing the valve stem is recommended to prevent future flat tires.
Is it possible to overinflate a bike tire?
You may worry that overinflating your bike tire will cause it to burst. However, the pros of increased speed and reduced rolling resistance outweigh the cons. It’s crucial to monitor pressure to avoid damage.
What type of tire sealant is best for preventing flats?
To prevent flats, use tire sealant. Benefits include sealing punctures as they happen, reducing the need for frequent tire changes. Proper application involves removing the tire, pouring in sealant, and remounting.
How often should I check my tire pressure?
To prevent potential hazards and ensure optimal performance, check your tire pressure at least once a week. Temperature fluctuations can cause pressure changes, which can lead to flats. Proper maintenance is crucial for safety.
Are there any special tools I need to inspect my bike tire for damage?
To inspect your bike tire for damage, you’ll need a tire lever to remove the tire, a patch kit, and a pump. Inspecting techniques include checking for cuts, punctures, and worn tread. Common causes of damage include sharp objects and underinflation.
Conclusion
So there you have it, dear biker. You now know the reasons why your bicycle tire keeps going flat. But don’t let this information discourage you from biking. After all, biking is a wonderful way to exercise and explore the great outdoors.
Instead, use this knowledge to be more proactive in maintaining your bike’s tires. Now, imagine yourself cruising down a scenic bike trail, the wind blowing through your hair, and the sun shining down on your face.
Suddenly, you hear a loud hissing sound, and your bike begins to slow down. You stop and realize that your tire has gone flat. But wait! You remember the steps to take to prevent this from happening again.
You quickly inspect your tire for punctures or tears, ensure proper tire pressure, and inspect the valve stems and wheel rim. Thanks to your newfound knowledge, you’re back on the road in no time, enjoying the beautiful scenery and the freedom that biking brings.
Remember, taking preventative measures and being proactive in maintaining your bicycle’s tires can save you time and frustration in the long run. Don’t let a flat tire ruin your biking experience. Get out there and explore the world on two wheels!