
Did you know that electric bike sales have surged by 91% in the last year? It’s no surprise that more and more individuals are opting for this environmentally friendly form of transportation.
But what happens when your electric bike suddenly stops working? Don’t panic! In this article, I will guide you through a step-by-step troubleshooting process to help you identify and fix the issue.
From checking the battery connection to inspecting the motor, we will leave no stone unturned in getting your electric bike back on the road.
Key Takeaways
- Regular maintenance and troubleshooting are essential for keeping an electric bike working smoothly and efficiently.
- Professional help may be necessary for complex issues that cannot be easily resolved.
- Following preventative measures and manufacturer’s recommendations can help prevent problems from occurring.
- Proper battery maintenance, including checking charge and cleaning terminals, is crucial for optimal bike performance.

Young Electric E-Bike Rack with Ramp, Hitch 2 Bike Rack, 200 lbs Capacity Electric Bike Carrier, Foldable Platform Mount for Cars, Trucks, SUVs, Minivans, Up to 5-Inch Fat Tire for 2'' Receiver
200LBS CAPACITY & V-GROOVE RAMP: The electric bike rack weighing 66 pounds is built with durable steel and...
As an affiliate, we earn on qualifying purchases.
Check the Battery Connection
Oh no, your electric bike might not be working because the battery’s connection isn’t secure!
Ensuring a secure battery connection is crucial when troubleshooting common battery issues. To start, locate the battery compartment on your bike. Carefully remove the battery and inspect the connection points.
Look for any loose wires or corrosion that may be hindering the connection. If you find loose wires, gently tighten them using a screwdriver. For corroded connections, clean them with a wire brush or sandpaper.
Once you’ve secured the battery connection, proceed to the next step to ensure the battery is charged.
By addressing this potential issue, you can effectively troubleshoot your electric bike and get it back on the road in no time.

WEIZE 700C Hybrid Bike for Adults, 14 Speed Road Bike, City Commuter Bicycle with Caliper Brakes, High-Carbon Steel Racing Adult Bike, Urban Adult Bicycle for Men and Women, White
Caliper brake system: The hybrid bike adopts a dual caliper brake design, making daily maintenance more convenient and...
As an affiliate, we earn on qualifying purchases.
Ensure the Battery is Charged
First things first, make sure you’ve charged up the battery of your e-bike. This is a crucial step in troubleshooting any electric bike issues. A common cause of electric bike malfunction is a low or dead battery. To ensure your battery is charged, plug it into a compatible charger and wait for the indicator light to turn green or show a full charge. If the light doesn’t turn on or there’s no response, check the power outlet and the charger for any issues. It’s also important to inspect the battery for any visible damage or loose connections. Troubleshooting tips for common battery problems include checking the fuse, inspecting the wiring, and testing the battery voltage. By ensuring your battery is charged, you can move on to the next step of troubleshooting – testing the power switch.

AVASTA 700C Road Adult Step-Over Hybrid Bike Bicycle for Men Woman Male Female,Lightweight Aluminum Alloy Frame with 21-Speed Gearing for City Commuting,Dual Disc Brakes,19 inch Frame,Chameleon Grey
🚴♂️【Durable Aluminum Alloy Frame】This lightweight yet strong frame is built to last, offering a perfect balance of durability...
As an affiliate, we earn on qualifying purchases.
Test the Power Switch
To ensure the smooth operation of your e-bike, it is imperative to test the functionality of the power switch.
The power switch is a crucial component that controls the flow of electricity to the motor, allowing your electric bike to operate.
Start by checking the battery level to ensure it has enough charge. If the battery is fully charged, proceed to test the power button.
Press the power button while observing any signs of life from the bike. Look for indicators such as lights turning on or the motor engaging.
If there are no signs of power, it could indicate a faulty power switch.
In the next section, we will examine the motor to further troubleshoot the issue.

Schwinn Wayfarer Hybrid Bike, 700c Mens and Womens Bike, 7-Speed Hybrid Bicycle, Retro Steel Frame, Front and Rear Linear Pull Brakes, Fenders, Cargo Space, Adult Bicycle
HYBRID BICYCLE: Ride in comfort and vintage style with the Wayfarer by Schwinn. With 700c wheels, this mens...
As an affiliate, we earn on qualifying purchases.
Examine the Motor
Inspect the motor to identify any issues or irregularities that may be affecting its performance. When troubleshooting an electric bike that is not working, it is important to thoroughly examine the motor for common problems. Here are some troubleshooting tips and common motor problems to look out for:
- Check for loose or damaged motor wires. Loose connections can cause the motor to malfunction.
- Look for signs of overheating, such as a burnt smell or discoloration on the motor casing. Overheating can lead to motor failure.
- Test the motor’s resistance using a multimeter. A reading that is significantly higher or lower than the recommended range indicates a problem.
By carefully inspecting the motor and addressing any issues found, you can improve the overall performance of your electric bike.
Now, let’s move on to inspecting the wiring to ensure there are no faults or loose connections.
Inspect the Wiring
Upon inspecting the wiring of the electric bike, it is crucial to check for any loose connections or faults that may be hindering its performance. Start by examining the connectors, ensuring that they are securely fastened and free from any corrosion or debris. Loose or improperly connected connectors can disrupt the flow of electricity and cause the bike to malfunction.
Additionally, carefully inspect the wires for any signs of fraying or damage. Frayed or damaged wires can lead to short circuits or electrical fires, posing a serious safety risk. If any issues are found, it is important to address them promptly by repairing or replacing the affected wiring.
Transitioning into the next section about the throttle, it is essential to evaluate its functionality to determine if it is contributing to the bike’s malfunction.
Check the Throttle
After peering into the tangled web of wires, it’s time to take a closer look at the throttle and unravel the mystery behind its role in the bike’s performance.
The throttle is a crucial component that controls the speed and power output of your electric bike. When troubleshooting issues with your electric bike, it’s important to inspect the throttle for any signs of damage or malfunction.
Common issues with the throttle include loose connections, worn-out components, or a faulty sensor. Start by checking the wiring connections to ensure they are secure and intact. Additionally, examine the throttle grip for any signs of wear or damage.
If everything seems fine, it’s recommended to test the throttle using a multimeter to verify its functionality. Once the throttle has been thoroughly inspected and tested, we can move on to verifying the brake system and its impact on the bike’s performance.
Verify the Brake System
To ensure optimal performance, it’s important to verify the functionality of the brake system on your electric bike.
Start by inspecting the brake pads to ensure they are not worn down or damaged. Worn-out brake pads can significantly reduce your stopping power and compromise your safety. If you notice any signs of wear, it’s crucial to replace them as soon as possible.
Additionally, test the brake cables to make sure they are properly connected and functioning correctly. Ensure that the cables are not frayed or loose, as this can affect the responsiveness of your brakes.
Finally, look for any loose or damaged parts, such as bolts or screws, as they can contribute to brake system malfunctions.
By thoroughly inspecting and testing your brake system, you can help identify and address any issues, ensuring a safer and more enjoyable ride.
Look for Any Loose or Damaged Parts
While inspecting the brake system, be on the lookout for any loose or damaged parts that could throw a wrench in your ride. Start by visually examining the brake calipers, brake pads, and brake cables for any signs of wear or damage. Check that the brake pads are properly aligned and have sufficient thickness.
Next, give the brake levers a firm squeeze to ensure they engage smoothly and with adequate force. If you notice any loose or damaged parts, it’s important to address them promptly.
Perform a diagnostic test by taking the bike for a short test ride, applying the brakes at different speeds and intensities to verify their functionality. If you’re unsure about any aspect of the brake system, seek assistance from an electric bike specialist.
Now, let’s move on to confirming the tire pressure to ensure optimal performance.
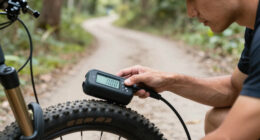
Confirm the Tire Pressure
Make sure your tires are properly inflated to maximize your ride and avoid any potential mishaps. Check the tire pressure regularly to ensure it is within the recommended range. Low tire pressure can affect your electric bike’s performance and make it harder to pedal.
To check the tire pressure, you will need a tire pressure gauge. Remove the valve cap and press the gauge onto the valve stem to get a reading. If the pressure is too low, use a pump to add air until it reaches the recommended level.
Additionally, inspect the tire condition for any signs of wear, such as cuts or bulges. Replace the tire if necessary.
Once you have confirmed the tire pressure and condition, you can move on to checking the chain and gears for any issues.
Check the Chain and Gears
First things first, take a good look at your chain and gears to ensure they’re in tip-top shape for a smooth and efficient ride. Regular maintenance of your chain and gears is crucial to keep your electric bike running smoothly and to prevent any potential problems.
Over time, dirt, debris, and rust can accumulate on the chain, causing it to become less efficient and potentially leading to shifting issues. To maintain your chain and gears, start by cleaning them thoroughly with a degreaser and a brush. Then, check for any signs of wear or damage, such as loose links or bent teeth. If you notice any issues, it’s important to address them promptly by replacing worn-out parts or adjusting the derailleur.
By keeping your chain and gears in good condition, you’ll ensure a more enjoyable and trouble-free ride.
Now, let’s move on to testing the pedal assist system.
Test the Pedal Assist System
Once you’ve checked the chain and gears, it’s time to experience the exhilaration of testing the pedal assist system.
Troubleshooting techniques for the pedal assist system can help identify common issues that may be causing your electric bike to not work properly.
Start by ensuring that the pedal assist sensor is properly aligned and securely attached to the bike frame. Check the wiring connections for any loose or damaged wires that may be affecting the system.
Additionally, inspect the battery and make sure it is fully charged and properly connected to the bike. Test the different levels of pedal assist to see if they are functioning correctly.
If the pedal assist system is still not working, it’s time to look for error codes or warning lights, which will be discussed in the next section.
Look for Error Codes or Warning Lights
After testing the pedal assist system and finding no issues, it’s important to look for error codes or warning lights on your electric bike. These indicators can provide valuable troubleshooting tips and help identify common problems that may be causing your bike to not work properly.
Error codes can range from simple issues like a loose connection to more complex problems like a faulty motor or battery. By paying attention to these codes or lights, you can gain insight into what specific area of your electric bike needs attention.
Once you have identified the error code or warning light, consult the user manual or manufacturer’s website for further guidance on how to resolve the issue. It’s crucial to follow these troubleshooting steps to ensure your electric bike is back up and running smoothly.
Consult the User Manual or Manufacturer’s Website
To get the best guidance on resolving any issues with your electric bike, make sure to consult the user manual or visit the manufacturer’s website. Troubleshooting tips and common electric bike problems can be found in these resources. The user manual provides detailed instructions on how to troubleshoot and fix common issues that may arise with your electric bike. Additionally, the manufacturer’s website often has a support section that includes troubleshooting guides and frequently asked questions. These resources can help you identify the problem and find the appropriate solution. However, if you are unable to resolve the issue on your own, consider taking it to a professional for repairs.
Consider Taking it to a Professional for Repairs
If all else fails, it’s worth considering bringing in a professional to fix your e-bike. While DIY repairs can be a cost-effective option, some issues may require the expertise of a trained technician. By consulting a professional, you can ensure that the problem is accurately diagnosed and fixed, preventing further damage to your electric bike.
Additionally, they have access to specialized tools and equipment that may be necessary for repairs. Before seeking professional help, though, it’s important to exhaust all other options. Consult the user manual or manufacturer’s website for troubleshooting tips and solutions. Many manufacturers provide comprehensive guides and videos that can assist you in resolving common issues.
Taking proactive steps to prevent future issues is crucial in maintaining the optimal performance of your electric bike.
Take Steps to Prevent Future Issues
One way to avoid future issues with your e-bike is by performing regular maintenance and following the manufacturer’s recommendations. By taking proactive steps, you can ensure that your electric bike continues to perform at its best. Here are some common electric bike troubleshooting tips and how to maintain the performance of your electric bike:
| Common Troubleshooting Tips | Maintaining Performance |
|---|---|
| Check battery charge | Keep tires properly inflated |
| Verify electrical connections | Clean and lubricate the chain regularly |
| Inspect brakes and brake pads | Store your e-bike in a dry and secure location |
| Monitor motor performance | Avoid extreme temperatures |
Regularly checking the battery charge, verifying electrical connections, inspecting brakes, and monitoring motor performance are essential for identifying any potential issues. Additionally, maintaining performance involves keeping your tires properly inflated, cleaning and lubricating the chain regularly, and storing your e-bike in a dry and secure location. By following these tips, you can prevent future problems and ensure the longevity of your electric bike.
Frequently Asked Questions
How do I check the battery connection on my electric bike?
To check the battery connection on your electric bike, start by disconnecting the battery from the bike. Use a multimeter to measure the voltage across the battery terminals. If the voltage is low, troubleshoot the charging issues by inspecting the charger and charging port.
How can I test the power switch on my electric bike?
To test the power switch on your electric bike, start by ensuring the battery is fully charged. Then, carefully press the power switch while observing any changes in battery life or troubleshooting motor issues.
What should I do if I notice any loose or damaged parts on my electric bike?
If I notice any loose or damaged parts on my electric bike, I should immediately address them to ensure optimal performance and safety. Regular maintenance, as outlined in the troubleshooting guide, is crucial for a well-functioning electric bike.
How do I confirm the tire pressure on my electric bike?
To check the tire pressure on my electric bike, I use a tire pressure gauge. I ensure it is at the recommended PSI for optimal performance. Additionally, I troubleshoot the battery connection to ensure it’s securely connected.
What steps can I take to prevent future issues with my electric bike?
To prevent future issues with your electric bike, it’s important to prioritize regular bike maintenance. This includes cleaning and lubricating the chain, checking tire pressure, inspecting the brakes, and keeping all electrical connections secure. Additionally, familiarize yourself with troubleshooting tips to address any potential issues promptly.
Conclusion
After troubleshooting my electric bike’s issues, I have come to realize that its problems were not just mechanical, but symbolic of the challenges we face in life.
Just like the battery connection, we must ensure our connections with others are strong.
And like charging the battery, we need to recharge ourselves and find balance.
Testing the power switch is akin to evaluating our choices, while examining the motor represents self-reflection.
By inspecting the wiring, we can identify the threads that hold our lives together.
Just as error codes guide us, learning from our mistakes is crucial.
Overall, maintaining our electric bike, like our lives, requires attention, patience, and a commitment to preventing future issues.