Imagine this: You are riding down the street on your reliable bike, feeling the breeze in your hair and the liberation of being on two wheels.
But wait, what’s that annoying clicking noise? It’s like a persistent mosquito buzzing in your ear, ruining your peaceful ride.
Fear not, my fellow cyclists, for I have the solutions to end this auditory assault. In this article, I will delve into the technical nitty-gritty of the bicycle clicking noise when pedaling, providing you with precise and detailed steps to silence that pesky sound.
So, hop on and let’s get to the bottom of this noise mystery.
Key Takeaways
- Inspect hubs, wheel rims, brakes, and spokes to identify the source of the clicking noise.
- Adjust saddle height and angle to prevent discomfort and improve efficiency.
- Check brake pad wear, alignment, and cables to ensure proper functioning and eliminate noise.
- Take the bike to a professional mechanic for a thorough evaluation and expert advice to address the underlying problems and ensure safe riding.
Check for Loose Pedals
You should check if the pedals are loose when troubleshooting a clicking noise in your bicycle.
Proper bicycle maintenance involves inspecting various components to identify potential issues.
Start by standing next to your bike and grasping one pedal with your hand. Apply pressure in a downward and backward motion to check for any movement or play. Repeat this process with the other pedal.
If you notice any looseness or wobbling, use a pedal wrench to tighten them securely. Loose pedals can cause a clicking noise as you pedal, so it’s crucial to address this issue.
Once you have confirmed the pedals are tight, you can move on to inspecting the chain and chainring to continue troubleshooting the source of the clicking noise.
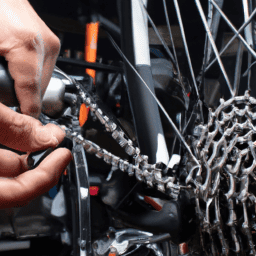
Inspect the Chain and Chainring
Inspecting the chain and chainring can help identify the source of the clicking sound while riding.
To start, check the chain tensioner to ensure it is properly adjusted. A loose or misaligned tensioner can cause the chain to rub against the chainring, resulting in a clicking noise.
Next, examine the chain for any signs of wear or damage. Look for tight spots or stretched links, as these can also contribute to the noise.
Additionally, make sure the chain is properly lubricated. A dry or dirty chain can create friction and produce unwanted sounds. Apply a suitable lubricant and wipe off any excess to ensure smooth operation.
By inspecting the chain and chainring, you can rule out any issues with these components before moving on to examine the bottom bracket, which may be the source of the clicking noise.
Examine the Bottom Bracket
Take a look at the bottom bracket to determine if it could be causing the clicking sound. Here are a few things to consider:
-
Checking frame alignment: Make sure the frame is properly aligned, as misalignment can cause the bottom bracket to move and create noise. Inspect the frame for any cracks or damage that may be affecting its alignment.
-
Lubricating bottom bracket: Apply a generous amount of lubricant to the bottom bracket to reduce friction and prevent any clicking. Ensure that the lubricant is compatible with the type of bottom bracket you have.
-
Inspecting bearings: Examine the bearings for any signs of wear or damage. If they are worn out, they may need to be replaced.
-
Tightening bolts: Check the bolts that secure the bottom bracket to the frame. If they are loose, tighten them to eliminate any play that could be causing the clicking noise.
-
Examining crank arms: Take a look at the crank arms to ensure they are properly tightened and aligned. Loose or misaligned crank arms can also produce clicking sounds.
By examining the bottom bracket and taking these steps, you can address any potential issues that may be causing the clicking noise.
Now, let’s move on to tightening the crank arms.
Tighten the Crank Arms
To address the issue, start by tightening the crank arms. A clicking noise in the crank arms can be caused by loose or improperly installed crank arms. To fix this, you will need a crank arm removal tool, a torque wrench, and some grease.
First, remove the crank arms using the removal tool. Clean the spindle and crank arm interface thoroughly. Apply a thin layer of grease to the spindle. Reinstall the crank arms and tighten them to the manufacturer’s recommended torque using the torque wrench. Make sure the crank arms are securely tightened and do not wobble.
Once the crank arms are tightened, check the pedal bearings for any signs of wear or damage. This will help diagnose and fix any clicking noise in the pedals.
Check the Pedal Bearings
Start by checking the pedal bearings to see if there is any wear or damage. This is an important step in diagnosing the clicking noise when pedaling. To inspect the pedal bearings, you will need to remove the pedals from the crank arms. Once the pedals are off, carefully examine the bearings for any signs of wear or damage. Look for any excessive play or roughness when rotating the pedals. If you notice any issues, it is recommended to replace the pedal bearings to eliminate the clicking noise. In addition to checking the pedal bearings, it is also a good idea to inspect the hubs for any loose or worn parts. Properly tightened and maintained hubs can contribute to a quieter ride. Moving on to the next section, let’s inspect the cassette or freewheel for any potential causes of the clicking noise.
Inspect the Cassette or Freewheel
Now it’s time to check out the cassette or freewheel for any potential causes of the clicking sound.
To begin, inspect the rear derailleur carefully. Look for any signs of misalignment or damage that could be contributing to the noise.
Additionally, check the condition of the pedals. Ensure that they are securely attached to the crank arms and that there is no excessive play or looseness. Any issues with the rear derailleur or the pedals could result in a clicking sound when pedaling.
Once you have thoroughly examined the cassette or freewheel, it’s important to transition into the next section about ‘look for loose or worn cleats’ to continue troubleshooting and resolving the clicking noise.
Look for Loose or Worn Cleats
Check if your cleats are loose or worn. Loose or worn cleats can cause a clicking noise when pedaling.
Possible causes of loose cleats include improper installation or insufficient tightening. Worn cleats, on the other hand, can result from prolonged use or excessive walking in cycling shoes.
To troubleshoot this issue, start by inspecting the cleats on your cycling shoes. Ensure that they are securely attached to the shoe and tighten any loose screws if necessary. If the cleats are worn, consider replacing them with new ones. This should help eliminate any clicking noises caused by loose or worn cleats.
Moving on to the next section about checking the derailleurs, you can further diagnose and address any potential issues with your bicycle.
Check the Derailleurs
Inspect your derailleurs to ensure they’re properly adjusted and functioning smoothly. To troubleshoot any issues with gear shifting, follow these steps:
-
Begin by checking the cable tension. If the derailleur isn’t shifting properly, it may be due to improper cable tension. Adjust the tension by turning the barrel adjuster clockwise to tighten or counterclockwise to loosen.
-
Next, examine the derailleur hanger alignment. A misaligned hanger can cause poor shifting performance. Use a derailleur alignment tool to straighten the hanger if necessary.
-
Check the limit screws. These screws control the range of motion of the derailleur. Make sure they’re properly adjusted to prevent overshifts or chain drops.
-
Lastly, inspect the jockey wheels. These small wheels can become dirty or worn out over time, leading to shifting issues. Clean or replace them if necessary.
Inspect the hubs to ensure they’re in proper working condition and continue troubleshooting the clicking noise.
Inspect the Hubs
To make sure your hubs are functioning properly, take a close look at them. Start by inspecting the wheel rims for any signs of damage or wear. Look for dents, cracks, or uneven surfaces, as these can affect the overall performance of your bicycle.
Additionally, check for loose spokes by gently squeezing them with your fingers. If you notice any movement or hear a clicking sound, it may indicate that the spokes need to be tightened. Loose spokes can cause the wheel to wobble and result in an annoying clicking noise when pedaling.
Once you have inspected the hubs and wheel rims, it’s time to move on to the next step: tightening the seatpost.
Tighten the Seatpost
Make sure you tighten the seatpost securely to ensure a comfortable and stable ride. Adjusting the saddle position is an essential step in achieving proper bike fit and preventing any clicking noises.
Start by loosening the seatpost clamp using an Allen wrench. Once loosened, adjust the saddle position to your desired height and angle. Remember to align the saddle with the center of the bike frame.
After adjusting, tighten the seatpost clamp until it is snug, making sure not to overtighten. To further prevent clicking noises, consider lubricating the seatpost with a small amount of grease or anti-seize compound before reassembling. This will help reduce friction and ensure smooth movement.
With the seatpost securely tightened and lubricated, let’s move on to the next step of checking the saddle for any issues.
Check the Saddle
After tightening the seatpost, the next step in troubleshooting the clicking noise when pedaling is to check the saddle.
As the primary point of contact between the rider and the bike, the saddle plays a crucial role in comfort and efficiency.
Start by ensuring that the saddle height is properly adjusted. A saddle that is too high or too low can cause discomfort and potentially contribute to the clicking noise. Adjust the saddle height according to your preference and riding style.
Additionally, check the saddle angle adjustment. A tilted or uneven saddle can also lead to clicking noises. Make sure the saddle is level and aligned with the ground.
Once you have completed these adjustments, it is time to examine the brake calipers and determine if they are the source of the clicking noise.
Examine the Brake Calipers
First, take a look at the brake calipers to see if they’re causing the issue. Check the brake pads to ensure they’re not worn down or misaligned. Look for any signs of uneven wear or damage on the brake pads; this could be the source of the clicking noise.
Next, inspect the brake cables for any signs of wear or fraying. Worn brake cables can cause the calipers to move improperly, resulting in a clicking sound. Also, make sure the brake calipers are properly aligned and tightened to the frame of the bicycle.
Lastly, check for any loose or damaged parts within the brake calipers. By examining the brake calipers thoroughly, you can determine if they’re the cause of the clicking noise.
Moving on to the next section, inspect the wheel spokes for any issues.
Inspect the Wheel Spokes
Inspecting the wheel spokes is essential to identify any potential issues. When inspecting the wheel spokes, it is important to check for loose pedals. Start by visually examining each spoke for any signs of damage or wear. Look for any loose or broken spokes that may be causing the clicking noise. Use your fingers to gently tap each spoke to ensure they are properly tensioned and not loose. If you encounter any loose spokes, tighten them using a spoke wrench.
Additionally, check the wheel trueness by spinning it and observing any wobbling or inconsistencies. If there are any issues with the wheel spokes, it is recommended to have them repaired or replaced by a professional.
Moving on to the next section about checking the frame and fork, it is crucial to ensure the overall stability and safety of the bicycle.
Check the Frame and Fork
To check the frame and fork, examine them closely for any signs of damage or instability. Look for cracks, dents, or bends in the frame, as these can affect its structural integrity. Check the fork for any signs of wear or damage, such as rust or loose parts.
Frame alignment:
Ensure that the frame is properly aligned by checking if the front and rear wheels are in line with each other. Misalignment can cause the bike to pull to one side or affect the overall stability while riding.
Fork lubrication:
Check the fork for any signs of dryness or lack of lubrication. Apply a suitable lubricant to the fork’s moving parts to ensure smooth operation and reduce friction.
Once you have inspected the frame and fork and made any necessary repairs, it is important to consider taking your bike to a professional bike mechanic for further evaluation and maintenance. They can provide expert advice and ensure that your bike is in optimal condition for safe and enjoyable rides.
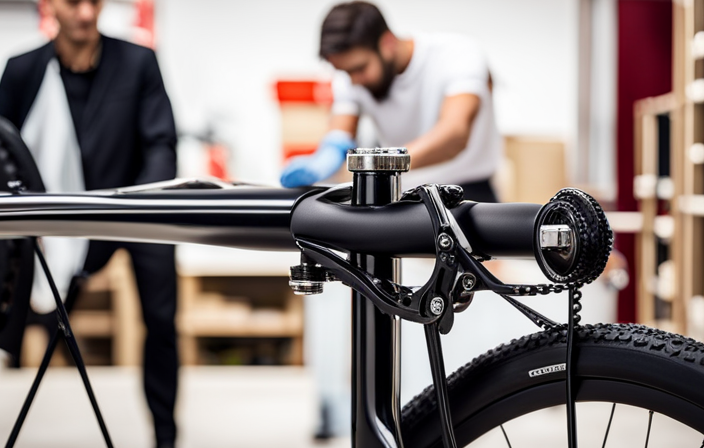
Take it to a Professional Bike Mechanic
If you want to ensure that your bike is in optimal condition, it’s recommended that you take it to a professional bike mechanic for a thorough evaluation and any necessary maintenance. Bike maintenance is crucial to keep your bicycle running smoothly and to prevent common problems such as the clicking noise when pedaling. A professional bike mechanic has the expertise and specialized tools to diagnose and fix any issues with your bike’s frame, fork, or components. They can identify the exact source of the clicking noise and take the necessary steps to eliminate it. By entrusting your bike to a professional, you can have peace of mind knowing that your bike will be thoroughly inspected and any underlying problems will be addressed, ensuring a safe and enjoyable riding experience.
| Common Bicycle Problems | Causes | Solutions |
|---|---|---|
| Clicking Noise | Misaligned components | Realignment and lubrication |
| Loose bolts | Tightening bolts | |
| Worn-out parts | Replacement | |
Frequently Asked Questions
How do I check for loose pedals?
To check for loose pedals, I would first ensure proper pedal maintenance. Common causes of clicking noises in bicycles can be loose pedal threads or worn pedal bearings. Careful examination and tightening may be necessary.
What should I look for when inspecting the chain and chainring?
When inspecting the chain and chainring, I check for chainring wear by examining the teeth for signs of excessive wear or damage. I also check the chain tension, making sure it is properly tensioned and not too loose or too tight.
How do I examine the bottom bracket for any issues?
To evaluate bottom bracket maintenance, start by inspecting for any signs of wear, such as excessive play or grinding sensations. Troubleshooting common bicycle clicking noises involves checking for loose or worn components, ensuring proper installation and alignment, and addressing any issues promptly.
How can I tighten the crank arms properly?
To tighten crank arms properly, first ensure the bottom bracket is in good condition. Use a torque wrench to tighten the crank bolt to the manufacturer’s specified torque. Loose crank arms can be a common cause of clicking noise in bicycle pedals.
What signs should I look out for when checking the pedal bearings?
When checking pedal bearings, signs of worn bearings include excessive play or roughness when spinning the pedals. To replace pedal bearings, remove the pedals, disassemble the pedal body, and replace the worn bearings with new ones.
Conclusion
After thoroughly inspecting and addressing all potential causes of the clicking noise in my bicycle, I can confidently say that my bike is now as silent as a whisper in a library.
Every loose pedal, chain, and crank arm has been tightened, and the pedal bearings have been meticulously checked.
The brake calipers, wheel spokes, frame, and fork have all been examined and found to be in perfect condition.
If you’re experiencing a similar issue, I highly recommend taking your bike to a professional bike mechanic for a thorough inspection and repair.