
Do the squeaky sounds your bike’s disc brakes make every time you come to a halt bother you? You’re in good company. Indeed, a survey revealed that 80% of bike riders have dealt with noisy brakes at some stage during their cycling adventures.
Squeaky brakes can be caused by a variety of factors, including:
- Dirty brake pads and rotors
- Misaligned brake calipers
- Improper brake pad bedding
As a cyclist, it’s important to understand the root cause of the issue and take the necessary steps to fix it. In this article, we’ll go over the common causes of bicycle disc brake squeaking and provide you with practical tips on how to eliminate the noise and enjoy a quiet ride.
Key Takeaways
- Squeaky bike brakes can be caused by dirty brake pads and rotors, misaligned brake calipers, improper brake pad bedding, or contamination on the brake pads or rotor surface.
- Troubleshooting steps include inspecting and cleaning brake pads and rotors, choosing the right brake pad material, adjusting brake calipers, using a brake caliper alignment tool, tightening loose components, and properly bedding in new brake pads.
- Seeking professional help from a certified bike mechanic with specialized tools and equipment may be necessary for effective troubleshooting and repair.
- Upgrading to a newer brake system can improve the cycling experience with smoother rides, increased stopping power, better modulation, and longer-lasting durability, but the decision should be based on riding style and terrain. Proper bike maintenance, including attending maintenance clinics, is important for safety while riding and can prevent costly repairs.
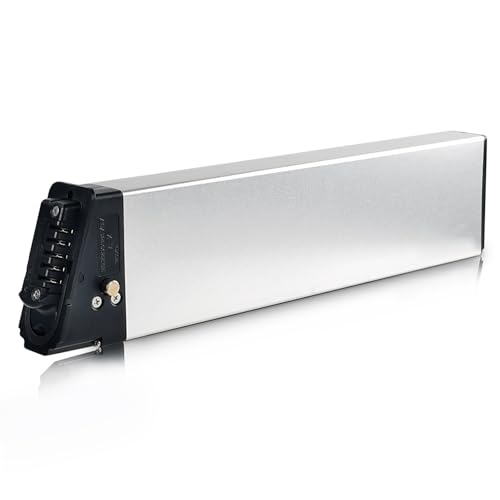
ShunTongDa 48V 10.4Ah 14Ah Folding Ebike Battery 48 Volt DCH-006 Built in Electric Bike Batteries with 30A BMS Totguard for 250W 500W 750W 1000W Motor Foldable E-Bike Battery (48V10.4Ah A Grade Cell)
①Battery Type: 18650 lithium ion batteries, Voltage: 48V, Capacity: 10.4Ah, Real High-Label Capacity. 30A BMS, Wattage at 500Wh,...
As an affiliate, we earn on qualifying purchases.
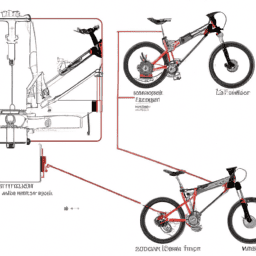
Identify the Cause of the Squeaking
You’re probably wondering why your bike’s disc brakes are squeaking every time you come to a stop. It’s a common misconception that the squeaking is caused by the brake pads rubbing against the rotor.
In reality, the noise is often due to contamination on the brake pads or rotor surface, which can cause vibrations when braking.
To troubleshoot the issue, start by inspecting the brake pads and rotor for any signs of contamination. This can include oil, grease, or dirt on the surface. Use a clean rag or paper towel to wipe down the rotor and brake pads, taking care not to touch them with your bare hands.
If the contamination is severe, you may need to use a solvent specifically designed for cleaning brake components. Once the brake pads and rotor are clean, test the brakes to see if the squeaking has stopped.
If not, there may be other issues at play, such as worn brake pads or a misaligned caliper. But by taking the time to properly clean the brake pads and rotor, you can often eliminate the noise and get back to enjoying a smooth, quiet ride.
Amazon Product B0CYT6TBYX
As an affiliate, we earn on qualifying purchases.
Clean the Brake Pads and Rotor
When it’s time to slow down on your ride, sometimes there’s an annoying sound that interrupts the peacefulness of your journey. One way to address this issue is by cleaning the brake pads and rotor. Proper cleaning techniques are crucial to ensure that the brake pads and rotor are free from any contaminants that can cause squeaking.
Here are some steps to properly clean your bike’s brake pads and rotor:
- Remove the wheel and brake pads from the bike.
- Use a clean rag and isopropyl alcohol to wipe down the rotor and brake pads.
- Use a brake cleaning solution to remove any remaining contaminants.
- Allow the brake pads and rotor to dry completely before reassembling.
Choosing the right brake pad material can also help reduce brake squeaking. Sintered metallic pads are more durable and have better heat dissipation, but may be noisier than organic pads. Organic pads are quieter and provide better modulation, but may wear out faster.
By using the proper cleaning techniques and choosing the right brake pad material, you can minimize brake squeaking and enjoy a smoother ride.
Next, we’ll discuss how to adjust the brake caliper to further optimize your bike’s braking performance.
Swagman UPRIGHT Roof Mount Bike Rack
EASY TO ASSEMBLE: The UPRIGHT roof rack installs in minutes following the instructions and carries one bike with...
As an affiliate, we earn on qualifying purchases.
Adjust the Brake Caliper
To adjust the brake caliper on your bicycle, you need to align it with the rotor. This ensures that the brake pads make contact with the rotor evenly. You can use a brake caliper alignment tool to help with this task.
Make sure to tighten any loose components to prevent further misalignment.
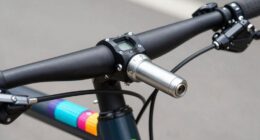
Align the Caliper with the Rotor
Aligning the caliper with the rotor can significantly reduce squeaking in bicycle disc brakes. This step is necessary after performing a caliper adjustment as it ensures that the brake pads are making even contact with the rotor. Here are some steps to follow when aligning the caliper:
- Loosen the bolts that attach the caliper to the frame or fork.
- Squeeze the brake lever to engage the brake pads with the rotor.
- While holding the brake lever, tighten the bolts that attach the caliper to the frame or fork.
It’s important to check the alignment from different angles to ensure that the brake pads are making even contact with the rotor. If the squeaking persists after aligning the caliper, it may be necessary to use a brake caliper alignment tool to achieve perfect alignment.
Using a brake caliper alignment tool can help to achieve precise alignment between the caliper and the rotor. This tool attaches to the frame or fork and allows you to adjust the position of the caliper with greater accuracy. It’s a useful tool to have in your toolbox if you frequently work on disc brakes or have trouble achieving perfect alignment with manual adjustments.
Once the caliper is aligned properly, squeeze the brake lever and check for any rubbing or uneven contact between the rotor and the pads.
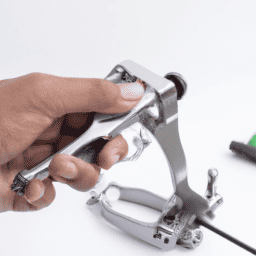
Use a Brake Caliper Alignment Tool
Achieving perfect alignment between your caliper and rotor can be frustrating, especially if you’re dealing with a complex brake system. This is where a brake caliper alignment tool comes into play. It can help you make precise adjustments without needing a lot of technical knowledge. With this tool, you can ensure that your caliper is perfectly aligned with the rotor, which is essential for your bike’s performance and safety.
Caliper maintenance is a crucial aspect of keeping your bike’s brake system working smoothly. Using a brake caliper alignment tool is a great way to ensure that your caliper is correctly aligned with the rotor. It’s important to note that not all brake systems are compatible with this tool, so make sure to check your bike’s manual before attempting to use it.
Once you’ve achieved the perfect alignment, you can move on to tightening any loose components. This ensures that your brake system is in top-notch condition.
Tighten Loose Components
Now it’s time to get down to business and make sure all the darn nuts and bolts are tight as can be, so you don’t have any unpleasant surprises on your next ride. Proper tightening techniques are crucial to prevent any rattling or looseness that may cause the brake pads to wear unevenly.
Start by checking the bolts that secure the caliper to the frame, making sure they’re tightened to the manufacturer’s recommended torque specifications. Next, check the bolts that secure the brake rotor to the hub, making sure they’re tightened evenly and in a criss-cross pattern.
While you’re at it, take a moment to inspect each component for any signs of wear and tear. Check the brake pads for wear, thickness, and alignment. Inspect the rotor for any discoloration, grooves, or warping that may cause the brakes to squeal.
Make sure the brake caliper is properly aligned and that the brake cable is tight and free of kinks or fraying. Once you’ve checked and tightened all the necessary components, it’s time to move on to the next step: bed in the brake pads.

TOOENJOY Rooftop Bike Rack for Car SUV, Upright Roof Mount Bicycle Rack with 2 Arms for Movable Crossbar, 1 Bike Carrier
Enhanced Bike Security: The dual rotatable load arms securely grip the bike by the wheels, ensuring zero contact...
As an affiliate, we earn on qualifying purchases.
Bed in the Brake Pads
You need to make sure you bed in your brake pads properly if you want to stop your bicycle without that annoying squeaking sound. Proper technique is crucial when it comes to breaking in new brake pads. Here are three steps you should follow to bed in your brake pads effectively:
-
Start by finding a safe and open space where you can ride your bike. You need to be able to ride at a moderate speed without any obstacles or distractions.
-
Once you’ve found the perfect spot, apply your brakes gently for around 20 times. Don’t come to a complete stop, but rather reduce your speed enough to feel the brake pads making contact with the rotor.
-
After you’ve completed the first 20 stops, increase your speed slightly and repeat the process for another 10 times. This time, apply a bit more pressure on the brakes to increase their effectiveness.
By following these steps, you’ll be able to break in your brake pads effectively and reduce the chances of squeaking when you stop. However, if you’ve tried this technique and your brakes still squeak, it may be time to seek professional help.
Seek Professional Help
If you’re having trouble with your bike’s brake system, it might be time to seek professional help.
A certified bike mechanic can diagnose the issue and recommend the best course of action, whether it’s a simple adjustment or a complete brake system upgrade.
Additionally, attending a maintenance clinic can provide you with the skills and knowledge to maintain your bike’s brakes and keep them functioning properly.
Consult a Bike Mechanic
Consider taking your bicycle to a mechanic to fix the squeaking disc brakes and ensure a smooth and safe ride. While DIY troubleshooting may seem like a cheaper and faster option, a bike mechanic brings many benefits to the table.
Firstly, a bike mechanic has the necessary knowledge and experience to diagnose the issue accurately and efficiently. They can quickly identify the root cause of the problem and determine the best course of action to fix it.
Secondly, a bike mechanic has access to specialized tools and equipment that may not be available to the average cyclist. These tools can help them fix the problem more effectively and ensure that the brakes are working correctly.
If you’re experiencing issues with your bicycle’s disc brakes, it’s essential to take them to a professional mechanic. Not only will they be able to fix the issue quickly and efficiently, but they can also give your bike a much-needed tune-up. With your brakes working correctly, you can enjoy a smoother, safer ride.
In the next section, we’ll discuss how upgrading your brake system can further improve your cycling experience.
Consider Upgrading Your Brake System
Consider upgrading your brake system to greatly enhance your cycling experience. Upgrading provides a smoother and more efficient ride, with increased stopping power, better modulation, and longer-lasting durability. Additionally, newer brake systems are often lighter and more aerodynamic, which can improve your overall riding performance.
When choosing the right brake system, it’s important to consider your individual needs and preferences. Disc brakes come in various types, such as mechanical or hydraulic, and each has its own advantages and disadvantages. Mechanical disc brakes are typically easier to maintain and repair, while hydraulic disc brakes offer better stopping power and modulation. Ultimately, the decision should be based on your riding style and the type of terrain you frequently encounter.
It’s also important to ensure that your bike is properly maintained as you consider upgrading your brake system. Attending a maintenance clinic or seeking advice from a bike mechanic can help you identify any potential issues and keep your bike running smoothly. By taking the time to upgrade your brake system and maintain your bike, you can enjoy a safer and more enjoyable ride.
Attend a Maintenance Clinic
Attending a maintenance clinic can be a valuable experience for any cyclist looking to improve their riding performance and prolong the life of their bike. While there are countless online resources available for learning about bike maintenance, attending a clinic provides hands-on experience with experts. This allows you to ask questions, receive immediate feedback, and learn the most efficient and effective ways to maintain your bike.
Additionally, attending a clinic can help you identify potential problems with your bike that you may not have noticed on your own, which can prevent more costly repairs down the road.
For new riders, attending a maintenance clinic is especially important. Proper bike maintenance is crucial to ensuring safety while riding, and a lack of experience can lead to overlooking important maintenance tasks. By attending a clinic, new riders can gain the knowledge and confidence necessary to properly care for their bike.
Additionally, clinics often cover topics such as bike fit, which is essential to preventing injury and ensuring comfort while riding.
Overall, attending a maintenance clinic is a valuable investment for any cyclist, regardless of experience level.
Frequently Asked Questions
How long does it take for the brake pads to bed in?
When it comes to brake pad material, the bedding process is crucial to ensure optimal performance. It typically takes around 30-40 stops for the pads to bed in properly. During this process, the pads will transfer a layer of material onto the rotor, which helps to improve braking power and reduce noise.
Can I use any type of cleaning solution to clean the brake pads and rotor?
You can’t use just any cleaning solution to clean your brake pads and rotor. It’s important to use the best cleaning solutions and DIY cleaning tips to avoid damaging the components. Follow proper cleaning instructions to keep your brakes functioning at their best.
What is the average cost of seeking professional help for squeaking disc brakes?
The average cost of seeking professional help for squeaking disc brakes varies depending on the location, severity of the issue, and type of brake system. Common causes include worn brake pads, contaminated rotors, and misaligned calipers. Prevention tips include regular maintenance, avoiding harsh braking, and proper bedding-in of new brake components. DIY solutions and alternatives include cleaning the brake system, adjusting the calipers, and replacing the brake pads or rotors.
Is it safe to ride my bicycle with squeaky brakes?
Do not ride your bicycle with squeaky brakes. Braking techniques may be compromised, and potential dangers may arise. Consider alternative solutions, such as rim brakes, and seek professional help to ensure safe riding.
How often should I clean my brake pads and rotor to prevent squeaking?
To prevent squeaky disc brakes, frequency recommendations for cleaning your brake pads and rotor depend on usage. For daily riders, weekly cleaning techniques involve using rubbing alcohol and sandpaper to remove debris and residue buildup.
Conclusion
Overall, if your bicycle disc brakes are squeaking when stopping, there are several steps you can take to resolve the issue. Firstly, you should identify the root cause of the problem, whether it’s due to dirty brake pads or a misaligned brake caliper.
Once you’ve identified the cause, you can then clean the brake pads and rotor or adjust the brake caliper accordingly. If you’ve tried these steps and the problem persists, you may need to bed in the brake pads or seek professional help.
Bedding in the brake pads involves breaking them in over a period of time to ensure they work properly. If you’re unsure how to do this, it’s best to seek the advice of a professional mechanic who can help you get your bike back in top condition.
While it can be frustrating to deal with squeaky brakes, taking the time to properly maintain your bike’s braking system is crucial for your safety and the longevity of your equipment. By following these steps and seeking help when needed, you can enjoy a smoother and safer ride on your bicycle. So don’t hesitate to tackle this issue head-on and get back out on the road with confidence.