Connect with us

Beach Cruiser

How Do Bicycle Brakes Work

Published

on

Riding my bike along the roadway, I’m aware that I might have to halt abruptly at any time. Fortunately, my reliable brakes are there to decelerate my speed and prevent any potential accidents. Ever curious about the mechanism behind these brakes?

In this article, I’ll be exploring the science behind bicycle braking and the different types of brakes available. From the classic rim brakes to the more modern disc brakes, there are a variety of ways to stop a bicycle. But how do they each work? Understanding the mechanics behind these systems can not only make you a better cyclist, but also help you properly maintain and troubleshoot your brakes.

So, let’s dive into the world of bicycle brakes and discover how they keep us safe on the road.

Key Takeaways

  • Bicycle brakes work through friction between brake pads and the wheel rim/rotor.
  • Proper maintenance, including regular inspection and replacement of brake pads, is essential for optimal brake performance and safety.
  • Hydraulic brakes use fluid to transfer force, while mechanical brakes use cables, and both types can be used for rim or disc brakes.
  • Factors affecting brake function include friction coefficients and braking force distribution, with a well-balanced distribution being essential for safe and effective stopping.

Overview of Bicycle Brakes

So, you’re probably wondering how your bike’s brakes actually stop you – well, it’s all about friction between the brake pads and the wheel rim.

There are two main types of brake pads: rubber and metallic. Rubber pads are quieter and provide better modulation, but wear out faster. Metallic pads provide better stopping power and last longer, but can be noisy and harsh on the rims.

When it comes to the mechanism that activates the brake pads, there are two main types of brakes: hydraulic and mechanical. Hydraulic brakes use fluid to transfer force from the brake lever to the brake pads. They offer better modulation and require less effort to apply than mechanical brakes.

Advertisement

Mechanical brakes use cables to transfer force from the brake lever to the brake pads. They are simpler and more cost-effective, but require more hand strength and are less precise.

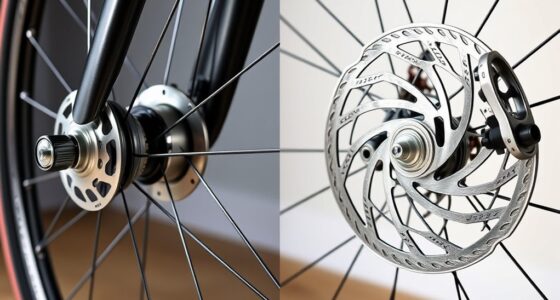
Rim brakes, which use friction between the brake pads and the wheel rim to slow down the bike, can be either hydraulic or mechanical.

Rim Brakes

You’ll love how efficiently rim brakes stop your bike with just a simple squeeze of the brake lever. Rim brakes work by using brake pads that press against the rim of the wheel to slow down or stop the bike. The brake pads are made of rubber or other materials that provide friction against the rim.

When you squeeze the brake lever, the cable tension increases, causing the brake pads to press against the rim. The harder you squeeze the lever, the more cable tension is applied, and the more force is applied to the brake pads, resulting in a stronger braking force.

To ensure that your rim brakes work properly, it’s important to maintain the correct cable tension. If the cable tension is too loose, the brake pads won’t make enough contact with the rim, resulting in weak braking. On the other hand, if the cable tension is too tight, the brake pads will rub against the rim even when you’re not braking, causing unnecessary wear and tear on both the brake pads and the rim.

Advertisement

By adjusting the cable tension, you can ensure that your rim brakes provide optimal stopping power when you need it.

Moving on to the next section, disc brakes offer a different type of braking system that provides even more stopping power and control.
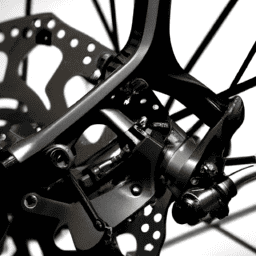
Disc Brakes

Get ready for a thrilling ride with disc brakes, as they give you the ultimate control and stopping power that will make your heart race.

Disc brakes are a type of braking system that uses a metal rotor, usually made of steel, attached to the hub of the wheel. When the brake lever is pulled, brake pads, often made of resin or metallic compounds, are forced onto the rotor, creating friction that slows down the wheel.

One of the advantages of disc brakes is their increased stopping power, especially in wet or muddy conditions. However, this also means that they produce more heat than rim brakes, which can cause the brake pads to wear out faster.

Advertisement

Proper disc brake maintenance, including regularly checking and replacing worn brake pads, is essential to ensure the best performance and safety. Upgrading disc brakes can also improve their performance, with options such as larger rotor sizes or different brake pad materials.

Transitioning into the subsequent section about "the science behind braking,"it’s important to understand how the design and materials of disc brakes affect their stopping power and durability.

The Science Behind Braking

Understanding the science behind how brakes function can make you appreciate the engineering behind your bike even more. When you squeeze the brake lever, the brake pads come in contact with the wheel rim or rotor, creating friction that slows down the bike.

This simple action is made possible by the complex interplay of multiple factors, such as the friction coefficients of the brake pads and the wheel surface, as well as the braking force distribution between the front and rear brakes.

To fully appreciate the science behind braking, consider the following nested bullet point list:

Advertisement
  • Friction coefficients:

  • The friction coefficient is a measure of the force required to move one object over another, and it plays a critical role in how your brakes function.

  • The higher the coefficient, the greater the stopping power.

  • Braking force distribution:

  • The distribution of braking force between the front and rear brakes is essential for maintaining stability and preventing skidding.

  • A well-balanced distribution can help you stop quickly and safely, especially in emergency situations.

When it comes to bike maintenance and troubleshooting, understanding how your brakes work can help you diagnose and fix any issues that may arise.

Maintenance and Troubleshooting

Maintaining your bike and keeping it in top shape is crucial for ensuring a smooth and safe ride. When it comes to bicycle brakes, regular maintenance is especially important. One of the most common issues with brakes is worn out brake pads. Over time, the rubber on the brake pads will wear down, reducing their effectiveness. To replace the brake pads, you’ll need to remove the old ones and install new ones. This is a relatively simple process that can be done with a few basic tools. When replacing the brake pads, be sure to choose pads that are compatible with your bike’s braking system.

Another issue that can arise with bicycle brakes is adjusting cable tension. If your brakes feel loose or unresponsive, it may be due to loose cable tension. To adjust the tension, begin by locating the barrel adjuster on the brake lever. This is a small knob or screw that can be turned to increase or decrease tension in the brake cable. Turn the knob or screw clockwise to increase tension and counterclockwise to decrease tension. Once you’ve adjusted the tension, test the brakes to ensure they are working properly. By learning how to troubleshoot and maintain your bike’s brakes, you can ensure a safe and enjoyable ride every time.

Brake Pad Replacement Adjusting Cable Tension
Remove old brake pads Locate barrel adjuster on brake lever
Install new brake pads Turn knob/screw clockwise to increase tension
Choose compatible pads Turn knob/screw counterclockwise to decrease tension
Use basic tools Test brakes to ensure proper function Adjust as needed and fine-tune if necessary.

Frequently Asked Questions

What is the maximum weight capacity for bicycle brakes?

As a cyclist, I know that weight limitations and brake pad compatibility are important factors to consider. The maximum weight capacity for bicycle brakes depends on the specific model and type, and it’s crucial to ensure that the brake pads are compatible with your bike.

Can you use different brake pads on the same type of brake system?

Did you know that brake pad compatibility can affect a bike’s stopping power? While similar pads may fit the same brake system, performance differences can occur. Always check compatibility to ensure optimal braking performance.

Advertisement

How long do brake cables typically last before needing replacement?

Brake cables typically need replacement after 1-2 years of regular use. Signs of wear include fraying, kinks, or rust. Regular cable maintenance can extend their lifespan.

Is it safe to use worn-out brake pads in an emergency situation?

As a bike mechanic, I do not recommend using worn-out brake pads in emergency braking situations. The material becomes less effective over time, increasing stopping distance. Always prioritize safety and replace worn-out brake pads promptly.

How do different weather conditions affect the performance of bicycle brakes?

In rainy weather, braking efficiency decreases due to reduced friction between the brake pads and the wet rims. Extreme temperatures can also affect brake pads, causing them to harden or wear out faster.

Conclusion

In conclusion, understanding how bicycle brakes work is crucial for any cyclist out there. Whether you prefer rim brakes or disc brakes, the principles behind their operation are the same.

As I’ve mentioned earlier, braking is all about converting kinetic energy into heat energy, and that’s where the brake pads come in. By applying pressure to the rim or rotor, the pads slow down the wheel, bringing the bike to a halt.

Advertisement

But there’s more to braking than just pressing on the levers. Proper maintenance and troubleshooting are essential to ensure your brakes are functioning correctly. By keeping an eye on your brake pads, cables, and calipers, you can identify any issues that may arise and fix them before they become a safety hazard.

Remember, brakes are one of the most critical components of your bike, and neglecting them could lead to disastrous consequences.

In the end, understanding the science behind braking not only makes you a better cyclist but also gives you a deeper appreciation for the engineering that goes into creating these essential parts. As the great inventor Thomas Edison once said, "To invent, you need a good imagination and a pile of junk."And while bicycle brakes may not be junk, they are a testament to human ingenuity and the power of innovation.

So next time you hit the brakes on your bike, take a moment to reflect on the beauty of this simple yet vital technology.

Advertisement

Olivia's writing is not only informative but also inspiring. She has a knack for telling stories that capture the essence of cycling and the joy it brings to people's lives. Her writing has been praised by readers and industry experts alike for its clarity, depth, and authenticity. In addition to her writing, Olivia is also an avid cyclist. She enjoys exploring new trails and routes and has participated in several cycling events and races. Her first-hand experience with cycling gives her a unique perspective on the sport, reflected in her writing. Overall, Olivia is a talented writer passionate about cycling and dedicated to producing high-quality content for FlatironBike. Her contributions to the magazine have helped make it a go-to source for cycling enthusiasts worldwide.

Continue Reading
Advertisement

Beach Cruiser

How To Clean A Bicycle Chain

Published

on

By

Cycling is a passion of mine, yet nothing detracts from a great ride more than a bicycle chain that’s dirty, gritty, or loud. Keeping the chain clean is crucial for the best performance and durability of the bike. However, for those new to it, the thought of cleaning a bike chain can be intimidating.

Don’t worry, though – in this article, I’ll walk you through the step-by-step process of how to clean a bicycle chain.

Before we dive in, let’s take a moment to understand why cleaning your bicycle chain is so important. Over time, dirt, dust, and grime can accumulate on your chain, causing it to wear out faster and perform poorly. A dirty chain can also negatively affect your bike’s shifting and braking, and can even make it harder to pedal.

By regularly cleaning your chain, you can extend its life, improve your bike’s performance, and enjoy a smoother, quieter ride. So, let’s get started!

Key Takeaways

  • Regular chain maintenance can extend chain life and improve performance.
  • Neglecting chain maintenance can lead to decreased performance, wear and tear, and rust buildup.
  • Proper cleaning with degreaser and lubrication can reduce friction and wear.
  • Removing the master link can make cleaning and lubrication easier, and reinstallation should be done properly using a chain tool and new quick link if necessary.

Understand the Importance of Cleaning Your Bicycle Chain

You need to understand why it’s crucial to clean your bike chain if you want to keep it in top condition. Regular chain maintenance offers several benefits, including smoother gear shifting, increased efficiency, and longer chain life.

If you neglect your chain, dirt, grime, and other contaminants will accumulate on it, leading to wear and tear that can cause it to stretch or break. A dirty chain also creates unnecessary friction, which can slow you down and make your ride less enjoyable.

Advertisement

To prevent chain wear and tear, there are a few tips you should keep in mind. First, avoid cross-chaining, which means using the largest chainring with the largest cog or the smallest chainring with the smallest cog. This puts extra stress on the chain and can lead to premature wear.

Second, shift gears smoothly and avoid sudden, jerky movements that can strain the chain.

Third, make sure your chain is properly lubricated to reduce friction and prevent rust buildup. With these tips in mind, you’ll be able to keep your bike chain in top shape and enjoy a smoother, more efficient ride.

Now, let’s move on to gathering the necessary supplies for cleaning your chain.

Gather the Necessary Supplies

First, grab a rag and a bottle of lubricant to prepare for the maintenance of your trusty two-wheeler. It’s important to have a clean rag to wipe off any dirt and grime from the chain, as well as a high-quality lubricant to keep it running smoothly. Additionally, you may want to invest in a chain degreaser to remove any stubborn build-up.

Advertisement

Proper storage of your bike also plays a crucial role in the longevity and efficiency of your chain. When not in use, it’s best to store your bike in a dry, cool place. This will prevent rust and minimize wear and tear on the chain.

With the necessary supplies on hand and a bit of care, you can ensure your bike chain stays in top condition. Now, let’s move on to the next step of removing the chain from your bike.

Remove the Chain from Your Bike

Now, it’s time to get down and dirty and wrench that stubborn chain off your bike like a biker boss. First, you need to locate the master link on your chain. The master link is the link that can be easily removed without the need for a chain tool. It usually has a clip or a pin that holds it in place. Check your chain for any chain wear indicators, such as stretched links or kinks, which may indicate that the chain needs to be replaced.

Once you’ve identified the master link, use a pair of pliers to remove the clip or pin that holds it in place. Gently wiggle the chain until the master link comes apart. Now, the chain is free from your bike. Be careful not to lose the master link and keep it somewhere safe. With the chain removed, you can now proceed to clean and lubricate it for optimal chain maintenance.

Without further ado, let’s dive into the next step of the process: clean and lubricate the chain.

Advertisement

Clean and Lubricate the Chain

To ensure smooth and efficient cycling, it’s important to regularly maintain the health of your bike’s chain by keeping it free of dirt and debris while also providing proper lubrication. Proper lubrication is essential for reducing friction and wear on the chain, allowing for smoother shifting and a longer lifespan for the chain. However, it’s important to avoid common mistakes such as over-lubricating, which can attract more dirt and debris, or using the wrong type of lubricant, which can lead to a buildup of gunk on the chain.

To properly clean and lubricate your bike’s chain, follow these steps:

  • Use a degreaser to remove dirt and grime from the chain.
  • Use a brush or rag to scrub the chain thoroughly.
  • Wipe off any excess degreaser and let the chain dry completely.

Apply a small amount of lubricant to the chain, making sure to cover all the links. Wipe off any excess lubricant with a clean rag.

By following these steps, you can ensure that your bike’s chain is clean and properly lubricated, leading to a smooth and efficient ride. Now that the chain is clean and lubricated, it’s time to reinstall it and test your bike’s performance.

Reinstall the Chain and Test Your Bike’s Performance

Ready to feel the difference in your ride? Get your hands dirty and reinstall that chain, then take your bike for a spin to see how smooth and efficient it runs.

Before you start, make sure you’ve got all the necessary tools and equipment. This includes a chain tool, a new quick link, and a degreaser.

Advertisement

Once you’ve got everything you need, you can begin the chain maintenance process. Start by checking the chain wear indicators. If they’re showing signs of wear, it may be time to replace the chain altogether. If the indicators are still within the acceptable range, you can begin reinstalling the chain.

Use the chain tool to break the chain and remove it from the bike. Then, clean it thoroughly with a degreaser before installing the new quick link.

Finally, test your bike’s performance to make sure everything is running smoothly. If you encounter any issues, use troubleshooting tips to identify and resolve any problems.

With proper chain maintenance, your bike will run like new for years to come.

Frequently Asked Questions

What is the best way to store a bicycle chain when it’s not in use?

When not in use, I store my bicycle chain in a dry, cool place to prevent rust. Consistent chain maintenance is crucial to extend its lifespan. Regular cleaning and lubrication will prevent buildup and rust.

Advertisement

Can I use dish soap or other cleaning products to clean my bike chain?

Using dish soap to clean your bike chain can be effective, but it can also strip away lubrication and cause rust. Instead, try bike-specific degreasers or citrus-based cleaners. Always lubricate your chain after cleaning.

How often should I clean my bike chain?

Regular chain maintenance is crucial for optimal bike performance. Signs of a dirty chain include rust, grime buildup, and noisy gear shifts. Clean your chain every 100-200 miles or after riding in wet or muddy conditions.

Is it necessary to remove the chain from the bike in order to clean it?

To ensure optimal bike performance, chain maintenance is crucial. While cleaning the chain, I recommend removing it for a thorough cleaning. This allows for access to hard-to-reach areas and ensures a more effective cleaning process.

What kind of lubricant is best for bike chains?

For optimal performance, I recommend using a bike chain lubricant that is water-resistant. When it comes to spray vs oil, I prefer oil as it lasts longer. Apply the lubricant to the chain while rotating the pedals to ensure even coverage.

Conclusion

In conclusion, cleaning your bicycle chain is an essential task that shouldn’t be overlooked. Neglecting to clean your chain can lead to decreased performance, increased wear and tear, and even chain failure.

Advertisement

To clean your chain, gather all necessary supplies, including a chain cleaning tool, degreaser, and lubricant. Remove the chain from your bike before cleaning and thoroughly clean each link.

Once cleaned, apply a high-quality lubricant to the chain and reinstall it on your bike. Test your bike’s performance and make any necessary adjustments. By following these simple steps, you can keep your bike running smoothly for years to come.

Continue Reading

Beach Cruiser

How To Put Motor On Bicycle

Published

on

By

Imagine the scene: you’re cycling uphill, your brow drenched in sweat, legs aching from the effort. Out of nowhere, a slight buzzing noise catches your attention from behind. Glancing back, you spot another rider, smoothly ascending the hill on an electric bike with ease. A sense of envy inevitably creeps in.

But fear not, my friend! With the right tools and a bit of know-how, you too can transform your trusty bicycle into a motorized machine.

In this article, I’ll be sharing with you step-by-step instructions on how to put a motor on your bicycle. From understanding the different types of motors available to gathering the necessary tools and materials, we’ll cover everything you need to know to get your bike up and running with a motor.

So, grab a cup of coffee and let’s dive right in.

Key Takeaways

  • There are two types of motors for bicycles: electric and gas-powered, each with their own advantages and disadvantages to consider.
  • When choosing a motor type, factors to consider include personal preference, budget, and intended use.
  • Proper installation of a motor requires tools such as wrenches, pliers, screwdrivers, and WD-40, as well as precautions such as wearing protective gear and ensuring the bike frame is cleaned and free from dirt.
  • Safety is always a top priority when riding a motorized bicycle, including wearing protective gear, following traffic laws and signals, and being cautious in wet or slippery conditions.

Understand the Different Types of Motors Available

You gotta know the diff’rent types of motors you can use before you start puttin’ one on your bike.

There are two main types of motors available for bicycles: electric and gas-powered. Electric motors are powered by rechargeable batteries and are more environmentally friendly compared to gas-powered motors. They also require less maintenance and are relatively quiet. However, electric motors have limited range and require frequent recharging. They’re also more expensive compared to gas-powered motors.

Advertisement

On the other hand, gas-powered motors run on gasoline and are more powerful compared to electric motors. They have a longer range and can reach higher speeds, making them ideal for longer rides or off-road adventures. However, gas-powered motors require more maintenance and emit harmful gases into the environment.

Choosing the right motor type depends on your personal preference, budget, and intended use for the bike.

With that said, let’s move on to gather the necessary tools and materials.

Gather the Necessary Tools and Materials

Alright, first things first – grab your toolbox and make sure you’ve got everything you need to get started, like a wrench, pliers, and a screwdriver. And don’t forget to grab some WD-40 to loosen up any stubborn bolts or screws that might be giving you trouble.

Before proceeding, it’s important to understand that different types of bicycles require different types of motors. Therefore, make sure that you’ve researched and selected the appropriate motor for your specific type of bicycle. Additionally, it’s important to take safety precautions when working with a motor. Make sure to wear protective gear such as gloves, goggles, and a helmet to prevent any injuries that might occur during the installation process.

Advertisement

Once you have gathered all the necessary tools and materials, it’s time to prepare your bicycle for motor installation. This involves removing any unnecessary components such as the pedals, chain, and derailleur. It’s also important to clean the frame thoroughly to ensure that the motor can be installed properly.

By preparing your bicycle in this way, you’ll be able to install the motor with ease and ensure that your bike runs smoothly.

Prepare Your Bicycle for Motor Installation

Now it’s time to get your ride ready for some serious power, so roll up your sleeves and let’s make some magic happen!

Before installing a motor, it’s essential to prepare your bicycle by following some pre-installation steps. Firstly, make sure the surface where the motor will be installed is clean and free from any dirt, grease, or dust. A clean surface ensures that the motor is mounted securely and won’t come loose while riding.

Next, check your brakes and make sure they’re in good working condition. It’s crucial to have a reliable braking system when motorizing your bicycle to ensure your safety while riding.

Advertisement

Additionally, consider weight distribution when choosing the right motor placement on your bicycle. Placing the motor in an optimal position ensures that the weight is balanced and doesn’t affect the bicycle’s handling.

With these pre-installation steps completed, you’re now ready to install the motor and transform your bicycle into a powerful machine!

Install the Motor

Now that I’ve prepared my bicycle for motor installation, it’s time to move on to the next step: installing the motor.

This involves connecting the wires between the motor and the battery, testing the motor to ensure it’s working properly, and then securing it onto the frame of the bicycle.

It’s important to follow each of these steps carefully to ensure a safe and successful installation.

Advertisement

Connect Wires

First, you’ll need to connect the wires from the motor to the battery using the provided connectors. Before you start, make sure you have the right wire gauge selection for your motor and battery. Using wires that are too thin could lead to overheating and possible damage.

Once you have the right gauge, strip the ends of the wires and twist them together before inserting them into the connectors. Be sure to use proper insulation techniques such as heat shrink tubing or electrical tape to prevent any short circuits.

Next, it’s important to double-check your connections and make sure everything is secure. A loose connection could cause the motor to malfunction or even stop working altogether.

Once you’ve confirmed that everything is properly connected, it’s time to move on to the next step: testing the motor. With the motor connected to the battery, turn the throttle and see if the motor starts up smoothly. If it does, congratulations! You’ve successfully connected the wires and installed the motor on your bicycle.

Test Motor

After all the hard work of connecting the wires, it’s time to see if everything is functioning properly by testing the motor.

Advertisement

To begin, I should attach the motor to the bike’s rear wheel using the appropriate mounting system. Once that’s done, I can turn the bike upside down and spin the wheel by hand to check if the motor is spinning as well. If it is, then the motor is properly installed and functioning correctly.

If the motor isn’t spinning, then I’ll need to troubleshoot the issue. First, I should check the wiring connections to make sure they’re secure and properly connected.

If that doesn’t solve the issue, I can use a multimeter to test the voltage of the battery and the wires. If the voltage is correct, then the issue may be with the motor itself and I’ll need to take a closer look at it.

Once the motor performance is tested and confirmed, I can move on to securing the motor in place without any worries.

Secure Motor

Make sure your motor is locked in tight, so you can ride with confidence and feel the wind in your hair. There are several motor mounting techniques you can use to ensure your motor is secure on your bicycle.

Advertisement

One technique is to use a motor bracket that’s specifically designed for your type of motor. When choosing the right motor bracket, make sure it’s compatible with your bicycle’s frame and the size of your motor.

Another technique is to use metal clamps to hold the motor in place. These clamps can be tightened securely around the motor and the bicycle frame. Make sure the clamps are placed in a position that won’t interfere with the chain or any other moving parts of the bicycle.

Once you’ve securely mounted your motor, give it a shake to ensure it’s firmly in place.

With your motor now securely mounted, you can move on to the next step and enjoy your motorized bicycle!

Enjoy Your Motorized Bicycle!

Now that you’ve got your motorized bicycle, it’s time to hit the road and enjoy the ride! One of the benefits of having a motorized bicycle is that it can make commuting or running errands much easier and faster.

Advertisement

However, it’s important to remember to be safe while riding. Here are some tips for safe motorized biking:

  • Firstly, always wear a helmet and other protective gear such as gloves and knee pads. This will help protect you in case of an accident.
  • Secondly, make sure to follow traffic laws and signals, and stay in designated bike lanes when possible. Always signal your turns and be aware of your surroundings.
  • Lastly, be cautious when riding in wet or slippery conditions, and avoid riding at night if possible.

By following these tips, you can enjoy your motorized bicycle while also staying safe on the road.

So, have fun and happy riding!

Having a motorized bicycle can be a great way to get around. It can save time and money while also being environmentally friendly.

However, it’s important to remember to be safe while riding. By wearing protective gear, following traffic laws, and being aware of your surroundings, you can enjoy your motorized bicycle to the fullest.

So, get out there and explore the world on your new ride!

Advertisement

Frequently Asked Questions

How fast can a motorized bicycle go?

I’ve found that the top speed of my motorized bicycle depends on factors like weight, terrain, and wind resistance. To optimize performance, I focus on acceleration and regularly maintain the engine. Safety considerations for high speed riding include wearing protective gear and obeying traffic laws.

Do I need a license to ride a motorized bicycle?

To ride a motorized bicycle, I need to check my state’s license requirements as they vary. Some states only require a regular driver’s license, while others need a special license or registration. Not having the proper license can lead to legal implications.

How much weight can a motorized bicycle carry?

I’ve found that the cargo capacity of a motorized bicycle can vary depending on the weight distribution. Generally, they can carry up to 200 pounds with proper balance and weight distribution.

Can I still pedal my bicycle with a motor installed?

I researched and found that a motorized bicycle can be equipped with either a pedal assist or throttle only installation. Pedal assist allows for pedaling while the motor provides assistance, while throttle only eliminates the need for pedaling. Each has its pros and cons.

How do I maintain and care for my motorized bicycle?

When it comes to motor maintenance, regular oil changes and air filter replacements are key. Troubleshooting tips include checking spark plugs and carburetor adjustments. It’s important to keep a toolkit handy and perform routine inspections to prevent larger issues.

Advertisement

Conclusion

Well, that’s it! I’ve successfully installed a motor on my bicycle and it’s a game-changer.

I feel like I’ve entered a new dimension of cycling. No more struggling up hills or arriving at work sweaty and tired. Now, I glide effortlessly through the streets, feeling like a superhero on wheels.

The installation process was surprisingly easy, especially with the right tools and materials. And the end result is simply amazing.

If you’re someone who loves cycling but wants a little extra power, I highly recommend putting a motor on your bike. Trust me, it’s worth every penny and every second spent on installation.

Advertisement

Continue Reading

Beach Cruiser

How Are Bicycle Frames Measured

Published

on

By

As an enthusiastic bicyclist, I’ve learned the critical role that the right bike frame size plays in cycling. Using a bike whose frame size doesn’t fit can cause discomfort, lower your cycling performance, and potentially lead to injuries. Therefore, it’s essential to be knowledgeable about accurately measuring your bike frame.

In this article, I will guide you through the process of measuring your bike frame. We will start by identifying the parts of a bike frame and understanding the importance of proper frame measurement. Then, we will move on to determining your ideal frame size and measuring your bike frame. Finally, I will provide some tips for adjusting your bike frame to ensure a comfortable and safe ride.

So, let’s get started!

Key Takeaways

  • Proper bike frame measurement is important for comfort, performance, and injury prevention.
  • Understanding parts and measurements, as well as choosing the right frame material, is crucial in determining the ideal frame size.
  • Measuring techniques vary depending on the type of bike frame and factors affecting sizing include height, inseam length, and riding style.
  • Adjusting the bike frame involves loosening bolts on the seat post and handlebars, and personal preferences and bike fit considerations should be taken into account.

Understand the Importance of Proper Frame Measurement

Proper frame measurement is crucial for ensuring a comfortable and efficient ride, so don’t skimp on taking the time to get it right! The importance of fit cannot be overstated.

When your bike frame is not properly measured, it can lead to an uncomfortable or even painful ride. Incorrect measurements can result in a number of issues, including poor posture, muscle fatigue, and even injury.

The impact of incorrect measurements can be felt not only in the short term but over the life of the bike as well. A poorly fitting bike can cause premature wear and tear on parts, leading to costly repairs or replacements. It can also affect your performance and enjoyment of cycling.

Advertisement

Taking the time to ensure proper frame measurement can make all the difference in your cycling experience. With a well-fitted bike, you’ll be able to ride longer, faster, and more comfortably.

Now, let’s move on to identifying the parts of a bike frame.

Identify the Parts of a Bike Frame

One key aspect of understanding a bike’s structure is being able to identify the various components of its frame. These components include the seat tube, top tube, down tube, and chainstays. Each of these parts has a specific function and contributes to the overall performance of the bike.

When considering a bike frame, it’s important to take into account the materials used and the frame geometry. Frame materials can vary from steel, aluminum, carbon fiber, and titanium, each with their own unique properties.

Frame geometry includes measurements such as the seat tube angle, head tube angle, and chainstay length. These measurements affect how the bike handles and performs in different scenarios.

Advertisement

Understanding the parts and measurements of a bike frame is crucial in determining your ideal frame size.

Determine Your Ideal Frame Size

Finding the perfect fit for your bike can make all the difference in your riding experience. There are several factors affecting sizing, including your height, inseam length, and riding style. To determine your ideal frame size, you’ll need to take measurements and consider these factors.

Choosing the right frame material is also important. Frame material affects the weight, durability, and overall performance of your bike. Common frame materials include aluminum, carbon fiber, steel, and titanium. Each material has its own unique characteristics, so it’s important to research and choose the one that best fits your needs.

Once you’ve determined your ideal frame size and material, you can move on to measuring your bike frame.

Measure Your Bike Frame

Now it’s time for you to get out your measuring tape and figure out the exact dimensions of your ride. Measuring your bike frame is important to ensure that you have a comfortable and efficient cycling experience.

Advertisement

There are several measuring techniques that you can use, depending on the type of bike frame you have. First, if you have a traditional diamond frame, you can measure the seat tube length from the center of the bottom bracket to the top of the seat tube. Another way to measure is to find the top tube length, which is the horizontal distance between the seat post and the head tube.

For sloping top tube frames, measure the virtual top tube length, which is the horizontal distance between the head tube and the seat post in a level position. Lastly, if you have a full suspension bike, measure the effective top tube length, which is the horizontal distance between the head tube and the seat post in a level position.

It’s also important to note that the measuring technique may vary depending on the material of your bike frame, as different materials have different properties that affect the measurements.

Now that you have measured your bike frame, it’s time to make any necessary adjustments to ensure that you have the perfect fit.

Adjusting Your Bike Frame

To adjust your bike frame, you’ll need to loosen the bolts on the seat post and handlebars. Make sure to use the appropriate tools and follow the manufacturer’s instructions.

Advertisement

Once the bolts are loosened, you can move the seat post and handlebars up or down and forward or backward to find the perfect position for your body. Adjusting techniques will vary depending on your personal preferences and bike fit considerations.

When adjusting your bike frame, it’s important to consider your riding style, body measurements, and flexibility. A proper bike fit can help prevent injuries and improve your overall riding experience. Experiment with different adjustments until you find the perfect fit for your body.

Remember to tighten the bolts securely after making any adjustments to ensure your safety while riding.

Frequently Asked Questions

What is the most common material used for bicycle frames?

As a bike enthusiast, I can tell you that the most common bicycle frame materials are aluminum, carbon fiber, and steel. Each has its own advantages and disadvantages, such as weight, durability, and cost. Choosing the right material depends on your riding style and budget.

How much does a typical bike frame weigh?

You might be thinking that a lightweight bike frame is weak, but that’s not necessarily the case. Bike frame materials like carbon fiber and aluminum can be both strong and lightweight, with a typical weight range of 1-3 pounds.

Advertisement

Can a bike frame be repaired if it is damaged?

When a bike frame is damaged, repair options depend on the severity of the damage and the material of the frame. Aluminum and carbon frames can be repaired, but it can be costly. Steel frames are easier and cheaper to repair.

Are there any safety considerations when measuring a bike frame?

Oh, measuring a bike frame is a piece of cake! Just grab a ruler and eyeball it. Who cares about accuracy and safety, right? In reality, precise measuring techniques are crucial for ensuring a safe and comfortable ride.

How often should a bike frame be replaced?

A bike frame’s lifespan depends on its material, usage, and maintenance. Signs of wear and tear include cracks, dents, and rust. I replace my bike frame when it becomes unsafe or no longer fits my needs.

Conclusion

In conclusion, measuring your bike frame is crucial for a comfortable and safe riding experience. It’s important to understand the different parts of a bike frame and how to determine your ideal frame size to avoid discomfort or injury.

Measuring your bike frame is a simple process that can be done at home with the right tools and following proper instructions. Remember the old adage, measure twice, cut once. This applies to bike frame measurement as well.

Advertisement

Taking the time to ensure accurate measurements will save you from the hassle of having to make adjustments later on. Adjusting your bike frame is also important for a customized fit that caters to your unique body measurements.

With the right knowledge and tools, measuring and adjusting your bike frame can be a fun and rewarding experience that leads to a more enjoyable ride.

Continue Reading
Advertisement

Affiliate disclaimer

As an affiliate, we may earn a commission from qualifying purchases. We get commissions for purchases made through links on this website from Amazon and other third parties.

About us

We are a passionate team driven by the belief that cycling is a fantastic and accessible way to stay active while enjoying the beauty of the outdoors. Our mission is to share our love for cycling with as many people as possible. We provide a welcoming environment for individuals of all ages, abilities, and backgrounds to come together and ride bikes. With Ralf’s visionary leadership, Zane’s expertise in cycling adventures, and Olivia’s dedication to community building, we strive to create a vibrant space where everyone can experience the joy of cycling. Through group rides, workshops, and inclusive events, we inspire and empower individuals to embrace an active lifestyle. Join us in our quest to pedal together, embrace the joy of cycling, and foster connections that last a lifetime.

Advertisement

Trending