As someone who loves cycling, there’s nothing quite like the sensation of air rushing through your hair and the surge of adrenaline you feel. However, as you continue to cycle, it’s vital to recognize that the efficiency of your bicycle depends on its parts, with the tire being among the most essential components.
A flat tire can ruin your ride and even cause accidents, which is why understanding proper tire inflation is essential. Imagine being on a long and scenic ride, only to hear the dreaded hissing sound of a flat tire. The picturesque route you were enjoying will now be replaced with the frustration of fixing your tire, or worse, calling for help.
This is why ensuring that your bicycle tire is correctly inflated is critical to an enjoyable riding experience. In this article, we will delve into the details of bicycle tire inflation, and explore the importance of proper tire pressure, how to find the correct tire pressure, and how to maintain optimal tire pressure to avoid any mishaps on the road.
Key Takeaways
- Proper tire inflation is crucial for an enjoyable and safe cycling experience.
- Different types of tires require different pressure levels, and the weight of the cyclist and any cargo being carried can also impact tire pressure.
- Overinflated or underinflated tires can increase the risk of blowouts, reduce traction, and cause poor handling.
- Regularly checking and maintaining tire pressure, using the correct pump for your bike’s valve type, and inspecting tires for signs of damage can prevent unnecessary wear and tear, increase longevity, and ensure maximum safety while riding.
Understanding the Importance of Proper Tire Inflation
You gotta make sure your tire is properly inflated, or you’ll be risking a bumpy and uncomfortable ride. But more importantly, proper tire inflation is vital for your safety on the road.
Underinflated tires can cause a number of issues, such as poor handling, reduced fuel efficiency, and increased risk of blowouts.
To ensure that your tires are properly inflated, there are a few safety tips you should follow. First, always check your tire pressure before heading out on a ride. Second, make sure to use a reliable tire pressure gauge to accurately measure the pressure in your tires. Third, be aware of the recommended tire pressure for your specific bike and tire type.
Following these tips will help keep you safe and your ride smooth.
It’s important to understand the effects of underinflation on your tires to fully appreciate the importance of proper tire inflation.
In the next section, we’ll discuss how to find the correct tire pressure for your bike.
Finding the Correct Tire Pressure
Feeling the smooth glide of your bike and the solid grip of the tires on the road is like the satisfying sensation of a perfectly cooked steak on your tongue – both require the right amount of pressure to reach their full potential.
As a cyclist, checking the pressure of your tires and adjusting as needed is essential to achieve optimal performance and safety. Here are some factors that can affect tire pressure:
- Temperature changes can cause fluctuations in tire pressure throughout the day.
- Different types of tires require different pressure levels, so it’s important to refer to the manufacturer’s guidelines.
- The weight of the cyclist and any cargo being carried can also impact tire pressure.
- Over time, tires will naturally lose pressure, so checking them regularly is crucial.
To ensure that your bike is performing at its best, it’s important to find the correct tire pressure. By regularly checking the pressure and adjusting as needed, you can prevent unnecessary wear and tear on your tires and ensure maximum safety while riding.
In the next section, we’ll discuss the process of inflating your tires to the correct pressure.
Inflating Your Tires
When inflating my bike tires, I always make sure to choose the right pump for the job.
I then remove the valve cap and attach the pump, making sure it’s securely in place.
Finally, I inflate the tires to the correct pressure, taking care not to overinflate or underinflate.
Choosing the Right Pump
Picking the right pump for your bike can make all the difference in keeping your tires at the proper air pressure. There are two main types of valves for bike tires: Schrader and Presta. Schrader valves are the same type used on car tires and are commonly found on lower-end or older bikes.
Presta valves are narrower and longer, and are commonly found on higher-end bikes. It’s important to know which type of valve your bike has before purchasing a pump.
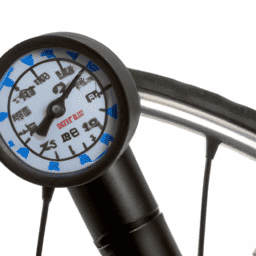
In addition to choosing the right pump for your valve type, there are also pump accessories that can make the process of inflating your tires easier. A pressure gauge can help ensure that you’re inflating your tires to the correct pressure, while a quick release valve can make removing the pump from the tire easier and prevent air from escaping.
With the right pump and accessories, inflating your tires can be a breeze. Now, let’s move on to removing the valve cap and attaching the pump.
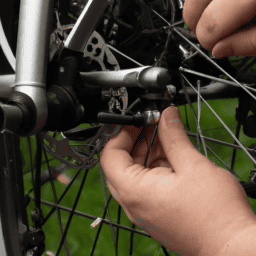
Removing the Valve Cap and Attaching the Pump
To begin inflating your bike tire, first remove the valve cap and attach the pump to the valve stem. It’s important to note that valve cap maintenance is crucial. This prevents dirt and debris from entering the valve stem and causing damage to the inner tube. When removing the valve cap, make sure to keep it in a safe place where it won’t get lost.
Once the valve cap is removed, attach the pump to the valve stem by pressing the pump head onto the valve and locking it in place. Different pumps have different attachment techniques, so make sure to read the instructions that come with your pump. Once the pump is attached, begin pumping air into the tire.
But before inflating to the correct pressure, it’s important to understand how much air your tire needs. We’ll discuss this in the next section.
Inflating to the Correct Pressure
Make sure you know the optimal pressure for your specific bike and riding conditions before inflating your tire, as this can greatly affect your performance and safety on the road.
Underinflated tires can increase rolling resistance, making it harder to pedal and slowing you down. Moreover, tires that are too soft can cause pinch flats and rim damage, which can be costly and time-consuming to fix.
On the other hand, overinflated tires are just as dangerous. They reduce traction, causing the bike to slip and slide on wet or slick surfaces. Additionally, overinflated tires can increase the risk of blowouts or punctures, which can be extremely dangerous at high speeds or on rough terrain.
Always check the recommended pressure range for your tires and adjust accordingly, taking into consideration the type of riding you’ll be doing and the terrain you’ll be covering.
Maintaining optimal tire pressure is critical to your bike’s overall performance and longevity. By keeping your tires in good condition, you can prevent flats, reduce rolling resistance, and ensure a smoother, more comfortable ride.
In the next section, we’ll discuss some tips and tricks for checking and maintaining your tire pressure, so you can get the most out of your bike and stay safe on the road.
Maintaining Optimal Tire Pressure
Maintaining the right tire pressure is crucial to ensure a smooth and safe ride on your bike. Here are three important things to keep in mind when maintaining optimal tire pressure:
-
Checking frequency: It’s important to check your tire pressure regularly, ideally before every ride. This will help you catch any issues early on and prevent accidents on the road. However, the frequency of your checks may vary depending on how often you use your bike and the conditions you ride in.
-
Tire gauge accuracy: To accurately measure your tire pressure, you’ll need a reliable tire gauge. Unfortunately, not all gauges are created equal, and some may not provide accurate readings. Make sure to invest in a high-quality gauge and test its accuracy periodically.
-
Optimal pressure range: Finally, it’s important to know the optimal pressure range for your bike’s tires. This information can usually be found on the sidewall of your tire or in your bike’s manual. Keeping your tires within this range can help prevent flats, improve traction, and ensure a comfortable ride.
Maintaining optimal tire pressure is just one part of keeping your bike running smoothly. If you do encounter any issues, don’t worry – there are plenty of common problems that can be easily troubleshooted.
Troubleshooting Common Problems
When it comes to maintaining my bicycle, one of the most common problems I encounter is dealing with leaks and punctures in my tires. To troubleshoot this issue, I first need to identify where the leak is coming from, whether it’s from the valve stem or the tire itself.
Depending on the severity of the damage, I may need to either fix or replace the tire entirely, or seek professional assistance from a bike mechanic.
Identifying Leaks and Punctures
Finding leaks and punctures in your bicycle tire can be a daunting task, especially if you don’t know where to start. However, there are some common causes of tire punctures that you should be aware of.
For instance, sharp objects such as glass, nails, and thorns can penetrate the tire and cause a leak. Additionally, worn-out tires are more likely to get punctured. To prevent tire punctures, you should avoid riding your bike on rough terrain, debris-filled roads, or broken glass. Also, make sure to keep your tires inflated to the recommended pressure to reduce the risk of punctures.
If you do find a puncture, don’t panic. Patching a bicycle tire is relatively easy, and you don’t need any special tools to do it. First, locate the puncture by inflating the tire and listening for air escaping from the hole. Once you’ve found the puncture, remove the object that caused it, and use a patch kit to fix the hole.
To do this, clean the area around the puncture and apply the adhesive patch over it. Press the patch firmly onto the tire and allow it to dry for a few minutes before inflating the tire again. With these simple steps, you can fix most punctures without having to replace the tire entirely.
Now that you know how to patch a bicycle tire, it’s essential to understand when it’s time to replace a damaged tire altogether. In the next section, I will discuss the signs that indicate that your tire needs to be replaced and how to do it.
Fixing or Replacing Damaged Tires
You’re cruising down the road when suddenly you hear a disheartening sound – the dreaded hiss of a deflating wheel. Don’t let a damaged tire deflate your spirits – learn how to fix or replace it to keep your ride smooth and effortless.
When it comes to fixing a damaged tire, the first decision you need to make is whether to repair or replace it. If the damage is minor, such as a small puncture or tear, you can usually patch it up with a repair kit. However, if the damage is significant, such as a large hole or sidewall damage, it’s best to replace the tire entirely.
When patching a damaged tire, there are a few techniques to keep in mind. First, make sure to locate the puncture or tear and clean the area thoroughly before applying the patch. Then, apply the patch according to the instructions on the kit, making sure to press it firmly onto the tire to create a strong seal.
It’s also important to check the tire pressure regularly after patching to ensure the seal is holding. Remember, patching a tire is only a temporary solution and should only be done for minor damage. If the damage is severe or the tire is worn out, it’s best to replace it entirely.
With these tips in mind, you can get back on the road with confidence knowing your tires are in top shape. However, if you’re unsure about the damage or don’t feel comfortable making the repair yourself, it’s always a good idea to seek professional assistance.
Seeking Professional Assistance
If you’re unsure about the condition of your tire or don’t feel confident in making the repair yourself, it’s always best to seek professional assistance to ensure your safety on the road. A trained mechanic will be able to properly diagnose any issues and make necessary repairs or replacements. However, seeking professional assistance can come with a cost and may not always be convenient.
An alternative to seeking professional assistance is to learn how to inflate your tires yourself. There are numerous benefits to self-inflation, including convenience and cost savings. Additionally, regular tire inflation can improve fuel efficiency and prolong the life of your tires. However, it’s important to note that over-inflation can be just as dangerous as under-inflation, so it’s important to follow the manufacturer’s recommended tire pressure. Ultimately, whether you choose to seek professional assistance or learn how to inflate your tires yourself, maintaining proper tire pressure is crucial for your safety on the road.
| Tire Pressure | Recommended by Manufacturer | Maximum Pressure |
|---|---|---|
| Front Tire | 30 psi | 35 psi |
| Rear Tire | 35 psi | 40 psi |
| Spare Tire | 60 psi | 60 psi |
This table illustrates the recommended tire pressure for different types of tires. It’s important to note that these values may vary by vehicle make and model, so it’s important to refer to your vehicle’s owner manual for specific recommendations. By learning how to properly inflate your tires, you can save money and ensure your safety on the road. However, if you’re unsure about the condition of your tires or need more extensive repairs, seeking professional assistance is the best course of action.
Frequently Asked Questions
How often should bike tires be replaced?
Oh, you know, I replace my bike tires every day just for fun. Just kidding, but factors affecting tire lifespan include usage, road conditions, and proper storage of unused bike tires. It’s recommended to replace them every 2-3 years.
Can I use a regular air pump to inflate my bike tires?
Yes, a regular air pump can be used to inflate bike tires. However, it is important to check for air pump compatibility with the valve type on your bike tire. There are also alternative inflation methods, such as CO2 cartridges or hand pumps.
Why do some bike tires require different pressures for the front and back tires?
The importance of tire pressure distribution during cycling is due to the varying factors affecting tire pressure distribution in bicycles. Factors such as weight distribution and terrain require different pressures for front and back tires in order to optimize performance and safety.
What are some signs that my bike tires are underinflated?
It’s important to maintain proper inflation in bike tires to ensure optimal performance. Underinflated tires can lead to decreased speed, decreased handling, and increased likelihood of punctures. Check for visible bulges, difficulty turning, and a feeling of sluggishness.
How do I know if my bike tires are overinflated?
To determine if my bike tires are overinflated, I check for signs such as excessive bouncing, reduced traction, and difficulty in handling. Proper technique for measuring tire pressure is to use a gauge and follow manufacturer’s recommendations. Overinflated tires can lead to reduced comfort, handling, and increased risk of punctures.
Conclusion
In conclusion, proper tire inflation is crucial for safe and efficient cycling. Neglecting this aspect can lead to a variety of issues, ranging from decreased performance to increased risk of accidents. Therefore, it’s essential to find the correct tire pressure for your bike and inflate your tires accordingly.
To maintain optimal tire pressure, regular checks and adjustments are necessary. Use a reliable tire gauge and follow the recommended pressure range for your specific tire type and riding conditions.
Remember to check your tires before each ride and adjust as needed. In summary, tire pressure is not something to overlook when cycling. Take the time to find the correct pressure, inflate your tires properly, and regularly maintain the optimal pressure range.
By doing so, you’ll enjoy a smoother and safer ride, with less chance of encountering common tire problems. Happy cycling!