
Were you aware that a report from the National Highway Traffic Safety Administration reveals that bicycles constitute 2% of all traffic-related deaths and 2% of traffic injuries in the United States? This underscores the importance of making certain that your bicycle is functioning properly, especially the rear brake system.
In this article, I’ll guide you through the steps on how to adjust the rear brakes on your bicycle to ensure your safety and the safety of others while cycling.
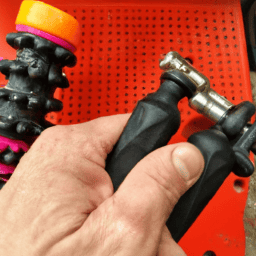
Before we dive into the nitty-gritty of adjusting the rear brakes, it’s crucial to understand the components of your rear brake system. The rear brake system consists of the brake lever, brake cable, brake caliper, and brake pads.
The brake lever is mounted on your handlebars and is responsible for activating the brake system. The brake cable connects the lever to the brake caliper, which is mounted on the rear wheel. The brake pads are located inside the brake caliper and are responsible for stopping the wheel when the brake lever is engaged.
By understanding each component and its function, you’ll be better equipped to diagnose and adjust any issues with your rear brakes.
Key Takeaways
- Proper working condition of rear brake system is crucial for safety while riding a bicycle.
- Regular maintenance and inspection of rear brake system is important for proper function and safety.
- Troubleshooting issues such as sticking or resistance in cable, squeaking or rubbing, and reduced stopping power is crucial for effective braking.
- Adjusting brake pads for proper alignment, choosing appropriate type and adjusting cable tension gradually without over-tightening are important techniques for adjusting rear brakes on a bicycle.
Understand the Components of Your Rear Brake System
Now you’re gonna wanna understand the components of your rear brake system. There are different types of rear brakes, such as caliper brakes, cantilever brakes, V-brakes, and disc brakes.
Each type operates differently, but they all have the same basic components. These include the brake lever, cable, brake caliper, brake pads, and brake rotor (for disc brakes).
To ensure your rear brakes work effectively, it’s important to maintain them properly. This means checking the brake pads for wear and tear regularly, and replacing them if they’re too worn.
You should also make sure the brake cables are clean and lubricated, and that the brake caliper is tightened securely to the frame. By understanding the components of your rear brake system and following these maintenance tips, you can ensure your brakes are in good working order.
Now, let’s move on to checking for wear and tear.
Check for Wear and Tear
Before adjusting my rear brakes on my bicycle, I always make sure to inspect the brake pads for any signs of wear and tear. This involves checking the thickness of the pads and looking for any uneven wear patterns.
Additionally, I check the brake cable for any damage or fraying that could affect the brake’s performance. By completing these two checks, I can ensure that my rear brake system is in good working order before making any necessary adjustments.
Inspect the Brake Pads
Just like a doctor checks the health of their patient, inspecting the brake pads is crucial to ensure the safety of your bike.
When inspecting brake pads, it’s important to pay attention to the thickness of the brake pad material. A worn-out brake pad will have less material and won’t be able to effectively stop the wheel, putting the rider at risk.
Inspecting Brake Pads: Tips & Tricks include checking for any signs of uneven wear, which could indicate a problem with the brake calipers or wheel. It’s also important to check the brake pads for debris and clean them if necessary.
Common Brake Pad Issues and Solutions include glazed brake pads, which result from overheating and cause a slippery surface that reduces stopping power. In this case, the brake pads need to be replaced. Another issue is contaminated brake pads, caused by oil or grease on the braking surface, reducing their effectiveness. To fix this issue, the brake pads need to be cleaned or replaced.
Once you’ve inspected the brake pads and addressed any issues, it’s time to move on to the next step: check the brake cable for damage.
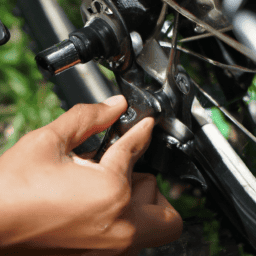
Check the Brake Cable for Damage
Inspecting the brake cable is crucial to ensure the safety of your ride. Any damage to the cable can result in decreased stopping power and put the rider at risk. To begin, inspect the cable for any signs of fraying or kinks. If any are present, it’s important to replace the cable as soon as possible.
Additionally, check the cable housing for any cracks or splits. These issues can cause the cable to stick or make the brakes feel spongy. If everything looks okay with the cable and housing, it’s time to troubleshoot any issues with the brake.
First, pull the brake lever and watch the cable as it moves through the housing. It should move smoothly and without any resistance. If you notice any sticking or resistance, try lubricating the cable with a light oil. If the problem persists, it may be time to replace the cable or housing.
Once the cable is in good working order, you can move on to adjusting the brake pads.
Adjust the Brake Pads
To properly adjust your rear brakes, you’ll want to make sure the brake pads are making solid contact with the rim of your wheel. Here are some tips to help you adjust the brake pads:
- Make sure the brake pads are aligned properly with the rim of the wheel. You can do this by loosening the bolt that holds the brake pad in place and adjusting it until it makes even contact with the rim. Tighten the bolt back up once you’ve achieved the proper alignment.
- Choose the right brake pads for your needs. Different types of brake pads are available, and each one has its own unique properties. For example, some brake pads are better suited for wet weather conditions while others are designed for maximum stopping power.
- Adjust the toe-in of the brake pads so that the front of the brake pad should make contact with the rim slightly before the back of the pad. This will ensure that the brake pads strike the rim at the same time when you apply the brakes.
Now that you’ve adjusted the brake pads, the next step is to adjust the brake cable tension.
Adjust the Brake Cable Tension
You can feel the difference in your braking power by tightening or loosening the brake cable tension on your bike. To adjust the brake cable tension, start by squeezing the brake lever and observing the distance between the brake pad and the rim.
If the brake pad is too far from the rim, then the cable is too loose, and you need to tighten it. On the other hand, if the brake pad is rubbing against the rim, then the cable is too tight, and you need to loosen it.
A common mistake when adjusting the brake cable tension is over-tightening the cable, which can cause the brake pads to wear out quickly or even damage the rim. To avoid this, make sure to adjust the cable tension gradually, testing the brakes after each adjustment.
The proper technique for adjusting the cable tension is to loosen the locknut on the brake caliper and turn the barrel adjuster in small increments until you achieve the desired distance between the brake pad and the rim. Once you have adjusted the cable tension, tighten the locknut to secure the adjustment.
Now that you have adjusted the brake cable tension, it’s time to test your rear brakes. Apply the brakes and check if the rear wheel stops smoothly without any jerking or skidding. If the brakes feel too soft or too hard, then you need to readjust the cable tension until you achieve the proper braking power.
Test Your Rear Brakes
Once you’ve tightened the brake cable tension, it’s important to ensure that your rear brakes are functioning properly by testing them out on a smooth, flat surface.
There are a few common issues that you might encounter when testing your rear brakes, such as squeaking or rubbing.
If you notice any of these issues, it’s important to troubleshoot them right away to prevent any potential accidents.
To troubleshoot squeaking or rubbing, start by checking that the brake pads are properly aligned with the rim.
If they’re not, adjust them accordingly until they’re flush.
You can also try cleaning the rim and brake pads with rubbing alcohol to remove any debris or residue that might be causing the issue.
If these solutions don’t work, it might be worth taking your bike to a professional mechanic for further inspection.
By testing and troubleshooting your rear brakes, you can ensure that they’re working properly and keep yourself safe while riding.
Frequently Asked Questions
How often should I adjust my rear brakes on my bicycle?
I adjust my rear brakes on my bicycle as often as necessary, depending on the signs of worn brake components. Regular brake maintenance is important to ensure optimal performance and safety.
What tools do I need to adjust my rear brakes?
Essential tools for adjusting rear brakes are a 5mm allen key, cable cutters, and a set of pliers. Follow these step by step processes: adjust the barrel adjuster, align the brake pads, and adjust the cable tension.
Can I adjust my rear brakes without removing the wheel?
Yes, it is possible to adjust the rear brakes without removing the wheel. However, it may require some additional tools and careful maneuvering to reach the brake pads and adjust their position.
How do I know if my brake pads need to be replaced?
To check wear on brake pads, inspect them for any grooves or unevenness. Proper alignment is important for consistent contact with the rim. Replace pads if there is less than 1/8 inch left.
What should I do if my rear brakes are still not working properly after adjusting them?
If my rear brakes still aren’t working properly after adjusting them, I would troubleshoot by checking the brake cables, pads, and calipers for any issues. If I can’t find a solution, I would seek professional help.
Conclusion
In conclusion, adjusting the rear brakes on your bicycle is a crucial maintenance task that every rider should know how to do. It ensures the safety of yourself and others on the road.
As I mentioned earlier, understanding the components of your rear brake system is essential before proceeding further. Checking for any signs of wear and tear is also crucial to ensure that the brake pads are in good condition.
Once you’ve inspected and identified any issues, adjusting the brake pads and cable tension will help improve the braking performance of your bicycle. Remember to test your rear brakes after making any adjustments to ensure that they’re working correctly.
By following these simple steps, you can enjoy a safer and more comfortable ride on your bicycle.