Replacing a bicycle inner tube may appear intimidating initially, but with the correct tools and some knowledge, it can be a straightforward task. As an experienced cyclist, I’ve dealt with my fair share of flat tires and have mastered the art of changing inner tubes.
To get started, gather the necessary tools such as tire levers, a new inner tube, and a pump. It’s important to have these tools on hand before starting the process to avoid any unnecessary delays.
Once you have the tools, it’s time to remove the wheel and tire. This can be a bit tricky, but with some practice, it can become second nature.
In the following paragraphs, I will go into detail on each step of the process, so you can confidently change your own bicycle inner tube without any hassle.
Key Takeaways
- Proper tools and preparation are necessary for changing a bicycle inner tube.
- Careful removal of the tire is important to avoid damage to the tire or rim.
- Choosing the correct size and type of tire is crucial for bike performance and longevity.
- Proper tire inflation is essential for a smooth ride and to prevent punctures.
Gather the Necessary Tools
Before you can change a bicycle inner tube, you’ll need to gather the necessary tools.
First and foremost, you’ll need a tire lever to pry the tire away from the rim. It’s important to use a tire lever specifically designed for bicycle tires, as using the wrong tool can damage the rim or tire.
You’ll also need a new inner tube that matches the size and type of your current tire. Make sure to check the tire’s sidewall for this information before purchasing a new inner tube.
In addition to these traditional tools, there are also alternative methods for changing a bicycle inner tube. For instance, some cyclists prefer to use their hands to remove the tire from the rim rather than using a tire lever. This technique requires a bit more strength and finesse, but can be just as effective if done correctly.
Additionally, it’s important to know proper inflation techniques to prevent future punctures and extend the life of your new inner tube.
With the necessary tools and knowledge in hand, it’s time to move on to removing the wheel.
Remove the Wheel
Once you’ve loosened the quick-release lever, you can simply pull the wheel off the bike. Proper wheel maintenance is crucial for overall bike performance and longevity. Before removing the wheel, take a moment to inspect it for any signs of damage, such as bent spokes or a warped rim. Troubleshooting common issues, such as a wobbly wheel or rubbing brake pads, can save you from further frustration down the road.
When removing the wheel, it’s important to remember which side of the bike it came from. This will ensure that you put it back on correctly and avoid any potential problems.
Once the wheel is off, place it on a flat surface with the cassette facing up. This will prevent any damage to the cassette or derailleur when removing the tire.
The next step is to remove the tire, which is covered in the following section.
Remove the Tire
To remove the tire, you’ll need to release the air pressure by pressing the valve stem and unscrewing the lock nut. This will allow the tire to easily slip off the rim.
Before removing the tire, it’s important to check the proper tire inflation. Riding with under-inflated tires can cause premature wear and tear, while over-inflated tires can lead to a bumpy ride and increase the risk of punctures. Punctures are a common occurrence for cyclists and can be caused by a variety of factors such as sharp objects on the road or worn-out tires.
Once the air pressure has been released, use a tire lever to carefully pry the tire off the rim. Begin at one side of the tire and work your way around until the entire tire is removed. Be sure to check the inside of the tire for any debris that may have caused the puncture.
Now that the tire is removed, it’s time to install the new inner tube.
Install the New Inner Tube
Now that you’ve removed the old tube, it’s time to get rolling again with a fresh one! Installing a new inner tube can seem daunting, but with the right steps, it can be a breeze. The first step is to make sure the new tube is the correct size for your tire. Check the label on the tube or the tire itself for the correct measurements.
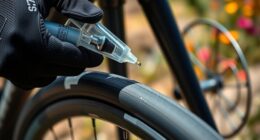
Once you have the correct tube, it’s time to install it. Start by inserting the valve stem into the hole in the rim. Then, work the rest of the tube into the tire, making sure it’s not twisted or folded over. Once the tube is in place, start working the tire back onto the rim, making sure the tube stays inside. Once the tire is in place, it’s time to inflate the tube to the proper pressure. Check your tire for the recommended pressure and use a pump to inflate the tube to that level. After inflation, make sure to troubleshoot any issues such as bulges or lumps in the tire. With a properly inflated and installed inner tube, you’re ready to replace the tire and wheel.
| Pros | Cons |
|---|---|
| Easy to follow steps | Can be time-consuming |
| Affordable fix | Requires some technical knowledge |
| Can be done at home | Can be frustrating for beginners |
| Can save you money | Requires some physical effort |
With these steps, you can now confidently install a new inner tube on your bicycle. Remember to pay attention to the details, such as proper inflation and troubleshooting any issues. With a little practice, you’ll be able to change a tube in no time. Next, we’ll move on to replacing the tire and wheel.
Replace the Tire and Wheel
It’s time to give your ride a fresh set of rubber by swapping out the worn-out tire and wheel. Before doing so, it’s important to choose the right tire for your bike. The type of tire you need will depend on the type of riding you do, as well as the terrain you’ll be riding on.
Road bikes typically require narrow, high-pressure tires, while mountain bikes require wider, lower-pressure tires for better traction on rough terrain. Once you’ve chosen the right tire, it’s important to ensure proper tire inflation.
Underinflated tires can lead to pinch flats, while overinflated tires can cause a rough, uncomfortable ride. Check the sidewall of your new tire for the recommended pressure range, and use a tire gauge to ensure your tire is inflated within that range.
Proper tire inflation not only ensures a smooth ride, but also helps prevent punctures and extends the life of your tire.
Frequently Asked Questions
What causes a bicycle inner tube to puncture or get damaged?
As a cyclist, I’ve learned that the causes of damage to a bicycle inner tube can range from sharp objects on the road to improper inflation. To prevent punctures, I always carry a patch kit and ensure proper tire pressure before each ride.
How often should you replace your bicycle inner tube?
As the saying goes, "an ounce of prevention is worth a pound of cure."Factors affecting bicycle inner tube lifespan include tire pressure, terrain, and riding style. Signs of worn out inner tubes include frequent punctures and bulges. Replace them before they fail.
What should you do if you don’t have the necessary tools to change a bicycle inner tube?
If lacking the necessary tools to change a bicycle inner tube, alternative solutions such as using a patch kit or calling for roadside assistance are options. DIY repair tips can include using household items like duct tape or a rubber band.
Can you patch a punctured bicycle inner tube instead of replacing it?
Patching a punctured bicycle inner tube is a cost-effective solution, but there are pros and cons. It may not hold up well if the damage is large, and the patch itself can create a weak point.
How do you prevent getting a flat tire while riding a bicycle?
Did you know that improper tire pressure causes 90% of all flat tires? To prevent flats, always maintain proper tire pressure and consider using a tire sealant for added protection against punctures.
Conclusion
So, that’s how you change a bicycle inner tube! It may seem daunting at first, but with the right tools and a bit of practice, you’ll be able to do it in no time.
Remember to always check the condition of your tires and tubes before heading out on a ride, and don’t hesitate to replace them if necessary.
As I finished replacing my own inner tube, I couldn’t help but think about the sense of accomplishment that came with being able to fix something myself. It’s a small task, but it’s a reminder that with a little bit of effort and know-how, we can take care of our own belongings and feel more self-sufficient.
So, next time you find yourself with a flat tire, don’t panic – just follow these steps and get back on the road in no time.
Related Posts:


Ralf is a devoted husband and father who loves spending time with his family. He enjoys riding his bicycle as much as possible, and takes every opportunity he can to get out on the open road. Ralf is a kind and gentle person who wants only the best for those around him.