Is your bike making a squeaking noise when you brake, or are you finding it takes longer to come to a stop? Now’s the moment to tackle the issue hands-on and figure out the fix on your own. Fear not, becoming a bicycle repair expert isn’t necessary for this task. Armed with a handful of tools and a bit of knowledge, you’ll get your brakes functioning perfectly once more.
The first step in fixing your brakes is to assess the problem. Is the brake cable loose or broken? Are the brake pads worn down? Once you identify the issue, gather the necessary tools, including an Allen wrench, pliers, and a screwdriver.
Don’t have these tools? No problem, you can purchase them at any bike shop or hardware store. With the right tools and a little bit of patience, you can easily adjust your brake pads and cable tension to have your bike stopping like a dream again.
Key Takeaways
- Assess the problem: Look for signs of squeaking or slow stopping, loose or broken brake cable, and worn down brake pads.
- Gather necessary tools: You’ll need an Allen wrench, pliers, and a screwdriver.
- Adjust brake pads and cable tension: Proper alignment is crucial, and different brake pad materials perform differently in wet and dry conditions.
- Test brakes and make final adjustments: Check responsiveness while riding, adjust lever positioning if necessary, and lubricate cable housing to prevent friction. Always pay attention to unusual movements or sounds and test the brakes regularly to ensure they’re working properly.
Assess the Problem
Got squeaky brakes? Let’s assess the problem and get your bicycle back on the road in no time!
The first step in fixing your bike’s brakes is to identify any issues. Check if the brake pads are worn out or misaligned. Worn out brake pads will cause your brakes to be less effective, while misaligned ones will cause the brake pads to rub against the wheel rim, resulting in a squeaking noise.
Another common mistake is not tightening the brake cables properly. If the cables are loose, the brake levers will feel mushy and won’t be able to apply enough pressure on the brake pads. Additionally, make sure that the brake pads are clean and free of debris. Dirt and oil buildup can reduce the friction between the pads and the wheel rim, making it harder to stop your bike.
Once you’ve identified the problem, gather the necessary tools to fix it.
Gather the Necessary Tools
First things first, you’ll need to grab some essential tools to get your ride in tip-top shape. To begin, you’ll need a set of Allen wrenches, a pair of pliers, and a flathead screwdriver. It’s important to ensure that your tools are in good condition before starting your bike repair. Check the wrenches for any signs of rust or wear, and make sure the pliers are easy to grip. Tool maintenance is key to ensuring that your brake repair goes smoothly and without any hiccups.
Once you have your tools ready, you can begin to assess the damage to your brakes and start the necessary repairs. Emergency brake repair is a crucial skill that every cyclist should have, and having the right tools on hand makes all the difference.
With your Allen wrenches, pliers, and screwdriver, you’ll be able to adjust the brake pads and get your bike back to working order. So, let’s move on to the next step and adjust those brake pads!
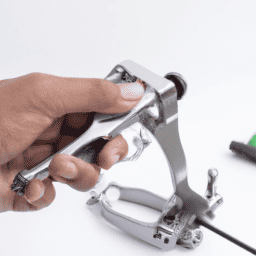
Adjust the Brake Pads
Now that you have your tools ready, it’s time to fine-tune your bike’s braking system by adjusting the position of the brake pads. Proper alignment is crucial for efficient braking, so make sure the brake pads are hitting the rim evenly on both sides. Use a ruler or a straight edge to check the alignment. If the pads are not aligned correctly, adjust them by loosening the bolt that holds the pad in place and moving the pad up or down until it’s properly aligned. Once the pad is aligned, tighten the bolt and repeat the process on the other side.
Choosing the right brake pad material is also important. Different types of brake pad materials perform differently in wet and dry conditions, and some materials wear out faster than others. Refer to the table below to help you choose the best brake pad material for your needs:
| Material | Pros | Cons |
|---|---|---|
| Rubber | Good in wet conditions, affordable | Wear out quickly, not great in extreme heat |
| Ceramic | Great in dry conditions, long-lasting | Expensive, not ideal in wet conditions |
| Metallic | Good in wet and dry conditions, long-lasting | Noisy, can damage rims |
Now that the brake pads are properly aligned and you have chosen the right material, it’s time to move on to adjusting the brake cable tension.
Adjust the Brake Cable Tension
To effectively fine-tune your bike’s braking system, it’s crucial to adjust the tension of the brake cable using a cable adjuster. This is because the brake cable tension directly affects the distance and power required to stop the bike.
If the cable tension is too loose, the brake pads won’t make proper contact with the rim, and you’ll have to squeeze the brake levers harder to stop. Conversely, if the cable tension is too tight, the brake pads will rub against the rim even when you’re not braking, causing excessive wear and tear.
To adjust the brake cable tension, start by loosening the cable anchor bolt located on the brake caliper. Then, use the cable adjuster to increase or decrease the tension until the brake pads make even and firm contact with the rim.
Common mistakes to avoid include adjusting the cable tension too much at once, which can cause the brake pads to rub against the rim, and not checking both brake pads for proper alignment. If you’re having trouble getting the brake pads to make proper contact with the rim, try cleaning the rim with rubbing alcohol or using a file to smooth out any rough spots.
Once you’re satisfied with the cable tension and brake pad alignment, move on to the next step: testing your brakes.
Test Your Brakes
Now that you’ve adjusted the brake cable tension on your bicycle, it’s time to test your brakes to ensure they’re working properly.
The best way to do this is to take your bike for a test ride and check the responsiveness of the brakes while riding.
If you find they’re still not functioning as they should, make final adjustments to the cable tension until you achieve the desired result.
Remember, properly functioning brakes are essential for your safety while riding.
Test While Riding
As you ride your bike, feel for any unusual movements or sounds coming from the brakes to ensure they’re properly functioning. Here are some things to pay attention to while testing your brakes while riding:
-
Pull on each brake lever separately and make sure they stop the wheel smoothly and evenly.
-
While riding, apply the brakes gently to see if there’s any rubbing or grinding noises.
-
Test the brakes at different speeds to ensure they work effectively at all speeds.
-
Check to see if the brake pads make even contact with the rim or rotor.
By testing your brakes while riding, you can identify any potential issues and address them before they become a safety hazard.
Once you’ve completed this step, it’s time to make final adjustments to your brakes.
Make Final Adjustments
You’re almost done ensuring your bike is safe to ride by making final adjustments to your braking system.
Start by checking the brake lever positioning. Ensure that the brake lever is at the right angle and height for your hand position. Adjust the lever if necessary using the bolt that attaches the lever to the handlebar. Make sure the lever is tight enough to stay in place while riding, but not too tight that it restricts movement.
Next, lubricate the cable housing. Use a lubricant specifically designed for bike cables and apply it to the cable housing. This will ensure that the cable moves smoothly within the housing, preventing any friction that could cause the brakes to fail. Be careful not to over-lubricate the housing, as this could attract dirt and grime, causing further issues.
Once you’ve checked both of these areas, your braking system should be working properly, and you’ll be ready to ride safely.
Frequently Asked Questions
What is the maximum weight limit for a bicycle’s brakes?
Did you know that a typical bicycle brake can handle a weight capacity of around 250-300 pounds? However, it’s important to consider the type of brake, as some may have lower weight limits.
Is it safe to ride a bicycle with only one functioning brake?
Riding with only one functioning brake is risky. Adjusting the working brake properly is crucial. Alternatives include walking the bike or using the foot brake. Fix the other brake immediately to ensure your safety.
How often should I replace my brake pads?
To ensure safe cycling, replace your brake pads when they’re worn out. Brake pad lifespan depends on brake pad selection and frequency of use. Choose the right pads and check them regularly for wear.
Can I use any type of brake pads for my bicycle?
When it comes to brake pad compatibility, it’s important to choose the right brake pad material for your bicycle. Not all brake pads are created equal, so be sure to consult your owner’s manual or a knowledgeable bike mechanic before making a purchase.
Are there any special safety precautions I should take when fixing my brakes?
When fixing bicycle brakes, it’s important to take proper safety precautions, such as wearing eye protection and using the proper tools. Top common brake issues and their solutions can be found in a comprehensive guide.
Conclusion
Congratulations! You’ve successfully fixed the brakes on your bicycle. Don’t forget to give yourself a pat on the back for a job well done.
Now that you’ve mastered the art of fixing your brakes, you can confidently hit the road knowing that your bike will stop when you need it to. Safety should always be your top priority when cycling.
In the world of cycling, there’s nothing more satisfying than having a smooth ride and being in control of your bike. By fixing your brakes, you’ve taken a crucial step towards achieving this.
As the saying goes, "An ounce of prevention is worth a pound of cure."Regularly maintaining your bike and fixing any issues that arise will ensure that you have a safe and enjoyable ride every time.
So, keep on cycling and keep on fixing those brakes!