For those who love cycling, few things are as irritating as dealing with brakes that squeak on your bicycle. It’s not just a nuisance when riding, but it poses a risk to your safety as well. Luckily, if you have a bit of technical knowledge and a few essential tools, repairing squeaky bike brakes can be quite straightforward.
The first step is to diagnose the problem. Squeaking brakes can be caused by a variety of issues, such as worn brake pads, dirty rims, or misaligned brake systems. Once you have identified the source of the problem, you can begin to take the necessary steps to fix it.
In this article, I will guide you through the process of:
- Cleaning your brakes and rims
- Replacing worn brake pads
- Adjusting the brake system
- Testing and fine-tuning your brake system to ensure a smooth and safe ride.
Key Takeaways
- Squeaky brakes are caused by worn brake pads, dirty rims, or misaligned brake systems.
- Fixing squeaky brakes involves diagnosing the problem, cleaning brakes and rims, replacing worn brake pads, adjusting brake pads for proper alignment, adjusting the brake system, and fine-tuning brakes for optimal stopping power.
- Different brake pads may be required for different brake systems, and different materials for brake pads can produce varying levels of noise and wear on the rotor.
- To fix squeaky bicycle brakes, pay attention to orientation of old brake pads, clean caliper and rotor before installing new pads, adjust cable tension or position of brake pads, and test brakes by giving brake levers a firm squeeze while riding at a slow speed.
Diagnose the Problem
Before attempting to fix your squeaky bicycle brakes, it’s important to diagnose the issue. Listen carefully for any unusual sounds while braking and feel for any unusual resistance in the brake lever. Identifying the cause of the squeak can help troubleshoot issues more effectively.
For instance, if you hear a high-pitched sound, it may indicate that the brake pads are worn out and need replacing. Alternatively, if the sound is more of a grinding noise, it could mean that the brake pads are misaligned or that the rim is dirty.
Another way to diagnose the problem is to check for any visible signs of wear and tear on the brake pads. If they are worn down unevenly or there are chunks missing, it’s likely that they need replacing. Additionally, inspect the rim for any signs of dirt or debris to help determine if cleaning is necessary.
Once you’ve identified the cause of the squeak, it’s time to move onto the next step of cleaning the brakes and rims.
Clean the Brakes and Rims
To get your ride running smoothly again, try giving the brakes and rims a thorough cleaning. Dirty brakes can cause squeaking and reduce stopping power, so it’s important to use proper cleaning techniques to remove any built-up grime or debris. Before cleaning, make sure to remove the wheels and brake pads from the bike to make the process easier.
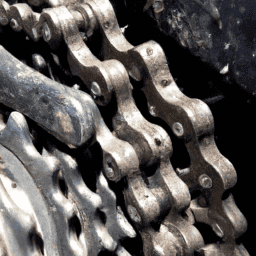
Common causes of dirty brakes include road grime, oil from the chain, and brake dust. To clean the brakes and rims, start by using a soft-bristled brush to remove any loose dirt or debris. Next, apply a mild degreaser to the rims and brake pads, being careful not to get any on the bike’s frame or other components. Use a clean rag to wipe away the degreaser and then rinse the area thoroughly with water. Finally, dry the brakes and rims with a clean towel and reassemble the bike.
To replace worn brake pads, it’s important to first check the manufacturer’s recommendations for your specific brake system. Different types of brakes may require different types of pads, so make sure to use the correct ones for your bike.
Replace Worn Brake Pads
I need to replace the worn brake pads on my bicycle. First, I’ll remove the old pads by loosening the retaining bolt and sliding them out.
Then, I’ll install the new pads by sliding them into place and tightening the retaining bolt.
Finally, I’ll adjust the pads to ensure they’re properly aligned with the rim and that they provide effective stopping power.
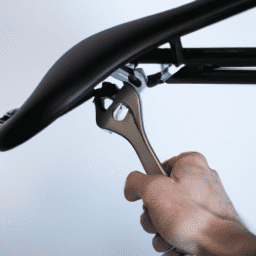
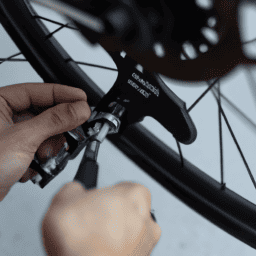
Remove Old Pads
First, you’ll need to loosen and remove the retaining bolt on the back of the brake caliper using a 5mm Allen wrench. Once the bolt is loose, slide the old brake pads out of the caliper. Be sure to note their orientation as you will need to install the new pads in the same way.
Choosing appropriate brake pads is crucial in ensuring your brakes function correctly. There are a variety of brake pad materials available, including organic, metallic, and ceramic. It’s important to select the appropriate material for your riding style and conditions. Common mistakes when removing old pads include not paying attention to their orientation, and not thoroughly cleaning the caliper and rotor before installing new pads.
To install new pads, simply reverse the process of removing the old ones. Slide the new pads into the caliper, making sure they are properly oriented. Tighten the retaining bolt and give the brakes a few test squeezes to make sure they are functioning properly.
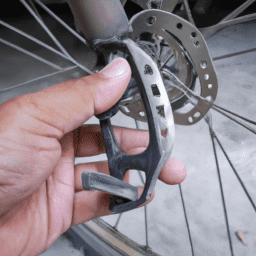
Install New Pads
Get ready to feel the satisfying grip of your new brake pads as you slide them into the caliper and tighten the retaining bolt. Before installing the new pads, make sure you’ve selected the proper type of pad for your bike’s braking system. Different bikes require different types of brake pads, so make sure you have the correct type of pad before proceeding.
To install the new pads, follow these pad replacement techniques:
- Remove the retaining clip or bolt that secures the old pads in place.
- Slide the old pads out of the caliper.
- Clean the caliper and brake rotor with rubbing alcohol or brake cleaner.
- Slide the new pads into the caliper and secure them with the retaining clip or bolt.
Once you have installed the new pads, it’s time to adjust them to ensure that they are properly aligned with the brake rotor. Adjusting the pads will help maximize their effectiveness and prevent premature wear.
Adjust the Pads
Once the new pads are installed, you’ll want to make sure they’re properly aligned with the brake rotor by adjusting them. Proper alignment is important to ensure efficient and safe braking.
Start by loosening the bolts that hold the brake caliper in place. This will allow you to move the caliper and adjust the position of the pads.
Next, check the alignment of the pads with the rotor. The pads should be touching the rotor evenly on both sides. If they’re not, adjust the position of the caliper until the pads are properly aligned. Also, make sure there is enough clearance between the pads and the rotor to prevent rubbing.
Lastly, consider the pad materials and how they affect braking performance. Different materials can produce varying levels of noise and wear on the rotor. Adjusting the pads properly can help prolong the life of your brake system and ensure a smooth ride.
With the pads properly aligned, you can now move on to adjusting the brake system as a whole.
Adjust the Brake System
Congratulations, you must be thrilled to have brakes that sound like a flock of geese in heat. Lucky for you, adjusting the brake system is a cinch.
Start by inspecting the brake maintenance and ensure that the brake cable tension is optimal. This is the first step towards fixing your squeaky brakes. Make sure that the brake pads are not worn out and that they’re properly aligned with the rim. If the pads are worn out, replace them with new ones.
Next, adjust the brake system by tightening or loosening the brake cable tension. This’ll depend on the type of brake system you’ve got. For example, if you’ve got a caliper brake, you can adjust the tension by turning the barrel adjuster. If you’ve got a cantilever brake, you can adjust the tension by tightening or loosening the brake cable with a wrench.
Once you’ve adjusted the brake system, test and fine-tune it until you’ve got optimal stopping power. With these steps, you can easily fix your squeaky bicycle brakes and enjoy a smoother, safer ride.
Test and Fine-Tune
Now it’s time to make sure your brakes are working perfectly by testing and fine-tuning them. It’s important to remember that even small adjustments can make a big difference in the performance of your brakes.
Fine-tuning techniques can include adjusting the brake pads, cable tension, and the position of the brake levers.
To test the brakes, give the brake levers a firm squeeze while riding at a slow speed and see how quickly and smoothly the bike stops. If the brakes feel too loose or the stopping power is not sufficient, try adjusting the cable tension or the position of the brake pads.
Brake adjustment tips can include making sure the brake pads are properly aligned with the rim of the wheel and adjusting the cable tension until the brake pads make firm contact with the wheel. With some patience and careful attention, you can fine-tune your brakes to achieve optimal stopping power and feel confident in your ability to ride safely.
Frequently Asked Questions
How often should I replace my brake pads?
I replace my brake pads every 3,000 to 5,000 miles. However, the lifespan of brake pads varies depending on factors such as usage, terrain, and weather. Signs of worn out brake pads include squeaking, reduced braking power, and uneven wear.
Can I use any type of brake pads on my bike?
When choosing compatible brake pads for my bike, it’s important to consider the advantages of different types, such as organic or metallic. Organic pads provide better initial bite, while metallic pads offer longer life and better performance in wet conditions.
How do I know if my cables need to be replaced?
To determine if my bicycle’s cables need replacing, I check for signs of cable wear such as fraying or rust. I can replace cables at home by following online tutorials and using proper tools.
Is it possible to fix a bent rim on my own?
DIY rim straightening is possible, but requires specialized tools and expertise. Professional rim repair options are available and may be more cost-effective in the long run. Consider the severity of the bend and potential safety risks before attempting any repairs.
How do I adjust the tension on my brake cables?
To adjust brake cable tension, first ensure that the brakes are properly aligned. Then, adjust the barrel adjuster until the desired tension is achieved. Brake cable lubrication can also help improve performance and reduce wear. For example, I adjusted the tension on my road bike’s brake cables using these techniques and noticed a significant improvement in braking power.
Conclusion
In conclusion, fixing squeaky bicycle brakes is an important task that every cyclist must know. The process involves diagnosing the problem, cleaning the brakes and rims, replacing worn brake pads, adjusting the brake system, and testing and fine-tuning.
By following these steps, cyclists can ensure that their bike brakes are in good working condition and that they can enjoy a safe and smooth ride. Interestingly, according to a survey conducted by the League of American Bicyclists, 60% of bicycle accidents involve collisions with motor vehicles. This statistic highlights the importance of having properly functioning brakes on a bicycle.
By taking the time to fix squeaky brakes, cyclists can prevent accidents and ensure their safety on the road. So, if you hear that annoying squeak every time you hit the brakes, don’t ignore it! Follow the steps outlined in this article to fix the issue and keep yourself safe while cycling.