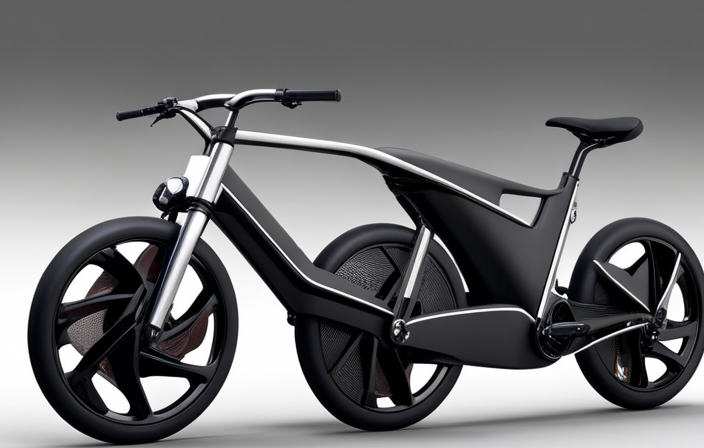
As an avid cyclist and lover of all things DIY, I found myself pondering the question: how can I combine my passion for biking with the mundane task of pencil sharpening?
The answer came to me in a burst of inspiration: why not convert an electric pencil sharpener into a bike-powered machine?
In this article, I will guide you step-by-step through the process of transforming your ordinary electric pencil sharpener into a pedal-powered masterpiece.
Get ready to embark on a unique and exhilarating journey that merges the worlds of biking and pencil sharpening like never before.
Key Takeaways
- Use rotational energy from pedaling to power the electric pencil sharpener
- Connect the dynamo and voltage regulator to the bike to convert the rotational energy into electricity
- Adjust the pencil guide to ensure even sharpening while using the bike-powered electric pencil sharpener
- Regularly inspect and maintain the bike-powered device for safety and efficiency.

Kryptonite Folding Bike Lock, Compact Lightweight High Security Anti-Theft Foldable Bicycle Lock with 2 Keys and Mount for E-Bikes Scooter Road Mountain Bikes, 88.4cm (34.8 in)
HIGH-SECURITY DESIGN: This Anti-Theft folding bike lock is made from 3mm hardened steel bars with tightened rivets for...
As an affiliate, we earn on qualifying purchases.
Gather the Necessary Materials and Tools
Before you can start converting your electric pencil sharpener with a bike, you’ll need to gather all the necessary materials and tools.
For this bike modification project that harnesses alternative energy, you will need a few key items. First, you will need a stationary bike stand that can securely hold your bike in place. This will ensure stability during the conversion process.
You will also need a DC motor that can generate electricity when connected to the bike’s pedal power. Additionally, gather a voltage regulator to control the flow of electricity, wires for connecting the components, and a battery to store the generated energy.
Now that you have all the materials, let’s move on to disassembling the electric pencil sharpener without damaging any of its components.

Master Lock Black Hardened Steel Link Folding Bike Lock with Key, Heavy Duty Anti-Theft Lock for Bicycles, Electric Scooters, 2-3/4ft (84cm) Length x 0.13 in (3.5 mm), 8335EC
HARDENED STEEL SECURITY: The folding bike lock has hardened steel links that resist cutting, sawing, and prying
As an affiliate, we earn on qualifying purchases.
Disassemble the Electric Pencil Sharpener
To start taking it apart, you’ll need to unscrew the casing of the device. The disassembling process of the electric pencil sharpener requires a few essential tools. You’ll need a Phillips head screwdriver to remove the screws securing the casing. Look for any hidden screws under rubber feet or labels. Once the screws are removed, carefully separate the casing into two halves. Pay attention to any wires or connectors that may be attached and gently detach them. Take note of the internal components and their positions as you disassemble. It’s crucial to be meticulous to ensure a successful conversion.
With the electric pencil sharpener disassembled, you can now move on to preparing the bike-powered mechanism.
Transition: With the electric pencil sharpener disassembled, the next step is to prepare the bike-powered mechanism.

Seatylock FoldyLock Compact Folding Bike Lock - Award Winning Patented Lightweight High Security Bicycle Lock - Heavy Duty Anti Theft Smart Secure Guard with Keys & Case for Bikes or Scooters
TOP RATED LIGHTWEIGHT COMPACT BIKELOCK - Best Light Weight Folding Bike Lock. Portable Solid Key Bike Lock Protects...
As an affiliate, we earn on qualifying purchases.
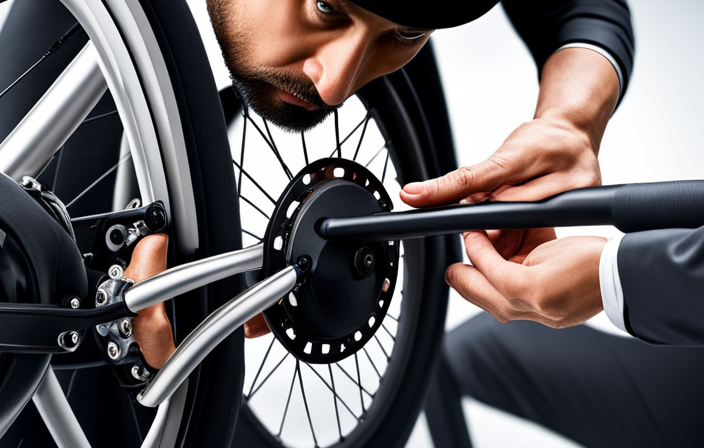
Prepare the Bike-Powered Mechanism
Now that we have the electric pencil sharpener disassembled, we can start preparing the bike-powered mechanism.
To convert the sharpener into a bike-powered generator, we need to gather a few supplies.
First, we will need a bike stand or a stable surface to hold the bike in place. This will ensure that the bike remains steady while we pedal.
Next, we will need a generator kit, which includes a motor and a belt. The motor will convert the mechanical energy from pedaling into electrical energy, while the belt will connect the motor to the sharpener’s mechanism.
By using a bike-powered generator, we are tapping into alternative energy sources and reducing our reliance on traditional power outlets.
With the mechanism prepared, let’s now move on to connecting the bike to the sharpener.

CROPS Q5-COCON Compact Bike Lock Cable, 6 ft, Yellow – Resettable 3-Digit Combination, Compact & Portable
Resettable 3-digit dial lets you set your own combination for added security.
As an affiliate, we earn on qualifying purchases.
Connect the Bike to the Sharpener
Once we have gathered the necessary supplies, we can easily connect the generator kit to the mechanism. The connectivity of the bike to the sharpener is crucial for it to function as an alternative power source. To ensure a smooth connection, follow the steps below:
| Bike Components | Sharpener Components |
|---|---|
| Bike frame | Pencil sharpener |
| Rear wheel | Generator kit |
| Pedals | Wiring |
| Chain | Power switch |
First, attach the generator kit to the rear wheel of the bike by securely fastening it using the provided bolts. Then, connect the generator to the sharpener using the wiring. Ensure that the wires are properly connected to the power switch on the sharpener. Lastly, make sure the chain is properly aligned with the sharpener’s mechanism. This will allow the movement of the bike’s pedals to power the sharpener.
With the bike and sharpener connected, we can now move on to testing the pedal-powered sharpener.
Transitioning into the subsequent section: "To ensure the effectiveness of our pedal-powered sharpener, we need to test its functionality."
Test the Pedal-Powered Sharpener
Make sure you secure the generator kit to the rear wheel and connect it to the sharpener using the provided wiring.
Now that the pedal-powered sharpener is set up, it’s time to test its efficiency. There are various testing methods you can use to analyze its performance.
One method is to measure the time it takes to sharpen a pencil using the pedal power. Compare this time to the original electric sharpener to determine the efficiency of the conversion.
Additionally, you can conduct a visual analysis of the pencil shavings to ensure that they are evenly shaved and not damaged.
Adjust the Mechanism for Optimal Performance
To ensure optimal performance, it’s important to make adjustments to the mechanism of the pedal-powered sharpener. Here are some key steps to optimize performance and improve efficiency:
-
Check the belt tension: Ensure that the belt connecting the pedal mechanism to the sharpener is properly tensioned. A loose belt can lead to slippage and decreased power transfer.
-
Adjust the sharpening angle: Fine-tuning the sharpening angle can significantly impact the quality of the pencil point. Experiment with different angles to find the optimal setting for your specific needs.
-
Lubricate moving parts: Regularly lubricate the moving parts of the sharpener to minimize friction and ensure smooth operation. Use a high-quality lubricant specifically designed for mechanical devices.
-
Inspect and clean the blades: Regularly inspect the blades for any signs of damage or dullness. Clean them thoroughly and sharpen if necessary to maintain optimal cutting performance.
By following these steps, you can optimize the performance of your pedal-powered sharpener.
Now, let’s secure the sharpener to a stable surface…
Secure the Sharpener to a Stable Surface
Before securing the sharpener to a stable surface, it’s important to ensure that it is placed on a level and sturdy foundation. To achieve this, several stabilization techniques can be employed.
One option is to use adhesive pads or rubber feet to prevent the sharpener from sliding or slipping during use. Alternatively, consider using clamps or brackets to attach the sharpener to a sturdy workbench or table. These methods will provide the necessary stability to ensure efficient and safe sharpening.
Additionally, when exploring alternative power sources, such as converting a pencil sharpener with a bike, it’s crucial to have a stable setup to prevent any accidents or damage.
Sharpen Your Pencils with Pedal Power
Now that the electric pencil sharpener is securely attached to a stable surface, it’s time to harness the power of pedal to sharpen your pencils. By converting the sharpener to be powered by pedal, you can enjoy the benefits of pedal power while also engaging in sustainable sharpening practices.
Simply place your pencil in the sharpener and start pedaling. As you pedal, the energy generated by your legs will be transferred to the sharpener’s mechanism, causing the blades to rotate and sharpen your pencil.
This eco-friendly method not only saves electricity but also provides a great workout for your legs. As you sharpen your pencils with pedal power, be sure to keep an eye on the sharpening process to ensure that the pencil is sharpened evenly and to the desired point.
If any issues arise, such as the pencil not sharpening properly or the blades becoming dull, it’s important to troubleshoot and make adjustments as needed.
Troubleshoot and Make Adjustments as Needed
If you encounter any issues, like the blades not rotating or the pencil not sharpening evenly, you should check for any obstructions or dullness and adjust accordingly.
Troubleshooting techniques can help you identify and resolve common problems with your electric pencil sharpener.
First, make sure there are no pencil shavings or debris blocking the blades. Use a small brush or compressed air to clean out any obstructions.
Next, check the blades for dullness. If they’re not sharp, you may need to replace them or sharpen them using a blade sharpener.
Additionally, you can adjust the pencil guide to ensure a more even sharpening.
Enjoy the Benefits of a Sustainable and Fun Pencil Sharpener
To fully experience the advantages of a sustainable and enjoyable pencil sharpener, you should explore its various features and functionalities. Here are some key benefits and sustainability features of a modern pencil sharpener:
-
Efficient power usage: A sustainable pencil sharpener is designed to minimize energy consumption, reducing your carbon footprint.
-
Durable construction: These pencil sharpeners are built to last, reducing waste and promoting a more sustainable lifestyle.
-
Eco-friendly materials: Many sustainable pencil sharpeners are made from recycled or renewable materials, promoting a greener environment.
-
Sharp blade technology: These sharpeners utilize advanced blade technology to provide precise and clean sharpening, ensuring optimal pencil performance.
-
Easy to clean and maintain: Sustainable pencil sharpeners are user-friendly, allowing for hassle-free cleaning and maintenance, enhancing their longevity.
By investing in a sustainable pencil sharpener, you not only enjoy the benefits of efficient and precise sharpening, but also contribute to a greener and more sustainable future.
Now, let’s explore how you can share your DIY project with others without writing ‘step’.
Share Your DIY Project with Others
Once you have completed your DIY project, don’t hesitate to show it off and inspire others with your creativity. Sharing your project with the DIY community is a great way to showcase your skills and contribute to the collective knowledge of creative projects.
By sharing your experience, you can provide valuable insights and tips that may help others in their own endeavors. Additionally, sharing your project can foster a sense of community and collaboration among DIY enthusiasts.
It’s amazing how a simple idea can spark inspiration and lead to even more innovative projects. So, go ahead and share your DIY creation with pride, and let others in the DIY community be inspired by your ingenuity.
Now, let’s explore other bike-powered devices and projects, opening up a world of possibilities for sustainable and fun inventions.
Explore Other Bike-Powered Devices and Projects
Let’s check out some other cool projects that can be powered by a bicycle.
One popular project is a bike-powered phone charger. This device uses the rotational energy generated by pedaling to charge your phone’s battery. It typically consists of a dynamo, which is attached to the bike’s wheel, and a voltage regulator to ensure a stable charging current. With this setup, you can charge your phone while cycling, making it ideal for outdoor adventures or long bike rides.
Another interesting project is a bike-powered blender. This innovative device allows you to make delicious smoothies or shakes while getting your exercise. The blender is connected to the bike’s rear wheel through a belt or chain, and as you pedal, the rotational energy powers the blender’s blades. It’s a fun and efficient way to enjoy a refreshing drink after a workout.
Now, let’s consider safety precautions and maintenance tips to ensure the longevity and safe use of these bike-powered devices.
Consider Safety Precautions and Maintenance Tips
Make sure you regularly inspect and tighten all the connections on your bike-powered devices to ensure they are secure during use. Here are some maintenance tips and the importance of safety precautions to consider:
-
Check the cables: Ensure that all cables are properly connected and not frayed or damaged. Replace any worn-out cables to prevent accidents.
-
Lubricate moving parts: Apply lubricant to the chain, gears, and pedals regularly to keep them running smoothly and prevent unnecessary wear and tear.
-
Test brakes and tires: Regularly check the brake pads for wear and replace them if necessary. Also, examine the tires for proper inflation and any signs of damage.
It is essential to prioritize safety when using bike-powered devices. By following these maintenance tips and taking necessary precautions, you can enjoy a safe and efficient experience.
Now, let’s dive into how you can get creative and customize your bike-powered sharpener.
Get Creative and Customize Your Bike-Powered Sharpener
After ensuring the safety and maintenance of your bike-powered pencil sharpener, it’s time to get creative and customize your setup. This is where the fun begins! Personalizing your sharpener not only adds a touch of uniqueness, but also allows you to make it more efficient and user-friendly.
To inspire your creativity, here are some exciting customization options to consider:
| Customization Option | Description | Benefits |
|---|---|---|
| Vibrant Paint Job | Give your bike a fresh coat of paint | Adds visual appeal and makes it stand out |
| Custom Decals | Apply decals related to your interests or hobbies | Show off your personality and interests |
| Adjustable Height | Modify the sharpener’s height for comfort | Enhances ergonomics and reduces strain |
| Alternative Power Source | Integrate solar panels or a wind turbine | Enables eco-friendly sharpening without pedaling |
Have Fun and Embrace the Unique Combination of Biking and Pencil Sharpening!
Get ready to fully enjoy the exciting experience of combining biking and sharpening your pencils! It may sound unconventional, but bike-powered art is a growing trend that allows you to stay active while indulging in your creative side.
With pencil sharpening techniques, you can take your bike-powered art to the next level. Here are three techniques to consider:
-
Pedal-Powered Sharpener: Attach a pencil sharpener to your bike’s frame, and as you pedal, the motion will rotate the blades and sharpen your pencils. This hands-free approach allows you to multitask and get your pencils sharpened while enjoying a bike ride.
-
Stationary Bike Sharpener: Convert a stationary bike into a pencil sharpener by connecting the bike’s pedals to the sharpener mechanism. This setup allows you to focus solely on sharpening your pencils while getting a good workout at the same time.
-
Manual Bike Sharpener: Use a handheld pencil sharpener while riding your bike. This technique requires a bit more dexterity, but it gives you the freedom to sharpen your pencils whenever and wherever you want.
Frequently Asked Questions
What are the necessary materials and tools needed to convert an electric pencil sharpener with a bike?
To convert an electric pencil sharpener with a bike, you will need alternative power sources for pencil sharpeners, such as a dynamo or solar panel, and creative ways to repurpose old bike parts, like using the chain to power the sharpener.
How do I disassemble the electric pencil sharpener?
To disassemble an electric pencil sharpener, start by unplugging it and removing any screws or fasteners holding the casing together. Be cautious of delicate parts and wires. Some common issues during this process include stripped screws or difficulty accessing internal components.
How do I prepare the bike-powered mechanism?
To prepare the bike-powered mechanism for pedal powered gadgets such as a bike modification, one must start by selecting a suitable gear ratio, attaching a drive chain to the bike’s rear wheel, and connecting it to the desired gadget.
How do I troubleshoot and make adjustments to the pedal-powered sharpener?
To troubleshoot and adjust a pedal-powered sharpener, start by checking the alignment of the pedal mechanism and ensuring it is securely attached. Use a wrench to tighten any loose bolts. Additionally, lubricate the moving parts to reduce friction and improve performance.
How do I ensure the safety and maintenance of the bike-powered sharpener?
To ensure the safety and maintenance of the bike-powered sharpener, follow these safety precautions: secure the bike firmly, wear protective gear, and keep children away. For maintenance, regularly check the bike’s condition, tighten any loose parts, and lubricate moving components.
Conclusion
As I stepped back and admired my creation, a sense of anticipation filled the air.
The electric pencil sharpener had been transformed into a bike-powered marvel, ready to revolutionize the way I sharpened my pencils.
The moment of truth had arrived, and with a quick pedal, the blades whirred to life, effortlessly transforming a dull pencil tip into a sharp point.
The possibilities were endless, as I imagined all the other bike-powered devices and projects that awaited me.
With a little creativity and a lot of fun, the unique combination of biking and pencil sharpening had truly come to life.
Stay tuned for more exciting adventures in the world of bike-powered innovation!