Ever thought about crafting an artistic masterpiece that is not only one-of-a-kind but also practical? Your search ends with constructing a bike using wire.
With just a few materials and tools, you can create a stunning wire bicycle that will impress your friends and family.
First, gather all the necessary materials and tools. You’ll need wire cutters, pliers, wire in various gauges, and a picture or sketch of a bicycle to use as a reference.
Don’t worry if you’re not an expert in wirework – this project is suitable for beginners and experts alike. With a little patience and attention to detail, you’ll soon have a beautiful wire bicycle that you can display with pride.
Key Takeaways
- Wire bicycle sculptures are a popular and versatile addition to home decor.
- Creating a wire bicycle requires basic materials and tools, and can be done by beginners and experts alike.
- Choosing appropriate wire and shaping techniques are important for creating a sturdy and visually appealing frame.
- Safety precautions should be taken when working with wire, and delicate handling is required for these sculptures.

Under Armour Squeeze Water Bottles, 32 oz Water Bottles, Sideline Sports Water Bottle with Quick-Shot Lid, Quick & Easy Hydration, Gym Water Bottles, Squeeze Bottle, 1 32oz Bottle
- Easy Hydration: Quick-shot lid and one-way valve
- On-the-Go Use: One-hand operation for active hydration
- Measurement Markings: Ounces and milliliters for tracking
As an affiliate, we earn on qualifying purchases.
Gather Materials and Tools
Gotta make sure you’ve got all the materials and tools before you start building your wire bicycle!
The first thing you need is wire. You can usually find it at hardware stores or online. Look for a sturdy, but flexible wire that’s easy to bend and shape.
You’ll also need pliers, wire cutters, a ruler, and a pencil. Make sure your pliers have a good grip and can easily manipulate the wire. You’ll use the wire cutters to trim the wire to size. The ruler and pencil help you measure and mark the wire accurately.
When working with wire, it’s important to take safety precautions. Wear protective gloves to avoid cuts or scrapes. Keep your work area clean and organized to prevent tripping or tangling. Start with a small piece of wire to practice bending and shaping before moving onto larger pieces. Remember to work slowly and carefully, as wire can easily break or become misshapen if not handled properly.
Now that you’ve got all your materials and tools ready, it’s time to create the frame.
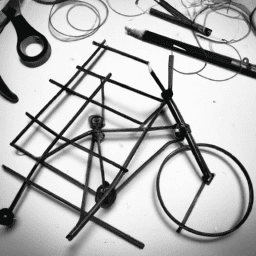
Create the Frame
You can start by bending and twisting the wires to form the basic shape of the frame. The wire gauge you choose will depend on the size and strength you want for your bicycle. Thicker gauges will provide sturdier frames, while thinner gauges will make the frame more lightweight.
Make sure to use pliers to bend the wires precisely and accurately. Start by creating the main triangle of the frame, which includes the top tube, down tube, and seat tube. Then, add the chainstays and seatstays to complete the basic frame shape.
Once you have the basic frame shape, you can move on to adding details such as handlebars, wheels, and pedals to turn your wire frame into a functional bicycle.
Add Details
To enhance the functionality of your wire frame, start attaching the handlebars, wheels, and pedals to create a vivid image of a fully functional bicycle. Begin by selecting the appropriate wire for each component.
For the handlebars, choose a thicker wire to provide a sturdy grip. Next, the wheels will require a thinner wire that can easily bend and curve without breaking. Lastly, the pedals will need a wire that is strong enough to withstand the rider’s weight and consistent movement.
Once the wire selection is complete, use shaping techniques to create the desired form of each component. For the handlebars, bend the wire into a curved shape that allows for a comfortable grip. For the wheels, create the circular shape by wrapping the wire around a cylindrical object, such as a bottle or can, and then adjust the diameter accordingly. Finally, for the pedals, use pliers to shape the wire into a flat surface with enough space to place your feet.
With these details added, you’re one step closer to completing your wire bicycle. To finish off your wire bicycle, add the necessary final touches such as a seat, chain, and brakes. By doing so, you’ll create a more realistic and functional bicycle that’s ready for use.
Finishing Touches
Now that I’ve added all the essential components to my wire bicycle, it’s time to give it a professional touch. One of the first steps is to polish the wire frame to a glossy finish. To achieve this, I’ll need to use a fine-grit sandpaper to smooth out any rough edges and imperfections. I’ll also use a wire brush to clean any dirt and dust that might be present on the wire frame. Once I’m done, I’ll use a polishing cloth to give the wire frame a shiny finish.
Another way to give my wire bicycle a unique touch is by painting it. I can use spray paint to add color to the wire frame, or I can opt for enamel paint for a more durable finish. I can also use stencils to add a design or pattern to the wire frame. Before painting, I’ll need to ensure that the wire frame is clean and dry. I’ll also need to apply a primer to the wire frame to ensure that the paint adheres properly.
With the polishing techniques and painting options, I can give my wire bicycle a professional touch. Once I’m done, I can move on to the next section, where I’ll learn how to display and use my wire bicycle.
Displaying and Using Your Wire Bicycle
Once the polishing and painting are complete, it’s time to showcase and ride your sleek and stylish wire bike. One way to use your wire bicycle is as home decor. It can be displayed on a shelf or hung on a wall using hooks. The wire bike adds a unique and creative touch to any room, and its minimalist design makes it versatile enough to fit in with any decor style.
Another way to use your wire bicycle is to showcase it in art exhibitions. Wire bicycle sculptures have become increasingly popular in the art world, and many artists have created elaborate and intricate designs. These sculptures can be displayed in galleries or outdoor installations, and they serve as a conversation piece and a visual representation of the artist’s creativity and skill. By creating your own wire bicycle, you can also participate in this trend and contribute to the growing appreciation for wire art.
| Pros | Cons |
|---|---|
| Adds unique touch to home decor | Not suitable for heavy-duty use |
| Versatile design | Requires delicate handling |
| Can be displayed in art exhibitions | May not be suitable for all art styles |
| Easy to transport and store | Requires occasional cleaning |
Overall, wire bicycles offer a fun and creative way to express your artistic side and add personality to your living space. Whether you choose to use it as home decor or showcase it in an art exhibition, your wire bicycle is sure to be a conversation starter and a source of inspiration for those who appreciate the beauty of wire art.
Frequently Asked Questions
How long does it take to make a wire bicycle?
I once made a wire bicycle in what felt like an eternity. Improving your wire bending skills can accelerate the process. Get creative with decorating your wire bike, it adds a unique touch.
Can the wire bicycle hold the weight of an adult?
Durability concerns and safety precautions must be taken into consideration when assessing if a wire bicycle can hold the weight of an adult. Factors such as wire thickness, structural integrity, and weight distribution must be evaluated.
Is it possible to add brakes to the wire bicycle?
Yes, it is possible to add brakes to a wire bicycle. Brake less riding has its pros and cons, but safety concerns make it necessary to install brakes. Other features like baskets and lights can also be added to wire bicycles.
What type of wire is best for making a wire bicycle?
Selecting the right wire gauge is crucial for durability when constructing a wire bicycle. Thicker gauges provide more strength and stability, while thinner options may not hold up as well. It’s important to consider the functionality and weight of the finished product.
How do you maintain and clean a wire bicycle?
To maintain and clean a wire bicycle, I recommend using a soft cloth to wipe down the frame regularly. Apply a rust inhibitor to prevent rust and use a toothbrush to remove dirt from hard-to-reach areas.
Conclusion
Well, that’s it folks! I hope this guide has been helpful in teaching you how to make your very own wire bicycle.
As I mentioned earlier, this project requires a bit of patience and skill, but the end result is truly worth it. Just like riding a real bicycle, building one out of wire requires a good amount of balance and precision. But once you’ve got the hang of it, you’ll find that the possibilities are endless.
So go ahead, gather your materials and tools, and create a masterpiece that you can proudly display in your home or even gift to a fellow cycling enthusiast. Who knows? You may even inspire someone else to take up this creative and rewarding hobby.
Happy crafting!