Taking off a chain from a bicycle might appear to be a challenging endeavor, yet it’s fundamentally a straightforward procedure that can be accomplished with the appropriate tools and a little bit of expertise.
Whether you’re looking to clean your chain or replace it entirely, understanding how to remove it is a crucial step in the process.
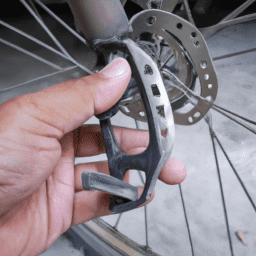
Before getting started, it’s important to gather all of the necessary tools. A chain tool, also known as a chain breaker, is essential for removing the chain links. You’ll also need a wrench to loosen the rear wheel and a rag for cleaning the chain.
Additionally, it’s important to know the length of your chain so that you can reattach it correctly later on.
With these tools in hand, you’ll be ready to remove your chain and get started on your maintenance or replacement project.
Key Takeaways
- Proper tool maintenance and finding the correct chain tool size are crucial for safe and effective chain removal.
- Accurately measuring chain length and checking for wear and tear before removal is important.
- Regular maintenance and lubrication are essential for preventing premature wear and ensuring smooth operation.
- Reinstalling the chain with proper tensioning and lubrication is crucial for a safe and smooth ride.
Gather the Necessary Tools
Before you can start removing the chain, you’ll need to gather a few essential tools like pliers, a chain tool, and a wrench, to make the process smoother and more efficient.
Proper tool maintenance is crucial to ensure that you can use them for a long time and avoid any accidents. Before each use, check that your tools aren’t rusty or damaged. You can clean them with a dry cloth or oil them lightly to prevent rusting.
Another important thing to consider is finding the right chain tool size. A chain tool is a device used to push out the pins that connect the links of the chain. The size of the tool depends on the width of the chain, and using the wrong size can damage the chain or the tool.
To determine the right size, you can measure the chain’s width with a ruler or check the manufacturer’s specifications. Once you have the right tools, you can move on to determining the chain length.
Determine the Chain Length
First, you’ll need to grab a tape measure to figure out the length of your current chain. This step is crucial because it’ll help you determine the correct length of the new chain you need to purchase.
To measure the chain length accurately, follow these tips:
- Shift the chain to the smallest chainring and the smallest cog.
- Pull the chain tight and measure the distance between the centers of the chain pins that are located 12 full links apart.
- Take note of the measurement and round it off to the nearest inch.
Once you have determined the length of your current chain, you can also use this opportunity to check the chain for wear and tear. If the chain is stretched or damaged, it may be time to replace it.
Tips for adjusting chain tension on a bike can also be helpful in ensuring that your chain is in good condition. With the correct chain length and proper tension, you can prevent premature wear on your drivetrain and enjoy a smoother ride.
Now that you have measured your chain length and assessed its condition, it’s time to move on to the next step – using the chain tool to remove the chain.
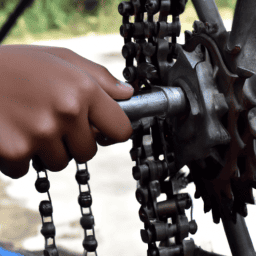
Use the Chain Tool to Remove the Chain
Now, it’s time to get your hands dirty and start using that chain tool to break the links apart. Chain maintenance is crucial to the longevity and smooth operation of your bicycle.
One of the most important steps in maintaining your chain is proper lubrication. However, sometimes the chain needs to be removed for thorough cleaning or replacement.
To use the chain tool, first locate the rivet that holds the chain links together. Place the chain tool on the rivet and tighten the tool until the rivet begins to push out of the link. Continue tightening until the rivet is fully removed and the link separates.
Repeat this process until the desired length of chain is removed. Once the chain is fully removed, it’s important to inspect it for wear and damage. If the chain is worn or damaged, it’s a good idea to replace it. If it’s just dirty, clean it thoroughly before re-lubricating and reinstalling it onto your bicycle.
Clean or Replace the Chain
Once you’ve used the chain tool to separate the links, it’s time to assess whether the chain needs cleaning or replacing. Proper chain maintenance is essential to ensure smooth shifting and to prevent premature wear on your bike.
Here are some tips on how to maintain and lubricate your chain:
- Clean the chain regularly with a degreaser and a brush or rag.
- Use a chain lubricant that’s appropriate for the conditions you ride in (wet or dry).
- Apply the lubricant to the chain while turning the pedals backward to ensure even coverage.
- Wipe off excess lubricant with a rag to prevent attracting dirt and debris.
Replace the chain if it’s worn beyond the manufacturer’s recommended limit.
By following these chain maintenance and lubrication tips, you can increase the lifespan of your chain and improve the overall performance of your bike. With a clean or new chain, you can now move on to the next step of reinstalling it onto your bicycle.
Reinstall the Chain
To successfully reinstall the chain, make sure you line up the chain with the gears and use the chain tool to connect the links you previously separated.
Once the chain is connected, it’s important to ensure proper lubrication before riding. The chain should be lubricated with a bicycle-specific chain oil, and excess oil should be wiped off with a clean rag.
Next, adjust the chain tension using appropriate techniques. The chain should be tight enough that it doesn’t droop excessively, but not so tight that it causes unnecessary strain on the drivetrain. Check the manufacturer’s recommendations for the specific bicycle model to determine the correct tensioning techniques.
Once the chain is properly tensioned and lubricated, the bicycle is ready for a safe and smooth ride.
Frequently Asked Questions
What should I do if the chain is stuck or won’t come off?
If my bike chain is stuck, I first try to wiggle it back and forth gently. If that doesn’t work, I apply some lubricant and gently try again. It’s crucial to maintain your chain to avoid this issue.
Can I remove a chain without a chain tool?
I investigated the theory of removing a bike chain without a chain tool. Alternative methods include using household tools like pliers or a hammer and nail. However, a chain tool is the safest and most efficient option.
How do I know if my chain needs cleaning or replacing?
To determine if my bike chain needs cleaning or replacing, I look for signs of wear, such as stretched links, rust, or excessive noise. Regular maintenance, including cleaning and lubrication, can extend the life of the chain.
Should I replace the chain and cassette at the same time?
Upgrading both the chain and cassette offers benefits like smoother shifting and increased durability. However, replacing only the chain can be a cost-effective option if the cassette is still in good condition.
How often should I remove and clean my chain?
I recommend cleaning my chain after every ride and removing it for a deep clean every few hundred miles. There’s no set frequency, but a dirty chain can cause wear and tear.
Conclusion
In conclusion, removing a chain from a bicycle may seem like a daunting task, but with the right tools and a little bit of knowledge, it can be done quickly and easily. It’s important to first gather the necessary tools, including a chain tool, before determining the chain length and using the tool to remove the chain.
Just like removing a chain from a bicycle, sometimes in life we need to remove things that are holding us back. It may seem difficult at first, but with the right tools and a little bit of knowledge, we can accomplish anything we set our minds to.
So don’t be afraid to take that first step and start removing the chains holding you back from reaching your goals. With determination and perseverance, anything is possible.