Picture yourself on an extended cycling journey when unexpectedly, a peculiar squeaking sound emerges from your bicycle. You increase your pedaling effort, wishing for the noise to dissipate, but it merely intensifies.
You stop to inspect your bike and realize the source of the noise is coming from your crank. It’s time to remove it and give it some much-needed maintenance.
Removing a bike crank may seem like a daunting task, but with the right tools and a bit of know-how, you can do it yourself. In this article, we’ll guide you through the process step-by-step, so you can get back on the road with a smooth and silent ride.
From gathering the necessary tools to inspecting and maintaining the components, we’ll cover everything you need to know to remove your bike crank like a pro. So, let’s get started!
Key Takeaways
- Proper preparation and tools are necessary to safely remove a bike crank, including a wrench, crank puller, and rubber mallet.
- Apply heat or lubrication to stubborn cranks, and avoid excessive force to prevent damaging components.
- Inspect and maintain parts for wear and tear, lubricate bolts and spindle before reassembly, and check chain tension and alignment.
- Use a torque wrench to properly tighten fixing bolt to recommended settings, and pay attention to any strange noises or issues after reassembling the bike.
Gather the Necessary Tools
You’ll need a few tools to get started on removing your bicycle crank. This is a common task in bicycle maintenance, and with a little DIY repair, you can have your bike running smoothly in no time.
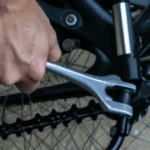
First, make sure you have a wrench that fits the crank bolts on your specific bike. A socket wrench with an extension can also work well for this task. Additionally, a rubber mallet can be handy for tapping the crank arm loose if it’s stuck.
Next, gather any other tools you may need, such as a pedal wrench or a crank puller. It’s always better to have everything you need on hand before you begin.
Once you have your tools ready, it’s time to prepare your bike for the next step.
Prepare Your Bike
Like a warrior preparing for battle, give your trusty steed a thorough check to ensure it’s ready for the crank extraction mission ahead.
Start by cleaning your bike to remove any dirt or debris that may interfere with the crank removal process. Use a damp cloth to wipe down the bike frame, chain, and gears. Pay special attention to the bottom bracket area where the crank is located.
Ensure that there are no loose bolts or damaged parts that could make the process difficult or dangerous.
Once your bike is clean, it’s time to take some safety precautions. Wear protective gear such as gloves and safety glasses to avoid any injury.
Secure your bike on a bike stand or workbench to prevent it from moving or falling over during the process.
With your bike prepared and safety measures in place, you’re now ready to remove the crank and move on to the next step.
Remove the Crank
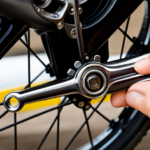
To remove the crank from your bike, you’ll need a crank puller tool. This tool will allow you to extract the crank arm from its spindle without damaging any of the components.
If you encounter a stubborn crank that won’t budge, there are a few tips and tricks you can try to loosen it, such as applying heat or using a larger wrench for more leverage.
Use a Crank Puller
Using a crank puller is the easiest way to remove a bicycle crank, as it fits perfectly onto the crank arm. There are different types of crank pullers available in the market, but the most common one is the 2-arm puller. Here’s a table that shows the components of a 2-arm crank puller:
| Component | Description |
|---|---|
| Center bolt | The bolt that screws into the crank arm |
| Pressure bolt | The bolt that presses against the bottom bracket |
| Pusher | The tool that pushes against the center bolt to extract the crank |
To use a 2-arm crank puller, follow these steps:
- Remove the dust cap from the center of the crank arm.
- Unscrew the center bolt of the crank puller and insert it into the threaded hole of the crank arm.
- Screw the pressure bolt into the bottom bracket and make sure it is snug.
- Place the pusher onto the center bolt and tighten it until the crank comes off the bottom bracket.
Using a crank puller is a simple and straightforward process, but there are some common mistakes to avoid. One of the most common mistakes is using the wrong size puller for the crank arm. Make sure to check the compatibility of the puller before using it. Another mistake is not tightening the pressure bolt enough, which can cause the puller to slip and damage the threads on the bottom bracket. Always make sure the pressure bolt is snug before using the puller. If you encounter a stubborn crank that won’t budge, don’t worry. The next section will provide you with tips for removing stubborn cranks without damaging your bike.
Tips for Removing Stubborn Cranks
If you’re struggling to get a stubborn crank off your bike, have you tried applying heat to the crank arm or using a rubber mallet to gently tap it loose?
Heating the crank arm with a heat gun or a hair dryer can help to expand the metal and break any corrosion or rust that may be holding it in place. Just be sure to heat it evenly and avoid focusing too much heat in one area to prevent damage to the surrounding components.
Another helpful tip is to use lubrication techniques to loosen the crank arm. Applying a penetrating oil or grease to the interface between the crank and the spindle can help to break down any rust or corrosion and make it easier to remove. However, it’s important to avoid using too much lubrication, as it can attract dirt and debris and make the problem worse.
Additionally, common mistakes like using excessive force or hitting the crank arm with a metal hammer can damage the crank and spindle threads, making it even harder to remove.
After successfully removing the crank arm, it’s important to inspect and maintain the components to prevent future issues.
Inspect and Maintain the Components
When inspecting and maintaining your bike components, it’s important to keep an eye out for any signs of wear and tear. This includes checking the condition of your bicycle crank and the chainrings for any damage or looseness.
The importance of lubrication cannot be overstated, so make sure to apply a generous amount of grease or oil to the crank bolts and the spindle before reassembling. In addition to lubrication, it’s essential to make sure the components are properly tightened and adjusted.
Check the chain tension and the alignment of the chainrings, as well as the tightness of the crank bolts. Any loose or damaged components should be replaced or repaired before attempting to reassemble your bike.
By taking the time to properly inspect and maintain your bike’s components, you can prevent future issues and ensure a smooth ride. Now, let’s move on to the next step of reassembling your bike.
Reassemble Your Bike
Now that you’ve removed the old crankset, it’s time to install the new one.
First, make sure the bottom bracket and crank arms are clean and free of debris. Then, carefully slide the new crankset onto the bottom bracket spindle and tighten the bolts to the recommended torque.
Next, reattach the chain and adjust the front derailleur if necessary.
Finally, take your bike for a test ride and check the bike’s performance to ensure everything is running smoothly.
Install the New Crankset
Next, it’s time to install the new crankset onto the bottom bracket spindle. Before you begin, make sure you’ve chosen the right crankset for your bike and that you’ve properly lubricated the spindle.
Here are the steps to follow:
-
Slide the right-side crank arm onto the spindle, making sure the teeth on the arm line up with the teeth on the spindle.
-
Thread the fixing bolt into the spindle and tighten it with a torque wrench to the manufacturer’s recommended torque setting.
-
Repeat the process for the left-side crank arm.
Once you’ve installed the new crankset, the next step is to reattach the chain. Make sure the chain is properly aligned with the new chainrings before proceeding.
Reattach the Chain
To successfully reattach the chain, you’ll want to take your time and ensure that it’s properly aligned with the new chainrings so that you can confidently ride your bike again. Before reattaching the chain, make sure it’s clean and lubricated. This will help prevent premature wear and prolong the life of your chain.
Once the chain is clean and lubricated, you can begin reattaching it. First, adjust the length of the chain if necessary. A new crankset may require a different chain length than your old one. To adjust the length, use a chain tool to remove links until the chain is the correct length.
Once the chain is the correct length, thread it through the derailleur and onto the new chainrings. Make sure the chain is properly aligned and tensioned before closing the chain link. With the chain securely attached, you can move on to checking the bike’s performance after the crankset replacement.
Check the Bike’s Performance
Once you’ve got the chain securely attached, it’s time to see how your bike is running with its new engine, so buckle up and take it for a spin!
As you ride, pay attention to any common issues that may arise, such as strange noises, loose bolts, or slipping gears. These issues could be a sign that something is wrong with your crank or other parts of your bike, so it’s important to address them as soon as possible.
If you do encounter any problems, don’t worry! Troubleshooting is a natural part of bike maintenance, and there are plenty of resources available to help you diagnose and fix any issues you may encounter.
Whether you turn to online forums, bike shops, or experienced riders in your community, there is always someone willing to lend a hand and help you get your bike back on track.
Remember, regular maintenance is key to keeping your bike in top shape and reaping the many benefits it has to offer, including improved performance, increased longevity, and a smoother overall ride.
Frequently Asked Questions
How can I determine if my crank needs to be removed?
To determine crank maintenance, check for excessive play or noise in the bottom bracket area. Proper bike fit is important to avoid stress on the crank. Consult a professional if unsure how to proceed.
Will removing the crank affect the alignment of other components on my bike?
Don’t worry, removing the bike crank won’t affect component alignment as long as you take precautions. Consider alternative crank removal methods and make sure to realign components post-removal to ensure optimal bike performance.
Can I remove the crank without a crank puller tool?
Removing the crank without a puller tool is possible, but not recommended. Alternative methods include using a hammer or a homemade tool, but they pose risks of damaging the crank or spindle. Benefits of using a puller tool include precision and safety.
How often should I inspect and maintain my bike’s components, including the crank?
Your bike’s components, including the crank, should be inspected and maintained regularly to ensure optimal performance. As a rule of thumb, check for wear and tear every 100 miles or every six months. An ounce of prevention is worth a pound of cure.
Are there any potential safety concerns or risks associated with removing a bike crank?
When removing a bike crank, there are potential safety concerns if not done properly. Make sure to follow proper crank removal technique to avoid damaging the bike or injuring yourself.
Conclusion
Congratulations! You’ve successfully removed your bicycle crank.
Now that you’ve learned this valuable skill, you can easily maintain and repair your bike’s components, saving you time and money in the long run.
But before you hit the road again, make sure to inspect and maintain the components you removed.
Did you know that according to a recent survey, more than 50% of cyclists never remove their bike’s crank? This means that they miss out on the opportunity to inspect and maintain their bike’s components, leading to potential problems down the road.
By learning how to remove your bike’s crank, you can be part of the minority who take proper care of their bike.
Remember, proper maintenance is key to keeping your bike running smoothly and safely. So next time you’re in need of a tune-up, don’t hesitate to remove your crank and give your bike the attention it deserves.
Happy cycling!


