Swapping out a bike spoke might appear to be a challenging endeavor, but it becomes straightforward and swift with the appropriate equipment and a little perseverance. In this article, I’ll walk you through the steps of changing a bike spoke, starting with locating the broken or damaged spoke, moving on to fitting the new spoke, and finally, checking the wheel’s performance.
First, we will gather the required tools and materials, including a spoke wrench, replacement spoke, lubricant, and a wheel truing stand (if available).
Then, we will identify the broken or damaged spoke and remove it from the wheel.
Finally, we will install the replacement spoke and test the wheel to make sure it is true and balanced.
So, let’s get started and learn how to replace a bicycle spoke like a pro!
Key Takeaways
- Identifying and fixing a broken or damaged spoke involves removing the damaged spoke with a spoke wrench and replacing it with a new spoke, adjusting spoke tension with a proper spoke tensioning tool, and checking spoke tension with a spoke tension meter for safety.
- Causes of spoke damage include hitting potholes or curbs, over-tensioning spokes, and riding with loose spokes, and regular maintenance such as tightening spokes and checking for signs of wear or damage can prevent unnecessary damage.
- Maintaining proper tire pressure and regularly inspecting the wheel for signs of damage or wear can also help prevent spoke damage.
- Regular bike maintenance, including fixing broken or damaged spokes, is important for optimal wheel alignment, a smoother ride, and ensuring safety while riding.
Gather the Required Tools and Materials
You’ll need to gather some tools and materials before you can replace a bicycle spoke.
First, you’ll need to choose the right spoke gauge. The spoke gauge is the thickness of the spoke, and it will vary depending on the type of bike you have. You can usually find the correct gauge by checking your bike’s manual or by visiting a bike shop.
Next, you’ll need to make sure you have the proper spoke tensioning tool. This tool is used to adjust the tension of the spoke so that it is tight enough to keep the wheel in place, but not so tight that it puts too much strain on the wheel.
Once you have these tools and materials, you can move on to identifying the broken or damaged spoke and replacing it.
Identify the Broken or Damaged Spoke
Feeling a wobble in your wheel? One of those slender metal rods may have taken a hit. Identifying the broken or damaged spoke is the first step towards fixing it. Here are some tips to help you:
-
Inspect the spokes: Look closely at each spoke and identify if any of them are broken or damaged. Check for any bends, twists, or cracks that may have occurred due to an impact with an obstacle or a pothole.
-
Listen for sounds: While you ride, listen for any strange noises that your bike might make. A broken or damaged spoke can cause a clicking or rubbing sound when the wheel rotates.
-
Check the wheel: Spin the wheel slowly and watch it closely. A broken or damaged spoke can cause the wheel to wobble or rub against the brake pads.
-
Common causes: Spokes can break or get damaged due to various reasons like overloading, improper installation, or wear and tear over time.
To prevent spoke damage in the future, make sure you maintain your bike regularly. Keep the wheels true, check the tire pressure, and tighten the spokes periodically. With these measures, you can avoid unnecessary damage to your bike and ensure a smooth ride.
Now let’s move on to the next step of removing the broken or damaged spoke.
Remove the Broken or Damaged Spoke
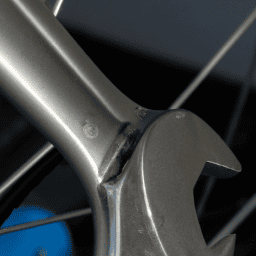
To remove a broken or damaged spoke, the first step is to loosen the nipple using a spoke wrench. This will allow you to free the spoke from the rim.
Once the nipple is loose, you can remove the spoke from the hub and pull it out of the wheel.
Loosen the Nipple
First, loosen the nipple on the spoke that needs to be replaced by turning it counterclockwise with a spoke wrench. It’s important to use the correct size spoke wrench to avoid damaging the nipple.
Techniques for nipple loosening may vary depending on the type of nipple used on your bicycle wheel. Some nipples require a bit of force to loosen, while others can be easily turned by hand. If the nipple is stuck, applying a small amount of lubricant to the threads may help to loosen it.
Common causes of spoke damage include hitting a pothole or curb, over-tensioning the spokes, or riding with loose spokes. It’s important to inspect your spokes regularly for signs of damage or wear, and to replace any damaged spokes as soon as possible to prevent further damage to your wheel.
Once the nipple is loosened, the broken or damaged spoke can be removed by simply pulling it through the rim and hub.
Remove the Broken or Damaged Spoke
Using my spoke wrench, I carefully unscrewed the nipple from the rim until the broken spoke could be removed with ease. It was like a puzzle piece sliding out of its place.
Spoke maintenance is an important aspect of bicycle maintenance and should be conducted regularly to ensure optimal wheel alignment. When removing the broken or damaged spoke, it’s important to inspect the surrounding spokes for possible damage or looseness. If any issues are detected, the surrounding spokes should be tightened or replaced if necessary.
Once the broken spoke has been removed, the next step is to install the replacement spoke. This process can be a bit tricky, but with proper attention to detail and precision, it can be completed with ease.
Install the Replacement Spoke
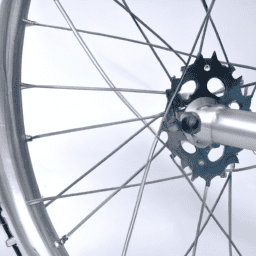
Now that you’ve got the replacement spoke, it’s time to get that bike wheel back in top shape and hit the road with confidence! Start by inserting the new spoke into the hub, making sure it lines up with the appropriate hole.
Thread the spoke through the rim and attach the nipple, tightening it with a spoke wrench. Be sure to use the correct spoke length calculation to ensure the spoke is the proper length.
Next, adjust the tension of the spoke by turning the nipple with the spoke wrench. Check the tension by plucking the spoke like a guitar string. It should make a clear, consistent sound. Repeat this process for all the other spokes that were loosened during the repair.
With the new spoke in place, your wheel should be back to its former glory. Now that the replacement spoke has been installed and tension adjustment has been made, it’s time to test the wheel and make final adjustments.
Give the wheel a spin to ensure it runs smoothly and does not wobble. If there are any issues, make small adjustments by tightening or loosening the appropriate spokes. Once you’re satisfied with the wheel’s performance, you can confidently hit the road knowing your bike is in top shape.
Test the Wheel and Make Final Adjustments
After ensuring all the spokes are properly tightened, give the wheel a spin and marvel at how effortlessly it glides along the ground. However, before you can ride off into the sunset, it is important to check the tension of the newly installed spoke and align the wheel to ensure it is safe to use.
To check the tension, use a spoke tension meter to measure the tension of each spoke. The tension of the new spoke should be close to the tension of the surrounding spokes. If the tension is too low, the wheel may become unstable and wobble while riding. On the other hand, if the tension is too high, the wheel may not be able to absorb impacts from bumps and potholes, leading to a higher risk of damage or injury. Once the tension has been checked and adjusted if necessary, it is time to align the wheel.
To align the wheel, place the bike on a level surface and check the gap between the tire and the frame or brake pads on both sides. If the gap is not equal, adjust the spoke tension accordingly until the wheel is centered. A centered wheel will not only provide a smoother ride but also reduce the wear and tear on the bike and its components. With the spoke tension and wheel alignment checked and adjusted, it is now safe to take your bike out for a spin and enjoy the ride.
Frequently Asked Questions
How do I know if a spoke needs to be replaced?
I can tell if a spoke needs replacing by looking for signs of damage such as a bent or broken spoke, or a wheel that is out of true. If unsure, seeking professional help is recommended.
Can I replace just one spoke or do I need to replace multiple spokes?
Replacing just one spoke can be a cost-effective solution, but it’s important to maintain wheel tension. If several spokes are broken, it’s better to replace them all to ensure proper tension.
Is it necessary to true the wheel after replacing a spoke?
It is highly recommended to true the wheel after replacing a spoke. Pros: improves bike handling, extends lifespan of wheel. Cons: time-consuming, requires specialized tools. Tips and tricks: seek professional help if unsure.
How tight should the replacement spoke be tightened?
The optimal tension for a replacement spoke should be the same as the adjacent spokes. Over tightening precautions should be taken to avoid damaging the rim. A spoke tension meter is recommended for precise measurements.
Can I use any type of spoke for replacement or does it need to be specific to my wheel?
When replacing a spoke, it’s important to consider spoke compatibility and replacement options. Not all spokes are created equal, so it’s best to use the same type and gauge as the original. A mismatched spoke could compromise the wheel’s integrity.
Conclusion
Replacing a bicycle spoke may seem daunting, but with the right tools and materials, it can be done quickly and easily. The first step is to gather all the necessary tools and materials, including a spoke wrench, replacement spoke, and lubricant.
Once you have all the required items, identify the broken or damaged spoke by spinning the wheel and inspecting each spoke individually. Next, remove the broken or damaged spoke by loosening the nipple with your spoke wrench. Be sure to keep track of the spoke’s orientation as you remove it.
Once the spoke is out, insert the replacement spoke into the hub and thread it through the correct hole in the rim. Then, tighten the nipple until the spoke is snug against the rim. Finally, test the wheel by spinning it and check for any wobbling or rubbing.
If everything looks good, make final adjustments to the spoke tension and lubricate the nipple with oil or grease. It’s important to check your spokes regularly to prevent any future issues.
Did you know that a broken spoke can cause your wheel to become unbalanced, leading to a rough and bumpy ride? In fact, a study found that broken spokes were one of the most common causes of wheel failure in cyclists. By regularly inspecting and replacing any broken spokes, you can avoid this issue and ensure a smoother ride.
So don’t let a broken spoke ruin your next bike ride. Take the time to replace it and keep your wheels spinning smoothly.