Changing out the hand grips on your bike might appear challenging at first, but in reality, it’s a simple operation that can be executed smoothly with the appropriate equipment and methods. In this guide, I’ll walk you through how to successfully swap your bicycle hand grips, making sure you end up with a snug and safe hold on your handlebars.
First and foremost, it is important to choose the right hand grips for your bicycle. There are a variety of materials, sizes, and designs available, so it is important to determine your preferences and needs.
Once you have selected your new hand grips, you can move on to removing the old ones. With the right approach and tools, you can quickly and easily remove the old hand grips and prepare your handlebars for the new installation.
Key Takeaways
- Choose the right grips based on your preferences and needs, considering materials like rubber, foam, leather, cork, and silicone, as well as ergonomic designs for support and comfort.
- Measure your handlebar diameter before purchasing new grips, and follow the manufacturer’s instructions for installation, including using grip glue for added security.
- When removing old hand grips, try twisting and pulling them off, or use rubbing alcohol or soapy water to make the process easier. Clean the handlebar before installing new grips.
- Test ride your bike to ensure comfort and safety, paying attention to proper hand placement, grip technique, and hand position. Make adjustments as needed to improve comfort and reduce slippage.
![LISEN Bike Phone Holder, [Super Easy Install] Motorcycle Phone Mount Ebike Accessories Bicycle Handlebar Holder Mount Gifts for Adults Kids Men Mountain Mini Bike Scooter Gear Accessories for iPhone](https://m.media-amazon.com/images/I/41f8iCmkMsL._SL500_.jpg)
LISEN Bike Phone Holder, [Super Easy Install] Motorcycle Phone Mount Ebike Accessories Bicycle Handlebar Holder Mount Gifts for Adults Kids Men Mountain Mini Bike Scooter Gear Accessories for iPhone
[Ultra-Secure Hold] – LISEN bike phone holder mount keeps your phone firmly in place even on bumpy or...
As an affiliate, we earn on qualifying purchases.
Choose the Right Hand Grips
Now it’s time to pick out the perfect pair of grips that feel like a warm hug for your hands while riding. When choosing hand grips, consider the material options available.
Most grips are made of rubber or foam, but there are also grips made of leather, cork, and silicone. Rubber and foam are popular materials because they’re soft, durable, and provide good grip. Leather grips offer a classic look and feel, but they may not be as durable as rubber or foam. Cork grips are also a popular choice because they’re lightweight and provide good shock absorption. Silicone grips are relatively new on the market and are known for being soft and comfortable, but they can be more expensive than other materials.
In addition to material options, you should also look for grips with an ergonomic design. Ergonomic grips are designed to provide support and comfort to your hands, wrists, and forearms. They’re typically thicker in the middle and taper towards the ends. This design helps to distribute pressure evenly across your hands and reduce fatigue.
Some ergonomic grips also have contoured shapes or raised areas for your fingers to grip, which can help improve your control and reduce slippage. So, make sure to choose grips that are both comfortable and functional for your style of riding.
Now, let’s move on to removing the old hand grips.

Lamicall Bike Phone Holder, Motorcycle Mount - Motorcycle Phone Holder, Handlebar Cell Phone Clamp, E-Bike Scooter Phone Clip for iPhone 17 Air Pro Max, 16 15 Plus, S20, 4.7 to 6.8" Smartphones
Sturdy and Safe: A special shape of this motorcycle & bike phone holder grips each corner of your...
As an affiliate, we earn on qualifying purchases.
Remove the Old Hand Grips
First, you’ll want to loosen the grip by twisting and pulling it away from the handlebar. This can be done by spraying some rubbing alcohol or soapy water into the space between the grip and handlebar. Once the solution’s been applied, twist and pull the grip until it loosens up. If it’s still difficult to remove, try using a flathead screwdriver to pry it off. Be careful not to damage the handlebar or grip while doing so.
After removing the old grips, it’s important to clean the handlebar before installing the new ones. Use a clean rag or paper towel to wipe any dirt or residue off the handlebar.
Additionally, if you’re using grip glue, apply a small amount to the inside of the new grip before sliding it onto the handlebar. This’ll help keep the grip in place and prevent it from slipping during use.
With the handlebar cleaned and prepped, you’re now ready to prepare for the installation of the new grips.

Ascher Ultra Bright USB Rechargeable Bike Light Set, Powerful Bicycle Front Headlight and Back Taillight, 4 Light Modes, Easy to Install for Men Women Road Mountain Cycling Black
Bright Bike Lights for Night Riding: This bike light set includes both a bright headlight and taillight. Powerful...
As an affiliate, we earn on qualifying purchases.
Prepare for Installation
To get started, grab a clean cloth and wipe down the handlebars until they’re clean and free of any debris or residue. This will ensure that the new hand grips have a clean surface to adhere to.
When preparing for installation, it’s important to keep proper hand placement in mind. Make sure to align the new hand grips with the brake levers and shifters and ensure that they are evenly spaced apart. This will help prevent any discomfort or pain in your hands during rides.
Once you’ve cleaned the handlebars and have proper hand placement, you’re ready to move on to the next step of installing the new hand grips.
Without further ado, let’s move on to the next section where we will install the new hand grips.

Rehook Original - Black Get Your Chain Back on Your Bike in 3 Seconds. Without The Mess Present for Any Cyclist or Gadget Lover
AS SEEN ON DRAGONS' DEN (Shark Tank UK) – Featured on BBC Dragons' Den where Rehook received investment...
As an affiliate, we earn on qualifying purchases.
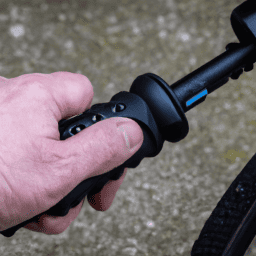
Install the New Hand Grips
Once you have your clean handlebars and proper alignment, it’s time to get a grip and put the pedal to the metal by installing those bad boys. You’ll be riding like a pro in no time! First, determine the appropriate grip sizing for your handlebars. Grips come in various sizes, so make sure to measure the diameter of your handlebars before purchasing new grips. This will ensure a snug fit and prevent any slipping or sliding while riding.
Next, consider the grip material. Grips can be made of rubber, foam, or other materials. Rubber grips are durable and provide a good grip, even when wet. Foam grips are lightweight and provide a comfortable ride, but may wear down more quickly than rubber grips. Once you’ve selected your grips, it’s time to install them according to the manufacturer’s instructions.
With your new grips securely in place, it’s time to test and adjust your bike to ensure a comfortable and safe ride.
Test and Adjust
Context:
Test and adjust
Input:
After successfully installing your new grips, take your bike for a test ride to ensure that it feels comfortable and safe. Here are some steps to follow during your test ride:
-
Check your grip technique: Make sure your hands are properly positioned on the grips and that your fingers are wrapped around the brake levers. This will help you maintain control of your bike and avoid accidents.
-
Pay attention to comfort: Notice if the new grips feel comfortable in your hands. If they’re too thick or thin, it may cause discomfort during longer rides. Consider changing the grips if they don’t feel right.
-
Test the grip: During your ride, try to grip the handlebars tightly and then release your grip. If the grip is too slippery, it may be difficult to control the bike. Consider replacing the grips with a more textured option.
-
Adjust as needed: If you notice any discomfort or issues during your test ride, make adjustments to the grips or your hand position. It may take a few rides to find the perfect grip thickness and position for you.
By following these steps, you can ensure that your new grips are properly installed and adjusted to your preference. Remember, proper grip technique and comfort are important for a safe and enjoyable ride.
Frequently Asked Questions
What materials are most commonly used for bicycle hand grips?
When it comes to bicycle hand grip materials, I prefer the ergonomic ones over foam. It’s important to choose the right size for comfort and control. Consider your hand size and riding style when making your selection.
How often should I replace my bicycle hand grips?
I replace my bicycle hand grips when I notice signs of wear, such as cracks, tears, or loss of grip. Some of the best grip brands include ODI, Ergon, and Renthal.
Can I install hand grips without any tools?
Sure, installing hand grips without tools is a piece of cake. Just use your teeth to rip the old ones off and shove the new ones on. But seriously, check for the right size and use some soapy water to slip them on easily.
Are there any special techniques for removing stubborn hand grips?
To remove stubborn hand grips, I recommend trying the heat method or lubrication technique. Heat the grip with a hair dryer or heat gun to loosen the adhesive, or use lubricant to slip it off. Be careful not to damage the handlebar.
Can I use hand grips designed for a different type of bike on my bicycle?
Compatibility concerns with using hand grips designed for a different type of bike on my bicycle? It’s like trying to fit a square peg in a round hole. Stick to grip design options specific to your bike to ensure proper fit and performance.
Conclusion
Replacing bicycle hand grips is a simple task that can be done in just a few steps. By following the right process, you can ensure that your new hand grips are installed correctly and securely.
Remember to choose the right hand grips for your bike, remove the old ones carefully, and prepare for installation by cleaning the handlebars and applying adhesive.
Once you have installed the new hand grips, it’s important to test them out and make any necessary adjustments. This may involve adjusting the position of the grips or tightening them to ensure that they’re secure.
By taking the time to replace your bicycle hand grips properly, you can improve your grip and control while riding, making your cycling experience safer and more enjoyable. For example, I recently replaced the hand grips on my mountain bike and noticed a significant improvement in my grip and control on rough terrain.
The new grips were more comfortable and provided better traction, allowing me to ride with more confidence and control. By following the steps outlined in this article, you can upgrade your bike’s hand grips and enjoy a safer, more comfortable ride.