Learning how to change a bicycle tube is a straightforward and crucial ability that every bike rider ought to master. Regardless if you’re just starting out or have plenty of experience under your belt, understanding how to swap out a tube is key to avoiding getting stuck during a ride. Initially, it may appear challenging, but armed with the appropriate equipment and a bit of practice, you’ll find yourself able to change a tube quickly.
Before you start, make sure you have the necessary tools: a new tube, tire levers, a pump, and a wrench if your bike has bolts instead of quick-release skewers.
Once you have your tools ready, it’s time to understand the different types of bike tubes. There are various sizes and valve types, so it’s important to make sure you have the right tube for your bike.
In this article, we will guide you through the process of replacing a bike tube step by step.
Key Takeaways
- Proper technique is crucial when using tire levers to avoid damaging the tube during tire replacement.
- Choosing the right type of tube and pump can help prevent future flat tires.
- Double-check the valve type and orientation before inflating the tube, and wear gloves and eye protection when using a high-pressure pump.
- Gradual inflation of the tube is important to avoid bursting or damaging the rim during tube replacement.

Schwinn Sporterra RX Gravel Bike, 700c Mens and Womens Bike, 14-Speed Drop Bar Gravel Bicycle, Mechanical Disc Brakes, Rigid Fork, Aerodynamic Riding Position, Quick Release Seat Post, Adult Bicycle
GRAVEL BICYCLE: Enjoy next level riding with the Sporterra RX by Schwinn. With 700c wheels, this mens and...
As an affiliate, we earn on qualifying purchases.
Understand the Different Types of Bike Tubes
You’ll wanna know the diff types of bike tubes so you don’t get stuck with a flat and no replacement!
The most common bike tube materials are butyl rubber and latex. Butyl rubber is the cheaper and more durable option. It can withstand punctures and abrasions better than latex tubes. However, it’s heavier and has a lower rolling resistance.
Latex tubes, on the other hand, are lighter and provide a smoother ride due to their flexibility. But they are more prone to punctures and require more frequent inflation.
To prevent flat tires on your bike, you can opt for puncture-resistant tubes or add a layer of tire liner between the tube and tire.
Puncture-resistant tubes have thicker walls and are heavier, but they offer an extra layer of protection. Tire liners, which can be made of various materials such as Kevlar or nylon, sit between the tire and tube and provide a barrier against sharp objects.
Knowing these pros and cons of different bike tube materials and ways to prevent flat tires will help you select the right tube for your needs.
Now, gather necessary tools to get started.
SAVADECK Carbon Gravel Bike - T800 Carbon Frame & Fork, Shimano GRX400 10-Speed Groupset, Hydraulic Disc Brakes, 700C x 40mm Tires - Lightweight Design for Road & Off-Road Adventures (Black, 58cm)
【Ultra-Lightweight T800 Carbon Frame】Built with a T800 R21 carbon fiber frame and fork, this bike weighs just 10.4kg...
As an affiliate, we earn on qualifying purchases.
Gather Necessary Tools
To replace a bike tube, you’ll need a few essential tools: tire levers, a pump, and a new tube.
Tire levers help you remove the tire from the rim, while the pump is used to inflate the new tube once it’s installed.
Make sure to have a new tube that matches the size and type of tire on your bike.
Tire Levers
Using tire levers is an effective way to remove the tire from the rim without damaging the tube. Tire levers are small, plastic or metal tools that help to pry the tire away from the rim. Here are some tips to follow when using tire levers:
- Place the first tire lever under the bead of the tire and pry it away from the rim.
- Move the tire lever around the rim, prying the tire away as you go.
- Use a second tire lever to pry the tire completely off the rim.
Be careful not to damage the tube while using the levers. Keep a set of tire levers with your bicycle at all times for easy access.
Proper technique is key when using tire levers. Common mistakes include using too much force, which can damage the tire or tube, or not positioning the levers correctly, which can cause the tire to slip back onto the rim. Brands and recommendations for tire levers include Park Tool, Pedro’s, and Topeak.
Now that you’ve successfully removed the tire from the rim using tire levers, it’s time to move on to the next step: using a pump to inflate the new tube.
Pump
Just like a musician needs an instrument to play, a cyclist needs a pump to keep their tires properly inflated. Proper pumping techniques are essential to avoid over-inflating or under-inflating your tires, both of which can lead to serious problems while riding. When choosing a pump, consider the type of valve on your tire, the intended use of the pump, and your personal preferences.
To properly inflate your tire, follow these pumping techniques:
| Steps | Proper Pumping Techniques |
|---|---|
| 1 | Remove valve cap and attach pump head to valve |
| 2 | Pump air into tire in short bursts |
| 3 | Check tire pressure with a gauge |
| 4 | Adjust pressure if necessary |
| 5 | Remove pump head and replace valve cap |
Choosing the right pump is also important for efficient inflation. There are two main types of pumps: floor pumps and hand pumps. Floor pumps are larger and have a stable base, making them ideal for home use. Hand pumps are smaller and more portable, making them great for on-the-go inflation. Consider the type of valve on your tire when choosing a pump, as some pumps are only compatible with certain valve types.
Now that you know how to properly inflate your tire and choose the right pump, it’s time to move on to replacing the tube.
New Tube
When your tire goes flat, the first step in replacing the bicycle tube is to get a new one. There are several pros and cons to consider when selecting a tube.
One of the main pros of choosing a high-quality tube is that it’s less likely to puncture or leak, but these tubes can be more expensive. Cheaper tubes may be more prone to flats, but they can be a good option if you’re on a tight budget.
When it comes to choosing the best brand, there are several options to consider. Some of the most popular brands include Continental, Schwalbe, and Vittoria. These brands offer a range of tubes to fit different tire sizes and types. Keep in mind that it’s important to select a tube that matches the size of your tire.
Once you’ve chosen the right tube, it’s time to remove the wheel.

SAVADECK Carbon Gravel Bike - T800 Carbon Frame & Fork | Shimano U6000 11-Speed Groupset | Hydraulic Disc Brakes | 700CX40mm All-Terrain Tires | Men & Women Road/Off-Road Bicycle (Gray, 53cm)
【Ultralight T800 Carbon Performance】: Featuring a premium T800 R21 carbon fiber frame and fork weighing just 10.4kg (22.92...
As an affiliate, we earn on qualifying purchases.
Remove the Wheel
To remove the wheel, you need to loosen the axle nuts using a wrench.
Make sure you release the brakes by either opening the quick-release lever or removing the brake pads from the rim.
Once the brakes are released, carefully remove the tire from the wheel by using tire levers and pulling the bead over the rim.
Loosen the Axle Nuts
First, loosen the axle nuts by using a wrench to turn them counterclockwise. Don’t forget to hold onto the opposite side of the axle with another wrench to prevent it from spinning.
Proper axle tightening is crucial to the longevity of your bike. During tube replacement, it’s important to remember that the axle nuts should be tightened evenly to avoid damaging the wheel or axle. Common mistakes during tube replacement include overtightening or uneven tightening of the axle nuts.
To ensure proper loosening, follow these steps:
- Use a wrench to turn the nut counterclockwise.
- Hold onto the opposite side of the axle with another wrench to prevent it from spinning.
- Loosen the nuts evenly to avoid damaging the wheel or axle.
- Once the nuts are loosened, slide the wheel out of the dropouts.
After loosening the axle nuts, the next step is to release the brakes.
Release the Brakes
Now it’s time to let go of those brakes and get the wheel rolling! Before you can remove the tire and replace the tube, you’ll need to release the brakes.
Start by adjusting the tension on the brake cable so that it’s loose enough to allow you to remove the wheel. You can do this by using the barrel adjuster located on the brake lever or by loosening the bolt that attaches the brake cable to the brake caliper.
Once the brake cable is loose, you can reattach the brake system once the new tube is in place. Make sure to reattach the brake cable to the caliper and adjust the tension so that the brakes are working properly before you take off on your next ride.
Now that the brakes are released, it’s time to move on to the next step and remove the tire.
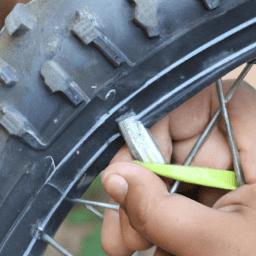
Remove the Tire
With the brakes released, it’s time to get your hands dirty and pop that tire off like a pro, using the tire levers to pry the tire away from the rim.
First, position the lever between the tire and the rim, then use it to lift the tire bead over the rim. Move the lever a few inches along the rim and repeat the process until the entire tire bead is free from the rim.
Make sure to keep the tire lever perpendicular to the rim to prevent damaging the inner tube. Now that the tire is off, it’s important to properly store it during the tube replacement process.
Place the tire on a clean and flat surface, away from any sharp objects or debris that could cause damage. Additionally, take this opportunity to inspect the tire for any debris or damage that could cause future flat tires.
Before moving on to removing the old tube and installing the new one, remember these tips for preventing future flat tires during the replacement process.

StoreYourBoard SwivelStow Bike Rack Garage Storage Rack 2 Pack - 2 Road & Gravel Bike Wall Mounts - Heavy Duty Bike Hanger - No-Lift Bike Rack Garage Storage Rack - Holds 70 lb Capacity
SPACE-SAVING BIKE STORAGE - Maximize garage organization with this wall mount bike rack designed for easy storage and...
As an affiliate, we earn on qualifying purchases.
Remove the Old Tube and Install the New One
Don’t be intimidated, replacing a bicycle tube is easier than you think! Start by releasing the air from the old tube and removing the wheel from the bike. Once you have the wheel off, it’s time to remove the old tube and install the new one. Here’s a step-by-step guide:
| Step | Action | Tips |
|---|---|---|
| 1 | Remove the cap from the valve on the old tube | Use pliers if necessary |
| 2 | Deflate the tube completely | Press the valve to release all air |
| 3 | Carefully remove one side of the tire from the rim | Use tire levers if needed |
| 4 | Remove the old tube from inside the tire | Be careful not to damage the tire |
| 5 | Check the tire for any cuts, sharp objects or debris that may have caused the puncture | This will help prevent future flats |
| 6 | Insert the new tube into the tire | Make sure it’s properly aligned |
| 7 | Inflate the tube slightly to give it shape | Be careful not to over-inflate |
| 8 | Carefully place the tire back onto the rim and check alignment | Make sure the tire is evenly placed on the rim |
| 9 | Inflate the tube to the proper pressure | Check the recommended pressure on the tire sidewall |
| 10 | Reattach the wheel to the bike | Make sure it’s properly aligned and securely fastened |
Now that you have installed the new tube, it’s time to inflate it to the proper pressure and reattach the wheel to the bike.
Inflate the Tube and Reattach the Wheel
Get ready to feel the breeze in your hair as you pump up your new tube and reattach the wheel for a smooth and comfortable ride.
Before inflating the tube, make sure it’s properly seated inside the tire and the tire is correctly mounted on the rim. Use a hand pump or a floor pump to inflate the tube gradually, checking the pressure regularly with a gauge. Overinflating the tube can cause it to burst, while underinflating it can lead to pinch flats or rim damage.
Common mistakes people make when inflating a new tube include using too much force to apply the pump head, not checking the valve type and orientation, and not tightening the valve cap properly.
Always double-check the valve type and make sure it matches your pump head. If using a Presta valve, unscrew the valve cap and use the pump head to push down the valve tip before inflating. After inflating, replace the valve cap and check the pressure again.
As a safety precaution, wear gloves and eye protection when inflating the tube, especially if using a high-pressure pump.
Frequently Asked Questions
How often should I replace my bicycle tubes?
How often should you replace your bicycle tubes? The frequency of tube replacement depends on the quality of the tube and how often you ride. Signs of wear and tear include punctures, bulges, and cracks.
What causes a bicycle tube to get punctured?
To prevent punctures, avoid sharp debris, maintain proper tire pressure, and check for tire wear. Common puncture locations include near the valve stem, on the tread, and on the sidewall.
Can I reuse an old tube after patching it up?
Did you know that reusing a patched tube increases the risk of another puncture by 50%? While it’s possible to reuse tubes, it’s not recommended due to potential safety hazards. Pros include cost savings, but cons include decreased reliability and safety.
What should I do if my valve stem breaks during the replacement process?
If your valve stem breaks during replacement, don’t worry. Valve stem alternatives include using a valve stem remover to install a new one or using a presta to schrader adapter. To avoid damage, don’t force the stem and use a gentle touch.
How can I prevent future punctures while riding my bike?
Did you know that 90% of punctures are caused by tiny pieces of debris on the road? To prevent future punctures, regularly clean and lubricate your bike’s chains and use essential gear like bike lights and helmets.
Conclusion
Congratulations! You’ve successfully replaced your bicycle tube. You’re now ready to hit the road once again. Remember to always carry a spare tube and the necessary tools with you for any future mishaps.
Replacing a bike tube may seem daunting, but with the right tools and knowledge, it’s a breeze. It’s a necessary skill to have as a cyclist, just like changing a tire on a car. Think of it like a surgeon replacing a vital organ – precise, technical, and meticulous.
Just like a surgeon, you’ve carefully removed the damaged tube and replaced it with a new one, ensuring your bike is functioning properly once again. So go ahead and ride with confidence, knowing that you have the skills to handle any future flat tires that come your way. It’s like having a superhero power that only cyclists possess!