Mastering gear shifting stands as a crucial skill for every cyclist. It boosts your ride’s efficiency, makes hill climbing a breeze, and keeps your knees from unnecessary stress. But if you’re just starting out on two wheels, figuring out how to switch gears might seem like a daunting task.
In this article, I will guide you through the basics of shifting gears on your bike. I’ll explain how your bike’s drivetrain works, when to shift gears, and how to do it properly. I’ll also cover some common gear-shifting problems you may encounter and how to troubleshoot them.
By the end of this article, you’ll have the knowledge and confidence to shift gears like a pro.
Key Takeaways
- Proper gear shifting can improve efficiency, help climb hills, and prevent knee strain.
- The right gear to use depends on the terrain and cadence.
- Maintaining a consistent cadence is important for efficiency and reducing leg fatigue.
- Regular cleaning and lubrication help prevent damage and costly repairs.

Under Armour Squeeze Water Bottles, 32 oz Water Bottles, Sideline Sports Water Bottle with Quick-Shot Lid, Quick & Easy Hydration, Gym Water Bottles, Squeeze Bottle, 1 32oz Bottle
- Easy Hydration: Quick-shot lid and one-way valve
- On-the-Go Use: One-hand operation for active hydration
- Measurement Markings: Ounces and milliliters for tracking
As an affiliate, we earn on qualifying purchases.
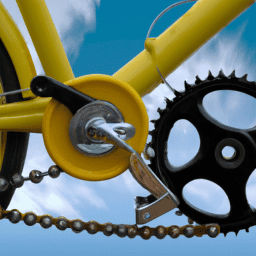
Understanding Your Bike’s Drivetrain
You gotta understand how your bike’s drivetrain works if you want to smoothly shift gears like a pro.
The drivetrain is comprised of the chain, gears, shifters, and derailleurs. These components work together to change the gear ratio, which is the relationship between the number of teeth on the front and rear gears. The gear ratio affects the amount of force needed to pedal and the speed at which you can travel.
When shifting gears, the chain tension changes as it moves from one gear to another. The chain needs to be tight enough to stay on the gears but not so tight that it causes unnecessary wear and tear.
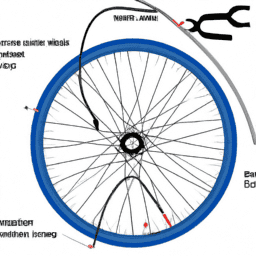
The derailleur is responsible for moving the chain from one gear to another by pulling it over the gears. It’s important to keep the chain clean and lubricated to prevent it from getting stuck or slipping off the gears.
Understanding how your bike’s drivetrain works is essential for knowing when to shift gears, which we’ll cover in the next section.
When to Shift
Knowing the right moment to change your pedaling pace can make all the difference in your ride. It not only helps prevent premature gear wear but also ensures a smooth and efficient ride. So, how do you know when it’s time to shift gears?
One way to determine when to shift gears is by paying attention to the cadence or the speed at which you pedal. Maintaining a consistent cadence helps you ride more efficiently, reducing the risk of leg fatigue and injury. Ideally, your cadence should be between 60 to 90 revolutions per minute (rpm). To achieve this, you may need to shift gears depending on the terrain and resistance. Here’s a table to help you determine the right gear to use based on the terrain and cadence:
| Terrain | Cadence | Gear |
|---|---|---|
| Uphill | <60 rpm | Low |
| 60-80 rpm | Middle-Low | |
| >80 rpm | Middle-High | |
| Flat | <60 rpm | Low |
| 60-80 rpm | Middle-Low | |
| >80 rpm | Middle-High | |
| Downhill | <60 rpm | Middle-Low |
| 60-80 rpm | Middle-High | |
| >80 rpm | High |
Incorporating proper cadence and shifting gears at the right time can help you maintain a smooth and efficient ride. Now that we know when to shift, let’s dive into how to shift gears.
How to Shift Gears
When it comes to shifting gears on a bicycle, there are a few key points to keep in mind.
First, you’ll need to know how to use the shifters properly, whether they’re located on the handlebars or elsewhere.
Second, it’s important to use the correct shifting technique, which involves smoothly shifting up or down without putting too much strain on the chain or derailleurs.
Finally, practice and experimentation are key to mastering the art of shifting gears, as you’ll need to get a feel for how different gears work in different situations.
Using the Shifters
Ah, the joy of using those tiny, finicky shifters! You’ll find that manipulating them with your fingers is just like trying to thread a needle while wearing mittens. However, with proper hand placement, you can avoid gear skipping and smoothly shift through your gears.
To use the shifters, keep your hands firmly on the handlebars and your fingers resting lightly on the shifters. Avoid gripping too tightly, as this can cause accidental shifts. When shifting, gently press the shifter with your thumb or forefinger in the direction you want to go.
It’s important to maintain a steady pedal stroke while shifting to prevent chain damage. Remember to also keep an eye on the gear display to ensure you are in the correct gear. With practice, you’ll soon be shifting gears like a pro!
Now, let’s move on to learning the proper shifting technique.
Shifting Technique
Get ready to effortlessly switch between different speeds as we delve into the technique of shifting gears on your bike! The first step towards proper gear shifting is to ensure your hands are in the correct position. Your hands should be on the brake hoods, with your thumbs and index fingers resting on the shifters. This will allow for quick and easy shifting without having to move your hands around on the handlebars.
Another important aspect of gear shifting is to avoid common mistakes. One such mistake is known as ‘cross-chaining’, which occurs when you use the smallest chainring with the smallest sprocket or the largest chainring with the largest sprocket. This places undue stress on the chain and gears, and can cause them to wear out more quickly.
Another mistake is to shift gears too quickly, without allowing the chain to properly engage with the new gear. This can result in a noisy and inefficient ride.
Proper hand positioning and avoiding common gear shifting mistakes are key to smooth and efficient riding. Now, it’s time to practice and experiment with shifting gears to find what works best for you.
Practice and Experimentation
You should practice and experiment with different gear combinations to find what feels most comfortable for you. Did you know that according to a study, cyclists who shift gears regularly can achieve a 15-20% increase in their overall speed and performance?
Here are some tips to help you find the right gear ratio:
-
Start with a low gear: When you’re starting out, it’s best to use a lower gear to make pedaling easier. This will help you build your confidence and get used to shifting gears.
-
Use the right gear for the terrain: If you’re going uphill, use a lower gear so you can maintain a steady pace without overexerting yourself. On flat terrain, use a higher gear to increase your speed.
-
Pay attention to chain alignment: Make sure your chain is aligned properly when shifting gears. If it’s not, you may experience skipping or jumping.
-
Practice: The more you practice shifting gears, the more comfortable and confident you’ll become. Don’t be afraid to experiment with different gear combinations until you find what works best for you.
By following these tips, you’ll be able to find the right gear ratio that works for you and improve your cycling performance.
In the next section, we’ll discuss how to troubleshoot common gear-shifting problems.
Troubleshooting Common Gear-Shifting Problems
If you’re experiencing issues with your gear-shifting, don’t fret – it’s a common problem that can be easily fixed.
One of the most common gear-shifting mistakes is not properly adjusting the derailleur alignment. The derailleur is responsible for moving the chain from one gear to another, and if it’s not aligned correctly, the chain may not shift smoothly or may even fall off.
To fix this issue, you’ll need to adjust the derailleur alignment by turning the barrel adjuster. Start by shifting to the smallest chainring and the largest cog, then turn the barrel adjuster until the chain runs smoothly. Repeat this process for all the gears to ensure proper alignment.
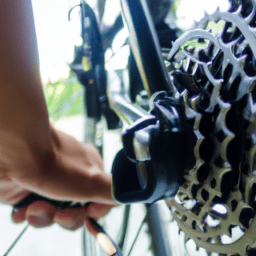
Another issue that can cause gear-shifting problems is worn or damaged cables. Over time, cables can stretch or become frayed, resulting in poor shifting performance. If you notice that your gears are not shifting smoothly, check the cables for any signs of wear and tear.
If the cables are damaged, replace them as soon as possible to ensure optimal shifting performance. With proper adjustment and regular maintenance, you can avoid these common gear-shifting problems and keep your bicycle running smoothly.
Maintenance and Care
When it comes to maintaining my bike, I always make sure to focus on three key points: regular cleaning and lubrication, replacing worn parts, and getting professional tune-ups.
Regular cleaning and lubrication help to keep my bike running smoothly and prevent any damage from occurring due to dirt or rust.
Replacing worn parts is important to ensure that the bike is functioning properly and to prevent any accidents or injuries.
Finally, getting a professional tune-up is crucial for identifying any potential problems and ensuring that my bike is in top shape for my next ride.
Regular Cleaning and Lubrication
Ironically, neglecting regular cleaning and lubrication of your bicycle gears won’t only decrease performance but also lead to costly repairs down the road. Therefore, it’s crucial to keep your bike clean and well-oiled. Here are three important steps you can follow to maintain your bike’s gears:
-
Clean the chain: Use a chain cleaner tool to scrub away dirt and grime from the chain, cassette, and derailleur. Apply a degreaser to the chain and let it sit for a few minutes before rinsing it off with water. Dry the chain with a clean rag.
-
Apply lubricant: Use a high-quality lubricant to coat the chain, cassette, and derailleur. Wipe off any excess lubricant with a rag.
-
Check for wear and tear: Inspect the chain, cassette, and derailleur for signs of wear and tear, such as stretched links, worn teeth, and bent derailleur hangers. Replace any worn parts to prevent further damage and ensure smooth shifting.
By following these steps, you can extend the life of your bike’s gears and avoid costly repairs. However, if you do need to replace worn parts, don’t worry. It’s a simple process that can be done with the right tools and a little know-how.
Replacing Worn Parts
Don’t let worn parts ruin your ride – replacing them is a simple process that can keep your bike running smoothly.
If you notice that your gears are slipping or not shifting smoothly, it may be time to replace your chain or cassette. Over time, these parts can become worn and stretched, which can affect the overall performance of your bike.
To replace a worn chain, you’ll need a chain tool to remove the old chain and install the new one. It’s important to choose the correct length of chain for your bike, as well as the appropriate type of chain for your drivetrain. Additionally, adjusting your derailleurs can help to ensure that your gears are shifting smoothly and accurately. By making small adjustments to the position of the derailleur, you can fine-tune the shifting performance of your bike.
If you’re not comfortable with these repairs, it may be time to consider taking your bike to a professional for a tune-up. Professional tune-ups can help to identify and repair any issues that may be affecting the performance of your bike. During a tune-up, a trained technician can inspect your bike for signs of wear and tear, adjust your gears and brakes, and perform any necessary repairs.
By keeping your bike in good working order, you can enjoy a smoother, more comfortable ride, and extend the life of your bike.
Professional Tune-Ups
You may be surprised to find that coincidentally, getting a professional tune-up for your bike can not only improve its overall performance, but also extend its lifespan. While DIY maintenance can be a cost-effective option, professional tune-ups offer a variety of benefits that can’t be achieved at home.
Firstly, professional mechanics have access to specialized tools and equipment that can detect and fix issues that may go unnoticed during DIY maintenance. They can also provide a more thorough cleaning and lubrication of your bike’s moving parts, leading to smoother and more efficient shifting. Additionally, professional tune-ups can identify potential problems before they become major issues, ultimately saving you money in the long run by preventing costly repairs.
Furthermore, a professional tune-up can be a cost-effective maintenance option in the long run. Regular tune-ups can help prevent wear and tear on your bike’s components, reducing the need for costly replacements. Professionals can also ensure that your bike is properly adjusted and aligned, maximizing its performance and minimizing unnecessary strain on its parts.
Overall, while DIY maintenance has its benefits, investing in a professional tune-up can be a worthwhile expense for those looking to maximize their bike’s lifespan and performance.
Frequently Asked Questions
How do I know when it’s time to replace my bike’s drivetrain components?
I can tell it’s time to replace my bike’s drivetrain components when I notice signs of wear, such as chain skipping or difficulty shifting. Replacement options include individual parts or a complete overhaul. Regular maintenance and proper care can prolong lifespan.
What are the differences between a single-speed bike and a multi-speed bike?
You may be wondering about the differences between single speed and multi speed bikes. Single speed bikes are lighter and simpler, but lack gear options. Multi speed bikes offer versatility, but can be heavier and require maintenance. Consider your needs and terrain before choosing.
Can I mix and match different brands and models of drivetrain components?
When it comes to compatibility concerns, it’s generally best to stick with components from the same brand and model. However, cost-effective options can include mixing and matching as long as the components have similar specifications.
How do I adjust the tension on my bike’s derailleur cable?
To adjust the tension on my bike’s derailleur cable, I first need to identify the issue by performing derailleur troubleshooting. Once I’ve found the problem, I can make precise cable tension maintenance adjustments to fix it.
What is the best way to clean and lubricate my bike’s drivetrain?
I learned the hard way that improper lubrication techniques can ruin a bike’s drivetrain. The key is using a degreaser to remove grime, then applying lubricant sparingly. Don’t make the mistake of over-lubricating or using the wrong kind of lubricant.
Conclusion
Well folks, I hope you found this guide to shifting gears on your bicycle helpful. It may seem like a simple task, but there are many factors to consider when shifting gears.
Remember to keep your drivetrain clean and well-maintained, and to listen to your bike’s cues when it comes to shifting.
But let’s also take a moment to reflect on the irony of this situation. We humans have created complex machines that require precise adjustments and maintenance just to function properly. Meanwhile, we ourselves often neglect our own physical and mental health, expecting our bodies to perform without any care or attention.
So, let’s apply the same level of care and attention to ourselves as we do to our bikes, and see how much smoother and more efficient our own lives can become.