Are you tired of riding your electric bike in the dark? Well, fear not! I’ve got the solution for you.
In this article, I will guide you through the process of adding lights to your electric bike, ensuring optimal visibility and safety.
We’ll assess your lighting needs, choose high-quality lights, and locate the ideal mounting positions. Plus, I’ll provide tips on maintaining the lights for longevity and following local regulations.
So let’s get started and light up your rides!
Key Takeaways
- Assess riding conditions and terrain to determine lighting needs
- Choose lights with high lumen output and long battery life for maximum visibility
- Follow manufacturer’s instructions for proper installation and maintenance of lights
- Select lights that meet safety standards and ensure proper alignment for optimal visibility

Under Armour Squeeze Water Bottles, 32 oz Water Bottles, Sideline Sports Water Bottle with Quick-Shot Lid, Quick & Easy Hydration, Gym Water Bottles, Squeeze Bottle, 1 32oz Bottle
- Easy Hydration: Quick-shot lid and one-way valve
- On-the-Go Use: One-hand operation for active hydration
- Measurement Markings: Ounces and milliliters for tracking
As an affiliate, we earn on qualifying purchases.
Assess Your Lighting Needs
First, you’ll need to figure out how much lighting you need for your electric bike. Assessing your lighting options and determining your lighting requirements is crucial for a safe and enjoyable riding experience.
When it comes to assessing lighting options, there are a few factors to consider. Firstly, think about the conditions in which you’ll be riding. Will you primarily be riding during the day or at night? If you plan on riding at night, you’ll need brighter lights to ensure maximum visibility.
Secondly, consider the type of terrain you’ll be riding on. If you’ll be riding on dark or poorly lit roads or trails, you’ll need more powerful lights to illuminate your path.
Additionally, think about the purpose of the lights. Are you looking for lights primarily for safety or do you also want lights that are aesthetically pleasing?
Once you have assessed your lighting needs, you can determine the type of lights you want to install.
Determine the Type of Lights You Want to Install
Once you’ve decided on the type of lights you want, it’s time to move on to the next step. Choosing the right lights for your electric bike is crucial for ensuring optimal visibility and safety on the road. Here are some factors to consider when determining the type of lights you want to install:
- Brightness: Look for lights with high lumen output to ensure maximum visibility, especially in low-light conditions.
- Battery life: Consider lights with long battery life to avoid frequent recharging or battery replacements.
- Mounting options: Look for lights that can be easily mounted on your electric bike without any modifications.
- Weather resistance: Opt for lights that are weatherproof to withstand rain, snow, and other harsh weather conditions.
- Beam pattern: Choose lights with a wide beam pattern to provide a broader field of vision and improve visibility.
By considering these factors, you can choose lights that meet your specific needs and preferences. Installing lights properly is essential for their effective functioning. Make sure to follow the manufacturer’s instructions and secure the lights firmly to your electric bike. Additionally, ensure that the wires are properly connected and protected to prevent any damage or malfunctioning.
Choose High-quality Lights for Optimal Visibility
To ensure optimal visibility on the road, you’ll want to choose high-quality lights that provide maximum brightness and a wide beam pattern. Choosing the right lighting technology and ensuring proper light alignment are crucial factors in enhancing your safety while riding your electric bike. Let’s take a closer look at the different lighting technologies available and their benefits:
| Lighting Technology | Brightness | Beam Pattern |
|---|---|---|
| LED | High | Wide |
| HID | Very High | Narrow |
| Halogen | Medium | Medium |
LED lights are a popular choice due to their high brightness and wide beam pattern, providing excellent visibility to both the rider and other road users. HID lights offer even greater brightness but have a narrower beam pattern, which may limit peripheral visibility. Halogen lights are a more budget-friendly option, providing moderate brightness and a medium beam pattern.
Proper light alignment is essential for maximizing the effectiveness of your lights. Aligning the lights correctly ensures that the beam pattern is directed where it is needed most, improving visibility and reducing the risk of blinding other road users.
Now that you understand the importance of choosing the right lighting technology and ensuring proper light alignment, it’s time to gather the necessary tools and equipment for the installation process.
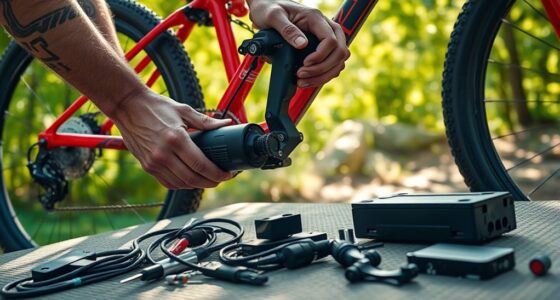
Gather the Necessary Tools and Equipment
Now that you know the importance of choosing the right lighting technology and ensuring proper light alignment, it’s time to gather all the tools and equipment you’ll need for the installation process.
Assessing lighting options is crucial to determine the type and quantity of lights you’ll need for your electric bike. Consider factors like brightness, beam pattern, and battery life to make the best choice.
Once you’ve decided on the lights, it’s essential to select appropriate tools for the installation. You’ll likely need a screwdriver, Allen wrenches, wire strippers, crimping tool, and electrical tape. These tools will help you secure the lights and make the necessary electrical connections. Additionally, you may need zip ties or Velcro straps to neatly route the cables and keep them in place.
With all the tools and equipment gathered, you’re now ready to move on to the next step, which is locating the ideal mounting positions for the lights. This process will ensure optimal visibility and safety while riding your electric bike.
Locate the Ideal Mounting Positions for the Lights
After assessing the brightness, beam pattern, and battery life of my chosen lighting options, it’s important to locate the ideal mounting positions for the lights on my electric bike. To do this, I need to consider the ideal mounting positions and lighting angles that will provide optimal visibility and safety on the road.
For the front light, the ideal mounting position is on the handlebars. This allows for easy access and adjustment while riding. The light should be mounted centrally, facing forward, and angled slightly downwards to illuminate the road ahead without blinding oncoming traffic. It’s important to ensure that the light is securely mounted to prevent any movement or vibrations while riding.
As for the rear light, the ideal mounting position is on the seat post or seat stay. This ensures that the light is visible from behind and at an adequate height for other road users to see. The light should be angled slightly upwards to maximize visibility.
By locating the ideal mounting positions and adjusting the lighting angles accordingly, I can ensure that my electric bike lights provide the best visibility and safety on the road.
Now, let’s move on to the next section and install the front light.
Install the Front Light
Once I’ve determined the ideal mounting position for the front light, I can proceed with installing it on my handlebars. Before beginning the installation, it is crucial to choose the right light that meets my visibility needs. I opt for a high-powered LED light that offers a wide beam angle and multiple brightness settings. This ensures maximum visibility and enhances my safety on the road.
To install the front light, I follow these safety precautions:
- Wear gloves to protect my hands from any sharp edges during the installation process.
- Make sure the bike is turned off and the battery is disconnected to avoid any electric shock.
- Position the light in a way that it doesn’t obstruct my view of the road and is securely fastened to the handlebars.
- Double-check all the connections and ensure they are tight to prevent the light from coming loose while riding.
With the front light securely installed and tested, I am now ready to move on to the next step, installing the rear light. This will further enhance my visibility to other road users and ensure a safer riding experience.
Install the Rear Light
To ensure maximum visibility to other road users, make sure you securely attach the rear light to your bicycle frame. There are several mounting options available, such as seat post mounts or rear rack mounts, so choose the one that best suits your bike and preferences.
Once you have selected the appropriate mount, position it on the frame where it will be most visible to other road users. Use the provided screws or straps to securely fasten the mount to the frame.
Next, you will need to make the necessary wiring connections for the rear light. Locate the wiring harness that came with the light, and identify the end that connects to the light itself. Insert this end into the corresponding connector on the rear light. Ensure that the connection is tight and secure to prevent any electrical issues during operation.
Now that the rear light is securely mounted and the wiring connections are in place, you can move on to the next step of connecting the lights to the electric bike’s power source. This will allow the lights to be powered by the electric system of your bike, ensuring a reliable and consistent source of light while riding.
Connect the Lights to the Electric Bike’s Power Source
After successfully installing the rear light, it’s time to connect the lights to the electric bike’s power source. This step is crucial as it ensures that the lights receive the necessary power to function effectively.
To begin, gather the necessary materials: wire cutters, electrical tape, and a soldering iron. Next, determine the best mounting options for your lights. This will depend on the specific design of your bike and personal preference. Once you have chosen the mounting locations, refer to the bike’s user manual or consult an expert for guidance on the appropriate wiring techniques.
To provide a clearer picture of the wiring process, refer to the table below:
| Light Component | Wire Color | Bike Power Source |
|---|---|---|
| Headlight | Red | Battery + |
| Black | Battery – | |
| Tail Light | White | Battery + |
| Green | Battery – |
Using the wire cutters, carefully strip the ends of the wires to expose the metal cores. Then, connect the corresponding wire colors from the light components to the bike’s power source, making sure to match the polarities correctly. Secure the connections with electrical tape or soldering for added durability.
With the lights successfully connected to the electric bike’s power source, it’s time to move on to the next step: testing the lights to ensure their proper functionality without any mention of ‘step’.
Test the Lights to Ensure Proper Functionality
Now that the lights are connected to the power source, it’s important to test them to ensure they are functioning properly. Testing the lights is a crucial step in the process of adding lights to an electric bike, as it ensures that they will work effectively when needed.
There are several test methods and troubleshooting tips that can be employed to ensure the lights are in proper working condition.
One test method is to turn on the lights and observe if they illuminate properly. Check if both the front and rear lights are emitting a steady and bright light. Additionally, it is important to verify if the lights are functioning correctly in different lighting conditions. Take the bike out for a test ride during the day and at night to ensure the lights are visible and provide sufficient illumination.
If the lights are not functioning as expected, troubleshooting can be done to identify and resolve the issue. One troubleshooting tip is to check the connections between the lights and the power source. Ensure that all connections are secure and properly attached. If the connections are loose or damaged, it may affect the performance of the lights.
By testing the lights and troubleshooting any issues that arise, you can ensure that your electric bike lights are functioning properly and providing the necessary visibility and safety.
Now, let’s move on to adjusting the light angles for maximum visibility.
Adjust the Light Angles for Maximum Visibility
Make sure you adjust the angles of your bike’s lights to maximize visibility while riding. Properly adjusting the light angles is crucial for improving visibility and ensuring your safety on the road.
To start, position the lights at a slight downward angle to prevent blinding other riders or drivers. This will also help illuminate the immediate area in front of your bike, allowing you to see any obstacles or hazards on the road. Additionally, make sure the lights are aimed slightly to the sides to enhance your peripheral vision. This will help you detect any approaching vehicles or objects from the sides, reducing the risk of accidents.
To adjust the light angles, locate the adjustment screws or knobs on the light brackets. Loosen these screws or turn the knobs to allow for movement. With the lights turned on, mount the bike and have someone stand a few meters away to observe the light beams. Gradually adjust the angles until the light beams are focused where you need them most. Once you have achieved the ideal angle, tighten the screws or knobs to secure the lights in place.
Securely Fasten the Lights to Prevent Vibrations
To prevent vibrations, it is crucial to securely fasten the light brackets to your bike. This will maintain the stability and functionality of your lights. Here are the key steps to follow when securing your lights:
-
Choose the right mounting positions: Before attaching the brackets, carefully consider the best locations on your bike for optimal visibility and minimal interference. Common mounting positions include the handlebars, seat post, fork, or helmet.
-
Use high-quality brackets: Invest in sturdy and reliable brackets specifically designed for bike lights. These brackets should have a secure grip and be compatible with your bike’s frame or handlebar size.
-
Tighten the screws properly: Once you have positioned the brackets, use a suitable tool to firmly tighten the screws. Make sure they are tight enough to hold the lights securely in place, but be cautious not to overtighten and risk damaging the brackets or the bike frame.
-
Test for stability: After fastening the brackets, give them a gentle shake to ensure they are securely attached and do not wobble. This will help prevent vibrations during your rides and maintain the visibility of your lights.
Consider Adding Additional Reflective Accessories for Enhanced Safety
Consider investing in reflective accessories to further enhance your safety while riding. Reflective gear plays a crucial role in increasing visibility, especially in low light conditions or at night. By adding reflective accessories to your electric bike, you can significantly improve your chances of being seen by other road users, reducing the risk of accidents.
In addition to reflective gear, it is also beneficial to consider adding additional lighting to your electric bike. Having bright, well-placed lights can greatly increase your visibility to others on the road, making it easier for them to see you from a distance. This is especially important when riding in areas with heavy traffic or on poorly lit roads.
Regularly Check and Maintain the Lights for Longevity
Transition: Now that we have discussed the importance of adding reflective accessories to enhance safety, let’s move on to the next crucial step in ensuring the effectiveness of your electric bike lights: regularly checking and maintaining them for longevity.
When it comes to bike lights, it is essential to stay proactive in their maintenance. By following a few simple steps, you can ensure that your lights are functioning optimally and will last for a long time. Here’s what you need to do:
- Inspect the lights regularly to ensure they are securely attached and aligned properly.
- Check the brightness of the lights to make sure they are emitting a strong and consistent beam.
- Clean the lights and remove any dirt or debris that may accumulate over time, as this can affect their performance.
- Replace any batteries as needed, ensuring you always have a reliable source of power.
- Test the lights before each ride to confirm they are working correctly.
By regularly checking and maintaining your bike lights, you can ensure their longevity and guarantee that they will provide you with the safety and visibility you need while riding your electric bike.
Transition: It is crucial to remember that following local regulations and laws regarding bike lights is imperative for a secure and legal riding experience.
Follow Local Regulations and Laws Regarding Bike Lights
Make sure you follow local regulations and laws for your bike lights, ensuring you have a safe and legal riding experience. It’s important to understand the specific requirements set by your local authorities, as they may vary from place to place.
Some common regulations include having a white light on the front of your electric bike and a red light on the rear. Additionally, you may need to have reflectors on your bike to enhance visibility.
To comply with these regulations, it is essential to choose high-quality lights that meet the necessary standards. Look for lights that are bright, durable, and have a long battery life. LED lights are a popular choice as they offer excellent visibility while consuming less energy.
It’s also a good idea to invest in lights that are easy to mount and remove, allowing you to quickly comply with the regulations when needed.
Enjoy Safe and Illuminated Rides on Your Electric Bike
To ensure your safety and visibility while riding, it’s crucial to have properly functioning and bright lighting on your electric bicycle.
Adding lights to your electric bike is a straightforward process that can greatly enhance your riding experience.
First, you will need to choose the right lights for your bike. Look for lights that are specifically designed for electric bikes and provide sufficient brightness.
Once you have your lights, you will need to install them using mounting brackets. These brackets allow you to securely attach the lights to your bike frame or handlebars. Make sure to position the lights in a way that maximizes your visibility to other road users.
Additionally, it’s important to consider the battery life of your lights. Opt for lights that have a long battery life or can be easily recharged. This will ensure that your lights are always ready for use when you need them.
Regularly check your lights to ensure they are properly functioning and replace any faulty bulbs or batteries.
Frequently Asked Questions
How do I determine the wattage or brightness level of the lights I need for my electric bike?
To determine the wattage or brightness level for electric bike lights, factors like desired visibility, riding conditions, and battery capacity should be considered. Tips for choosing the right lights include checking lumens, beam patterns, and light modes.
Can I install both front and rear lights on my electric bike?
Yes, you can install both front and rear lights on your electric bike. When it comes to light installation tips, it’s important to choose the best lighting options that provide sufficient brightness and visibility for safe riding.
Are there any specific tools or equipment required for installing lights on an electric bike?
To install lights on an electric bike, you will need a screwdriver, wire cutters, wire strippers, and electrical tape. Follow this step-by-step guide for a successful installation of front and rear lights on your electric bike.
What are some common mistakes to avoid when installing lights on an electric bike?
When installing lights on an electric bike, it’s crucial to avoid common mistakes that can compromise proper installation. Rushing the process, neglecting proper wiring, and using incompatible components can lead to faulty lighting and potential safety hazards.
Are there any alternative power sources for bike lights besides the electric bike’s power source?
Yes, there are alternative power sources for bike lights besides the electric bike’s power source. Some options include solar powered lights, which harness sunlight to charge, and battery powered lights, which rely on replaceable batteries for power.
Conclusion
In conclusion, adding lights to your electric bike is essential for safe and enjoyable rides. By assessing your lighting needs and choosing high-quality lights, you can ensure optimal visibility on the road.
Regularly checking and maintaining the lights will contribute to their longevity. It is also crucial to follow local regulations and laws regarding bike lights to stay compliant.
By considering additional reflective accessories, you can enhance your safety even further. So, gear up, light up, and enjoy your electric bike rides with confidence and illumination.