Putting together a bike might appear to be an intimidating challenge, yet when equipped with the appropriate tools, gear, and guidance, it becomes an enjoyable and fulfilling task.
In this article, I will guide you through the steps to assemble a bicycle from scratch.
Before we get started, it’s important to note that the process may vary depending on the type of bike you have. However, the basic steps are the same.
It’s also crucial to follow the manufacturer’s instructions carefully and take all necessary safety precautions.
So, let’s grab our tools and get started!
Key Takeaways
- Follow manufacturer’s instructions and safety precautions for a satisfying and rewarding assembly experience.
- Use proper tools, eye protection, gloves, and a stable work surface for safety.
- Unpack and sort parts, clean components before assembly.
- Double check all final adjustments and safety checks before riding.
Gather the Necessary Tools and Equipment
You gotta have the right tools and gear if you wanna build your dream bike – don’t skimp on the essentials! First and foremost, you’ll need a set of hex keys, also known as Allen keys. These come in various sizes, so it’s best to have a multi-tool with a range of sizes.
A set of wrenches, both open-end and adjustable, will also be necessary. A pair of pliers, wire cutters, and a screwdriver set will come in handy as well.
Safety precautions should always be taken when assembling a bike. Eye protection is crucial, and gloves are recommended. It’s also important to work in a well-lit area and have a stable work surface. Additionally, before starting, make sure to read through the bike manufacturer’s instructions thoroughly to ensure you have all the necessary tools and equipment.
Now that you have your tools and safety gear ready, it’s time to unpack the bike and lay out the parts.
Unpack the Bike and Lay Out the Parts
After opening the box, it’s exciting to see all the shiny parts spread out on the ground, just waiting to be put together into a fully functioning mode of transportation. However, before diving into the assembly process, it’s important to take the time to identify each part and ensure that everything is present. Using the manual as a guide, I carefully sorted through the components and organized them into categories such as frame parts, wheels, brakes, and gears. This step may seem tedious, but it will save time in the long run and prevent the frustration of missing pieces during assembly.
With all the parts laid out, it’s also a good time to thoroughly clean each component. Depending on the manufacturer, some parts may have a protective coating or need to be lubricated before being assembled. I used a soft cloth and mild soap to clean off any residue or dirt that may have accumulated during shipping. It’s important to handle each part with care to avoid scratching or damaging the finish. By taking the time to properly identify and clean each part, I was able to start the assembly process with confidence. Now, it’s time to move on to the next step – assembling the frame.
Assemble the Frame
Alright, now that I’ve unpacked all the parts, it’s time to start assembling the frame of my bike.
The first thing I need to do is install the fork into the head tube of the frame.
Then, I’ll attach the handlebars to the stem and clamp them onto the fork.
Finally, I’ll install the seat post and saddle to complete the frame assembly.
Install the Fork
Now that we’ve got all the necessary tools, let’s start installing the fork! First, adjust the height of the fork to match the frame. This is done by loosening the stem bolt on the top of the headset and sliding the fork until it is at the correct height. Once you have the correct height, tighten the stem bolt.
Make sure the fork is straight before tightening the bolt by looking at it from the front and adjusting as necessary.
Next, insert the fork into the head tube of the frame, making sure it is straight. Tighten the bolts on the headset, making sure they are snug but not overly tight. Check that the fork can turn smoothly without any resistance or wobbling. If it doesn’t turn smoothly, loosen the bolts slightly and adjust the fork until it turns smoothly.
Now we’re ready to move on to attaching the handlebars. With the fork securely installed, it’s time to attach the handlebars.
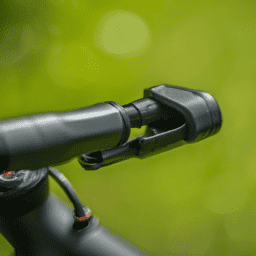
Attach the Handlebars
To attach the handlebars, you’ll need to grab the stem and slide it onto the fork. Make sure that the stem is aligned with the front wheel before tightening the bolts. This will ensure that the handlebars are straight and won’t cause any accidents. Once the stem is in place, tighten the bolts with a wrench. Remember not to overtighten them, as this can damage the headset bearings.
Proper grip technique is essential for a comfortable and safe ride. When adjusting the handlebar height, make sure that you don’t exceed the maximum height limit marked on the stem. This will prevent any accidents caused by an unstable handlebar height. Additionally, make sure that the handlebars are at a comfortable height and angle for your riding position. Having the right handlebar position will help prevent discomfort or pain in your arms and wrists during longer rides.
Now, let’s move on to installing the seat post and saddle.
Install the Seat Post and Saddle
Get ready to make your ride comfortable by installing the seat post and saddle.
First, you need to adjust the height of the seat post according to your height. To do this, loosen the bolt on the seat post clamp using an Allen key. Adjust the height of the seat post to your desired level and tighten the bolt securely. Make sure that the minimum insertion mark isn’t visible, as this indicates that the post has been inserted too low.
Next, it’s time to choose the right saddle for you. Saddles come in different shapes and sizes, so it’s important to choose one that fits your body type and riding style. Take the time to sit on a few different saddles and adjust the angle and position until you find the most comfortable one.
Once you’ve found the right saddle, attach it to the seat post using the bolts provided and tighten them securely.
Now that you’ve installed the seat post and saddle, it’s time to move on to the next step and install the wheels. Make sure to follow the instructions carefully to ensure a safe and smooth ride.
Install the Wheels
You’ll want to start by placing the wheel into the dropouts on the frame. Make sure that the quick release lever is open before you do this. Once the wheel is in place, tighten the quick release lever to secure the wheel onto the frame. It’s important to choose the right wheel size for your bicycle. The table below shows the standard wheel sizes and the corresponding tire widths that you should use. Make sure to check your bicycle’s specifications to determine the appropriate wheel size.
| Wheel Size | Tire Width Range | Common Use |
|---|---|---|
| 700c | 23-28mm | Road bikes |
| 27.5" | 1.9-2.5" | Mountain bikes |
| 26" | 1.9-2.5" | Older mountain bikes, cruisers |
| 24" | 1.5-2.5" | Kids’ bikes, some mountain bikes |
Proper tire inflation is crucial for a safe and smooth ride. Make sure to check the recommended tire pressure and inflate the tires accordingly. Finally, double check that the wheels are securely attached and spinning freely before moving on to the final adjustments and safety checks.
Final Adjustments and Safety Checks
Now it’s time to make sure everything is properly aligned and adjusted for a safe ride. First, I recommend checking the proper helmet fit.
The helmet should sit level on your head and cover your forehead. Adjust the straps so that the helmet fits snugly and doesn’t move around when you shake your head. Make sure the helmet doesn’t obscure your vision and that the chin strap is securely fastened.
Next, it’s important to check the brakes. Adjust the brake levers so that they are easy to reach and apply. Test the brakes by squeezing the levers and making sure the wheels come to a complete stop.
If the brakes feel loose or unresponsive, adjust the tension using the barrel adjusters near the brake calipers. Finally, check the tire pressure using a pressure gauge and inflate to the recommended level.
Inflating the tires to the proper pressure will ensure a smooth and efficient ride. With these final adjustments and safety checks, you can confidently take your new bike out for a spin.
Frequently Asked Questions
How do I know if my bicycle frame is the right size for me?
To ensure my bike frame is the right size, I measure my inseam and use a bike sizing chart. Proper bike sizing is crucial for comfort, efficiency, and injury prevention. Measuring techniques vary, but accuracy is key.
Can I use any type of grease or lubricant when assembling my bike?
To ensure proper bike assembly, it’s important to use the right grease and lubricant. Check the compatibility of your grease with your bike’s materials. Choose a lubricant that’s effective for the specific components you’re working on.
Do I need to adjust the brakes before riding my bicycle?
Yes, I need to adjust the brakes before riding my bicycle. I will use brake adjustment techniques such as centering, tensioning and alignment to ensure they function properly. Riding safety precautions are important, so I will double-check their performance before taking off.
Can I replace the tires on my bicycle with any brand or size?
I can replace my bicycle tires with different brands or sizes, but there are pros and cons to upgrading. Choosing the right tire pressure is important. Consult the manufacturer’s recommendations and consider terrain and riding style.
How often should I perform maintenance on my assembled bicycle?
Regular maintenance is crucial for a long-lasting bike. Inspect components regularly for signs of wear and tear, such as rust or fraying cables. Service the bike every 6-12 months to ensure optimal performance and safety.
Conclusion
In conclusion, assembling a bicycle requires patience, precision, and a bit of know-how. It’s important to gather all the necessary tools and equipment before beginning the process.
Unpacking and laying out the parts in an organized manner can save time and prevent confusion. Assembling the frame is the most crucial step, as it sets the foundation for the rest of the bike.
Installing the wheels, while seemingly simple, requires attention to detail to ensure they’re properly aligned and secured. Finally, performing final adjustments and safety checks can prevent accidents and ensure a smooth ride.
Remember to tighten all bolts and screws, adjust the brakes and gears, and check the tire pressure before hitting the road. With these tips and techniques, anyone can successfully assemble their own bicycle.