
While enjoying a relaxing bike ride, you may encounter a bothersome creaking noise coming from your bike’s crank. No need to fret, as I have a solution for you.
In this step-by-step guide, I’ll show you exactly how to tighten your bicycle crank to eliminate that pesky noise and ensure a smooth and secure ride. With just a few simple tools and a little bit of know-how, you’ll be back on the road in no time.
Let’s dive in and get those cranks tightened up!
Key Takeaways
- Proper tightening of bicycle cranks is crucial for safety and preventing risks.
- Use a torque wrench and follow recommended torque specifications to avoid under or over-tightening.
- Regularly inspect crank arms for signs of looseness, wear, or damage.
- Test the stability of the cranks by applying pressure, listening for clicking sounds, and visually checking for movement in different riding positions.
Identify the Tools You Will Need
You’ll need to identify the tools you’ll need to tighten the bicycle crank. Proper maintenance techniques for the bicycle crank are crucial to ensure a smooth and safe ride.
Before beginning, it is important to know the common mistakes to avoid when tightening the bicycle crank, such as over-tightening or using the wrong tools.
To get started, you’ll need a socket wrench with the appropriate size socket that matches the crank arm bolts. Additionally, having a torque wrench can help ensure that the bolts are tightened to the correct specifications.
It’s important to note that different bicycles may require different tools, so it’s essential to consult your bike’s manual or a professional if you’re unsure.
Once you have the necessary tools, you can move on to locating the crank arm bolts.
Locate the Crank Arm Bolts
First, find the bolts on the crank arm. These bolts are typically located on the sides of the crank arm and are used to secure it to the bottom bracket spindle. To remove the crank arm, you will need a crank puller tool, which is specifically designed for this task. Here’s how to remove the crank arm using a crank puller:
- Start by loosening the bolts on the crank arm using an Allen wrench.
- Attach the crank puller tool to the crank arm and turn it clockwise until the crank arm starts to come off.
- Continue turning the crank puller tool until the crank arm is completely loosened and can be removed.
To maintain the crank arm, make sure to clean it regularly and check for any signs of damage or wear. Proper maintenance will ensure optimal performance and longevity of the crank arm.
With the crank arm removed, you can now position the bike correctly for further maintenance.
NEXT SUBTOPIC: ‘Position the Bike Correctly’
Position the Bike Correctly
Now, make sure you have the bike positioned correctly for the next step. Proper bike positioning is crucial to ensure that you have easy access to the crank arm bolts and can perform the necessary adjustments effectively.
Start by placing the bike on a level surface, making sure it is stable and won’t tip over. Next, stand facing the bike and position yourself so that you have a clear view of the crank arm bolts.
It’s important to avoid any common mistakes in bike positioning, such as having the bike at an angle or leaning against a wall, as this can hinder your ability to tighten the crank properly.
Once you have positioned the bike correctly, you are ready to move on to the next step and use a wrench to loosen the bolts.
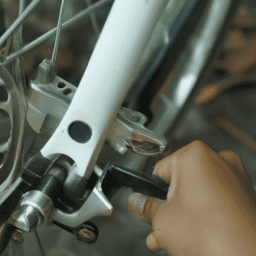
Use a Wrench to Loosen the Bolts
To begin, grab a wrench and loosen the bolts holding the crank arm in place. Start by locating the bolts on the side of the crank arm near the bottom bracket. Ensure that the wrench is the correct size for the bolts to avoid damaging them.
Place the wrench securely onto the bolt head and turn it counterclockwise to loosen the bolts. Apply firm pressure to break the initial resistance, and then continue turning until the bolts are completely loosened.
Once the bolts are loose, they can be easily removed by hand. With the bolts removed, the crank arm will no longer be secured to the bottom bracket.
This transition sets the stage for the subsequent section on how to remove the crank arm.
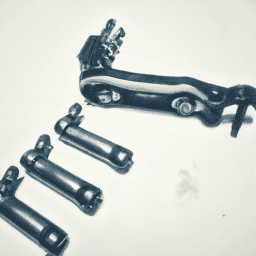
Remove the Crank Arm
Once you have successfully loosened the bolts, you can proceed to remove the crank arm. To do this, you will need a crank puller tool. Start by inserting the tool into the crank arm, making sure it is securely attached. Then, turn the handle of the tool clockwise until the crank arm starts to loosen. Keep turning until the crank arm is completely off the bottom bracket spindle.
Now that you have removed the crank arm, you can proceed to install the new crank arm. Begin by applying a small amount of grease to the spindle to ensure smooth installation. Align the splines on the crank arm with those on the spindle, and gently slide the new crank arm onto the spindle. Make sure it is properly seated and secure.
With the crank arm removed and the new one installed, we can now move on to the next step: cleaning the crank arm and bottom bracket.
Clean the Crank Arm and Bottom Bracket
Next, you’ll want to thoroughly clean both the crank arm and the bottom bracket to ensure optimal performance. Here are some cleaning techniques and maintenance tips to follow:
- Use a clean cloth or brush to remove any dirt, grease, or debris from the crank arm and bottom bracket.
- Apply a mild degreaser to help break down any stubborn grime.
- Scrub the surfaces gently to avoid damaging the components.
- Rinse off the degreaser and dirt with water, making sure to remove all residue.
By following these cleaning techniques and maintenance tips, you’ll prolong the lifespan of your bicycle crank and bottom bracket, ensuring smooth and efficient operation.
Now, let’s move on to the next step and apply grease to the bottom bracket spindle to further enhance performance.
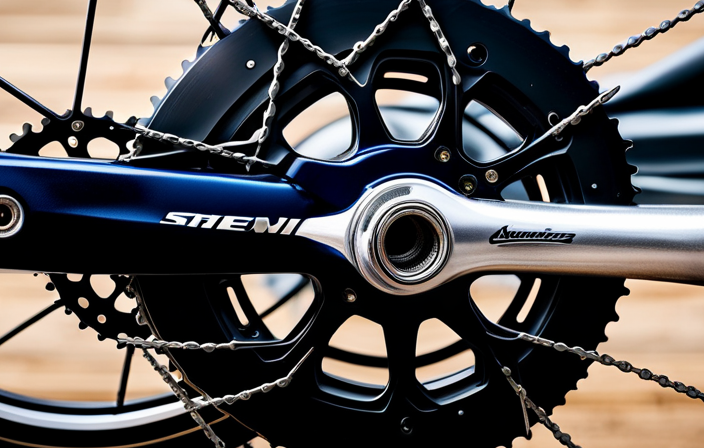
Apply Grease to the Bottom Bracket Spindle
To ensure optimal performance and prevent wear and tear on your bike, it is important to apply grease to the bottom bracket spindle. This step is crucial in maintaining the smooth rotation of the crank arm. Applying grease creates a protective barrier between the spindle and the crank arm, reducing friction and allowing for efficient power transfer.
When it comes to choosing the right grease for your bottom bracket spindle, different types offer varying benefits. Some greases are specifically formulated for high-performance bikes, providing superior durability and resistance to extreme conditions. Others may be more suitable for everyday commuting, offering long-lasting lubrication without compromising on affordability.
While applying grease to the bottom bracket spindle is relatively straightforward, it’s important to avoid common mistakes. Over-greasing can lead to excess buildup and attract dirt and debris, causing more harm than good. Additionally, using incompatible grease can result in poor performance and premature wear.
With a properly greased bottom bracket spindle, we can now move on to the next step: reattaching the crank arm.
Reattach the Crank Arm
Now that we have greased the bottom bracket spindle, it’s time to reattach the crank arm. Before we begin, let’s troubleshoot any potential issues with the crank arm. If the arm doesn’t fit snugly onto the spindle, check for any dirt or debris that may be causing interference. Clean the spindle and arm thoroughly before proceeding.
To reattach the crank arm, follow these steps:
| Step | Action |
|---|---|
| 1 | Slide the crank arm onto the spindle, ensuring that the splines align properly. |
| 2 | Use a crank arm bolt or self-extracting bolt to secure the arm onto the spindle. |
| 3 | Tighten the bolt using a wrench or an Allen key, making sure it is snug but not overly tight. |
| 4 | Double-check the crank arm’s alignment and ensure it spins freely without any wobbling. |
Now, we can move on to the subsequent section about tightening the bolts with a torque wrench.
Tighten the Bolts with a Torque Wrench
To ensure proper fastening, you’ll need a torque wrench to tighten the bolts securely. This is crucial in bike maintenance as the correct torque prevents the crank arm from loosening during rides, ensuring a safe and smooth cycling experience.
When tightening the crank bolts, it is important to avoid common mistakes such as over-tightening, which can cause damage to the crank and the threads. Over-tightening may also result in the crank arm becoming difficult to remove in the future. On the other hand, under-tightening the bolts can lead to the crank arm coming loose while riding, posing a serious safety risk.
Therefore, it is essential to use a torque wrench to apply the recommended torque specified by the bike manufacturer.
Once the bolts are tightened, we can move on to checking for proper tightness in the subsequent section.
Check for Proper Tightness
Check if the bolts are properly secured for a safe and smooth cycling experience. To ensure that the crank arm is tightened correctly, follow these steps:
- Use a torque wrench to tighten the bolts to the manufacturer’s recommended torque specification.
- Check for any signs of a loose crank arm, such as clicking or creaking sounds while pedaling or a wobbly feel when applying pressure.
- Inspect the crank arm regularly for any visible signs of wear or damage.
- Apply a threadlocker compound to the bolt threads before tightening them to prevent loosening over time.
- Consider using a crank arm extractor tool to remove the crank arm and inspect the interface between the crank arm and the bottom bracket spindle for any signs of wear or damage.
By following these steps and regularly checking the tightness of the crank arm, you can prevent it from loosening during your rides.
Now, let’s move on to the next section and repeat the process for the other crank arm.
Repeat the Process for the Other Crank Arm
Once you have completed the steps for one crank arm, it’s time to repeat the process for the other one. To ensure proper tightening of the bicycle crank, you must follow a step-by-step approach. Here are the steps to tighten the other crank arm:
| Step | Procedure |
|---|---|
| 1 | Place the wrench on the crank bolt of the other crank arm. |
| 2 | Rotate the wrench clockwise to tighten the crank arm. |
| 3 | Use a torque wrench to achieve the recommended torque specification. |
When tightening the crank arm, it’s important to avoid some common mistakes. These include over-tightening the crank arm, which can lead to damage, or under-tightening it, causing instability. To maintain crank arm stability, here are some tips:
- Ensure both crank arms are tightened evenly.
- Regularly check for any looseness or play in the crank arms.
- Use a torque wrench to achieve the recommended torque specification.
By following these steps and tips, you can ensure the stability of your bicycle crank arms. Next, we will test the cranks for stability.
Test the Cranks for Stability
After completing the tightening process for both crank arms, it’s important to test the stability of the cranks. To ensure that they are securely in place, follow these steps:
-
Apply pressure: Stand on the pedals and push down forcefully, checking for any movement or wobbling. This will verify if the cranks are properly tightened and won’t loosen during rides.
-
Listen for clicking sounds: While applying pressure, listen carefully for any clicking or creaking sounds. Clicking noises could indicate loose or worn-out components, such as bottom bracket bearings.
-
Inspect for movement: Observe the cranks visually as you pedal. Look for any side-to-side or up-and-down movement, which could suggest a loose connection.
-
Test multiple positions: Pedal in different positions, such as standing or sitting, and check for stability throughout. This helps ensure that the cranks won’t shift when encountering different riding conditions.
Once you have tested the cranks for stability and checked for any clicking sounds or movement, you can proceed to make any necessary adjustments to guarantee a secure and reliable ride experience.
Make Any Necessary Adjustments
To ensure a secure and reliable ride experience, it’s important to make any adjustments that may be necessary.
Start by checking the crank bolts to ensure they are tightened properly. Use a torque wrench to tighten them to the manufacturer’s specifications.
If the crank is still loose, remove it and inspect the crank arm and spindle for any signs of wear or damage. If there is any damage, replace the affected parts.
Next, check the bottom bracket for any play or looseness. If necessary, tighten the bottom bracket cups using a bottom bracket tool. Additionally, check for any creaking or clicking sounds while pedaling, as this could indicate a worn or damaged bottom bracket.
Troubleshoot common crank issues by adjusting the chainline or checking for bent chainrings.
Lastly, make sure to clean up and store your tools properly to keep them in good condition for future use. This will ensure that you are always prepared for any necessary adjustments.
Clean Up and Store Your Tools
Before putting away your tools, make sure to clean them properly and store them in a safe place. Cleaning tools is important to maintain their functionality and prolong their lifespan.
Start by wiping off any dirt or grease using a clean cloth. If there’s stubborn grime, use a mild detergent and water solution. Rinse the tools thoroughly and dry them completely to prevent rust.
Once cleaned, organize your tools in a tool chest or toolbox. Make sure each item has its designated spot. This will make it easier to find and access them in the future.
Consider using dividers or foam inserts to prevent tools from shifting and getting damaged.
By properly cleaning and organizing your tools, you’ll be ready to enjoy your smooth and secure ride without any worries.
Enjoy Your Smooth and Secure Ride
Now you can fully enjoy your smooth and secure ride without any worries. After properly tightening your bicycle crank, you’ll experience a smoother ride with improved power transfer.
To ensure a secure grip, follow these step-by-step instructions.
First, locate the crank bolts on both sides of the crank arm. Using a hex wrench, tighten the bolts clockwise until they are snug. Be careful not to overtighten, as this can damage the crank or strip the threads.
Next, check for any play or movement in the crank by grabbing it and trying to wiggle it side to side. If there is any movement, repeat the tightening process.
Once you have achieved a secure grip, take your bike for a test ride to ensure a smooth and enjoyable cycling experience.
Frequently Asked Questions
How often should I tighten my bicycle crank?
I should tighten my bicycle crank every 500-1000 miles or every 3-6 months. The time it takes to tighten the crank depends on the specific bike and tools used. The type of terrain can affect how often I need to tighten it.
Can I use any type of wrench to loosen the bolts?
Yes, you can use any type of wrench to loosen the bolts on your bicycle crank. However, it is important to use the proper wrench size to ensure a secure fit and prevent damage to the bolts.
Are there any specific torque settings I should follow when tightening the bolts?
When tightening the bolts on a bicycle crank, it is crucial to follow the proper torque settings. Using a torque wrench, set it to the recommended torque specified by the manufacturer. Apply the torque evenly and in a clockwise direction, ensuring a secure and safe connection.
How can I test the stability of the cranks?
To test the stability of the cranks, I recommend performing a visual inspection for any visible damage or loose components. Additionally, you can apply force to the cranks in different directions to check for any excessive movement or play. These testing methods can help identify common issues.
What are some signs that indicate the crank needs to be tightened?
Signs of a loose crank include a clicking or creaking sound, wobbling or side-to-side movement, and difficulty shifting gears. Regular crank maintenance is crucial to prevent damage and ensure safe cycling.
Conclusion
After following these simple steps to tighten your bicycle crank, you’ll feel like a master mechanic, ready to conquer any road or trail.
Your bike will become a symphony of precision, with each pedal stroke feeling as smooth as silk.
No more wobbly cranks or annoying creaks.
With your newfound knowledge, you’ll be able to confidently tackle any cycling adventure, knowing that your crank is secure and ready to propel you forward.
So hop on your bike, embrace the thrill, and enjoy the ride of a lifetime.